
Chemistry Laboratory Apparatus: Names, Uses, and How Each One Works
Every common chemistry lab apparatus explained by what it does and why, from Bunsen burner and burette to water trough, beehive shelf, and Kipp's apparatus, with the uses students are actually asked about.

On this page
Ask a student to name the apparatus in a gas-preparation setup and most can: Woulfe's bottle, thistle funnel, delivery tube, beehive shelf, gas jar, water trough. Ask them why the thistle funnel's stem must dip below the liquid surface, or why the beehive shelf sits inside the water trough rather than beside it, and the naming falls apart.
Knowing an apparatus is not the same as knowing what it does. A list of names is what a search engine can answer in a sentence. What actually helps at the bench, and what an exam question tests, is function: what each piece is for, why it is shaped the way it is, and what goes wrong when it is used incorrectly.
This guide names each apparatus and then does the part that matters: explains what it does and where students go wrong with it.
A chemistry laboratory runs on a standard set of apparatus, and most of it falls into three groups: general-purpose equipment used in almost every experiment, glassware, and special-purpose apparatus needed only for particular procedures such as titration, gas preparation, and distillation.
This guide covers each piece by what it does, not just what it is called. For most items that means the function, the reason for its design, and the point where students most often use it wrongly.
For the microbiology laboratory, which shares some equipment but adds sterilization, culture, and identification instruments, see Equipment Essential for the Microbiology Laboratory.
Chemistry Apparatus at a Glance: What Each One Does
| Apparatus | Primary function |
|---|---|
| Bunsen burner | Produces a controlled flame for heating |
| Tripod stand | Supports glassware over the burner |
| Wire gauze | Spreads heat evenly under flat-bottomed glassware |
| Tongs | Holds hot beakers, flasks, and crucibles |
| Test tube holder | Holds a test tube during heating |
| Test tube rack | Holds test tubes upright for storage and transfer |
| Desiccator | Dries and stores moisture-sensitive substances |
| Spatula | Transfers and scrapes solid or powder samples |
| Mortar and pestle | Grinds solids to a fine powder |
| Watch glass | Holds small samples; covers beakers; evaporates liquids |
| Beaker | Holds, mixes, and heats liquids (not for accurate volume) |
| Conical (Erlenmeyer) flask | Holds and swirls liquids; the receiving flask in titration |
| Round-bottom flask | Heating and distillation; even heating over a flame |
| Volumetric flask | Prepares an accurate volume of solution to the mark |
| Graduated (measuring) cylinder | Measures liquid volume approximately |
| Burette | Delivers a measured, variable volume in titration |
| Pipette | Delivers a fixed or measured volume accurately |
| Funnel | Directs liquids and holds filter paper for filtration |
| Thistle funnel | Adds liquid reagent into a sealed gas-generating bottle |
| Delivery tube | Carries generated gas from the reaction vessel |
| Woulfe's bottle | Reaction vessel for gas preparation |
| Beehive shelf | Positions the gas jar for collection over water |
| Water trough | Holds water for collecting gas over water |
| Gas jar | Collects and stores the prepared gas |
| Kipp's apparatus | Generates gas on demand, stopping when not needed |
| Retort / condenser | Condenses vapor in distillation |
| Crucible | Holds a solid for strong heating or ignition |
The sections below take the most important of these and explain how each works and where students go wrong.
Bunsen burner
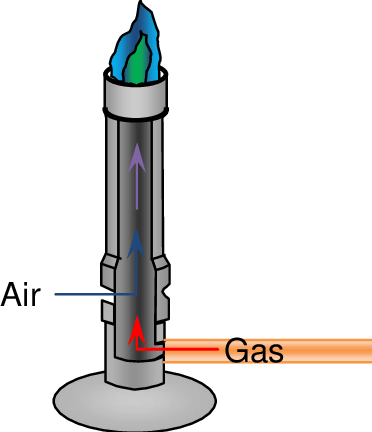 Figure: Working principle of Bunsen Burner
It is the laboratory equipment useful for heating materials. The burner produces a single open flame with the use of gas. The gas is either natural, like methane, or petroleum, like propane and butane. In chemistry laboratories, it helps to perform heating experiments like evaporation.
Read more about Bunsen burner here
Tripod Stand
The material used for its construction is iron. Its purpose is to hold glassware during heating. The top part of the equipment can either be triangular or circle shaped. It is the part that holds the wire mesh gauge and glassware for heating. As the name suggests, the base of this laboratory equipment has three legs.
Wire mesh gauge
The material of the gauge is metal wires like iron, nichrome, or steel. The gauge is placed on top of a tripod for using a bunsen burner. It helps provide even heating while using glassware with a flat bottom surface. Some wire mesh gauge has a ceramic center, which helps in protecting the glass from breakage due to heat and provides much more heating.
Tongs
These hold hot equipment like beakers, flasks, and crucibles after or during experiments. The shape of this equipment is like scissors. There are different types of tongs based on their purpose. Beaker tongs have rubber for easy gripping. Flask tongs have rounded ends for easy holding.
Test tube holder and rack
The holder helps in handling test tubes while heating or using harmful chemicals. One should only use test tubes with holders if they are dealing with acids and bases to avoid accidents in the laboratory.
The purpose of a test tube rack is to place the test tube upright. The stand helps in storing and transferring multiple test tubes at a time. The materials used for construction of the rack are metal, plastic, or wood. It comes in various sizes and shapes. The stand commonly used in chemistry laboratories is the classic type with 8-10 holes for test tubes.
Desiccator
The use of laboratory equipment is for drying wet substances. It is also applicable for storing moisture-sensitive substances. The equipment is used under vacuum pressure. There are various types of desiccators. It can be either manual or automated.
In chemistry laboratories, desiccators help store some chemicals and compounds sensitive to water, like sodium.
Read more about desiccators here.
Centrifuge
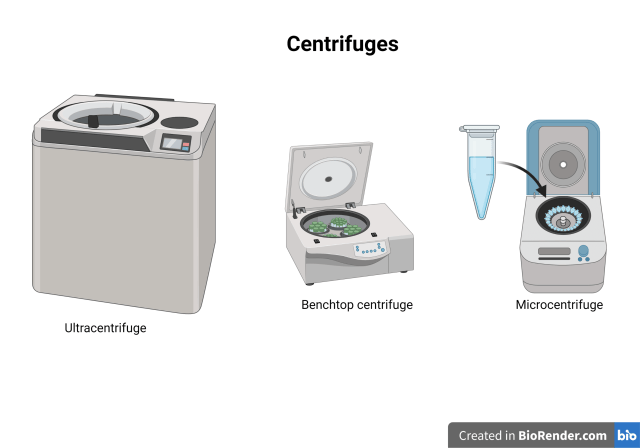 Figure: centrifuges
It is a piece of laboratory equipment useful to separate components of a mixture based on size, density, viscosity, and motor speed. The separation occurs due to the centrifugal force in the rotor where a sample is placed. There are different types of centrifuges benchtops, ultracentrifuges, high-speed, low-speed, and refrigerated centrifuges.
Read more about centrifuges here.
Blotting and filter paper
Filter paper is a cellulose paper used to separate solids from liquids during filtration. Folded into a funnel, it retains the solid residue while the liquid passes through. In quantitative work, ashless filter paper is used so it burns away cleanly when the residue is weighed.
Blotting paper is a thicker absorbent paper used to soak up excess liquid. (Note that the transfer membranes used in Western blotting are made of nitrocellulose or PVDF, not ordinary blotting paper; the two are often confused because of the shared name.)
Spatula
The use of a spatula in chemistry laboratories is to transfer solid materials or powder, mix materials, and scrap materials from surfaces. The material used for the construction of reusable spatulas is stainless steel. There are different styles of stainless steel spatulas; micro, double-ended, and trough-shaped spatulas are some types.
Laboratory thermometer
The thermometer measures different chemicals and substances’ room temperature, freezing, and boiling points. A laboratory thermometer is typically a liquid-in-glass type, a sealed glass stem containing alcohol (often dyed) or, in older instruments, mercury, which expands up a calibrated scale as temperature rises.
Digital thermometers with a probe are now common. These measure the temperature of a substance in contact with the bulb or probe, which is what freezing-point and boiling-point determinations require. Infrared thermometers, by contrast, measure surface temperature at a distance and are not used for these contact measurements.
Forceps
These are hinged tools that help to grasp and hold objects. Their main use is when hands and fingers are too big for things. There are various forceps like a thumb, locking, and kelly forceps.
Thumb forceps or tweezers are useful in chemistry laboratories. In chemistry laboratories, forceps help to hold chemicals and solids that should not be handled with bare hands, like sodium metal. The thumb forceps are held like pen style between the thumb and index finger.
Litmus paper
Litmus paper answers only one question: is the solution acidic or basic? It turns red in acid and blue in alkali, but gives no measure of how acidic or how basic. pH paper (universal indicator strips) goes further, producing a range of colors matched against a chart to estimate the actual pH value, usually to within a unit. So litmus tells you the direction; pH paper tells you roughly how far. Neither is as precise as a pH meter.
Where students get confused: litmus does not give a pH number. A common exam trap is to ask for the pH of a solution given only that it turned litmus red; the correct answer is that litmus shows it is acidic (pH below 7) but cannot give a value.
Analytical balance
 Figure: Parts of analytical balance
This laboratory equipment helps in weighing the mass of chemicals and objects. It can measure up to 0.01 mg. The balance is very precise equipment for measurement and comes in different varieties like single pan, double pan, electronic, and microbalance. In chemistry laboratories, this equipment makes solutions by weighing the right amount of substances (generally solid).
Read more about analytical balance here.
Droppers
This equipment dispenses liquid substances from one container to another for various experiments. The droppers are plastic or glass and may or may not have graduation marks. The plastic droppers are for one-time use, and glass droppers are reusable. One end of the dropper has a bulb that helps dispense the perfect drop of solution.
Mortar and pestle
These are two pieces of laboratory equipment that aid in crushing and grinding objects. The shape of the mortar is like a bowl. Its construction is from durable materials like ceramic or stones. The pestle is a club-shaped grinding piece of equipment made of the same material as mortar.
In the laboratory, a mortar and pestle grinds solid samples into a fine, uniform powder, which is often necessary before weighing, dissolving, or reacting a solid, since smaller particles dissolve and react faster and more evenly. Hard samples such as crystals or dried material are reduced this way before analysis.
Glassware used in Chemistry Laboratory
Although many pieces of equipment required in chemistry laboratories are made of glass, this section comprises general purposes laboratory equipment constructed of glass. These include test tubes, flasks, stirrers, etc.
Test tubes
These are used to perform various laboratory tests. In the chemistry laboratory, test tubes assist in testing different properties of organic and inorganic compounds. It is also helpful to study various properties of gases after laboratory preparation.
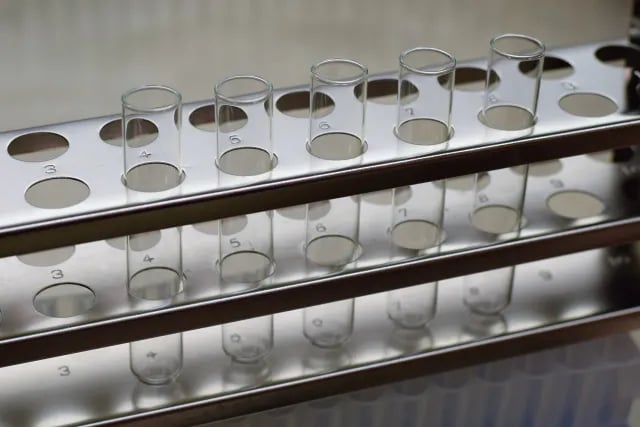 Figure: Test tube in rack
The tube has a cylindrical shape with closed rounded bottoms and open at the top. There may or may not be the presence of rims at the top. These come in various sizes and are the most common laboratory equipment.
Read more about test tubes here.
Round bottom flask
The flask has a round bottom or base and is applicable in various experiments, especially gas preparation and distillation. RB flask is made of borosilicate glass and is available in multiple sizes, and the number of necks also varies.
Beaker
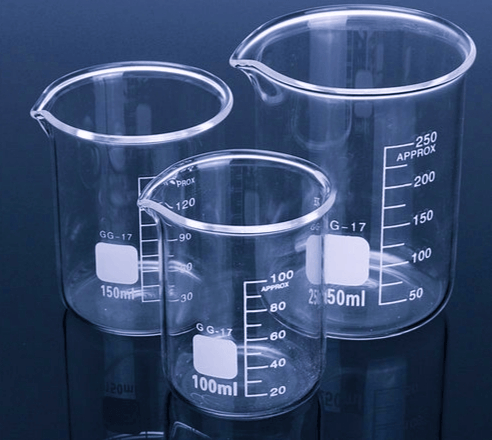 Figure: Different types of beakers
The use of laboratory equipment is to hold chemicals or liquids in laboratories. It has a beak-like spout on the top of the flask, which helps quickly pour fluids, decreasing the risk of spilling. It is available in various sizes, like common form and tall form. Graduations marks are present in some beakers. However, these could be more precise.
Glass rod
It is applicable in stirring and mixing liquids. The equipment is made of borosilicate glass and does not have any openings. The rod comprises a single glass piece, and its length is 10-40 cm with a diameter of 0.5 cm.
Glass tube
Like glass rods, these are also made of single glass pieces that are cylindrical and hollow from both sides. Its use is for liquid dispensing tubes for transferring solutions from one place to another or delivery tubes for gas production.
Funnel
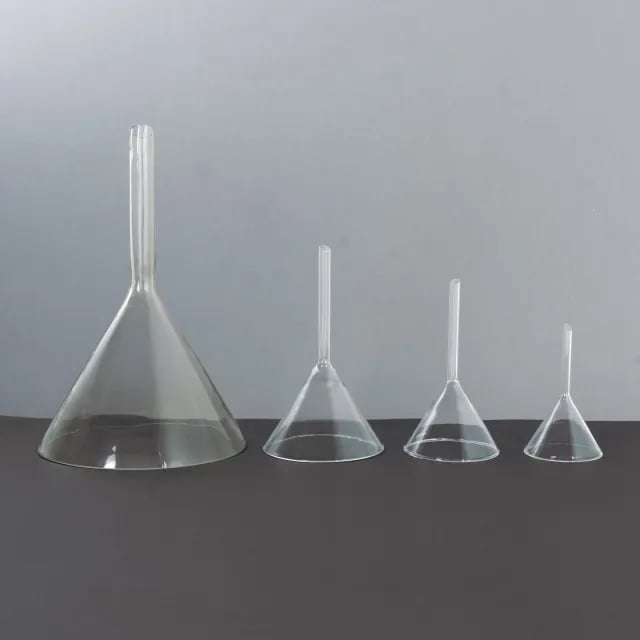 Figure: funnel
This piece of laboratory equipment is helpful in the filtration and pouring of liquids or fine-graded materials from one container to another. Its neck is narrow, which allows only a certain amount of fluids to pass through. The use of funnels is also in other separation methods, like evaporation and condensation.
Watch glass
This piece of laboratory equipment is concave in shape and useful in evaporating liquid by placing it on top of a beaker with boiling water. It is also known as clock glass. It also holds solid substances and covers beakers.
Reagent bottle
The use of these bottles are to preserve and store chemicals and prepare solutions. These are generally made of borosilicate glass and have a stopper. Like beakers, these also have graduation marks, but the marks could be more precise.
Special Purpose Laboratory Equipment
Some equipment in the chemistry laboratory is essential only during experiments like gas preparation and distillation. The laboratory equipment required in chemistry laboratories for different purposes is as follows:
Titration Equipment
Titration is the method of slowly adding a solution of known concentration into another solution of unknown concentration until it reaches the neutralization indicated by the change in color. Specific equipment is used in titration: pipette, burette, cylinder, volumetric flask, etc.
Pipette
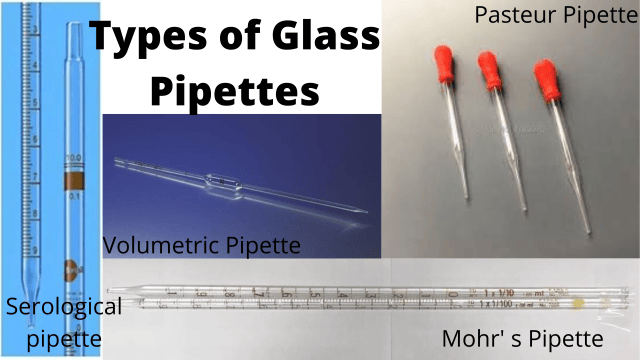 This equipment has graduation marks for precise measurements. It helps in transferring liquids and drawing up chemicals. These are cylindrical tube-like structures. Some pipettes have bulbs in between with graduation marks at the top of the pipette.
Read more about glass pipettes here.
Pipette bulb
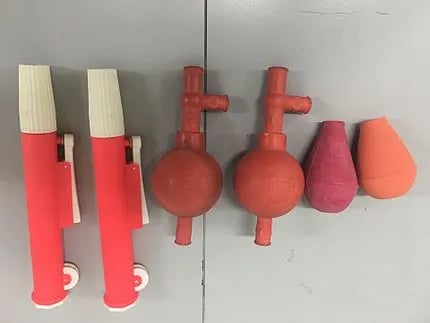 Figure: pipette bulb
The pipette bulb draws up liquid and attaches it to the pipette. The material used for its construction is rubber, and gentle pressure helps draw the liquid from the container.
Graduated cylinder
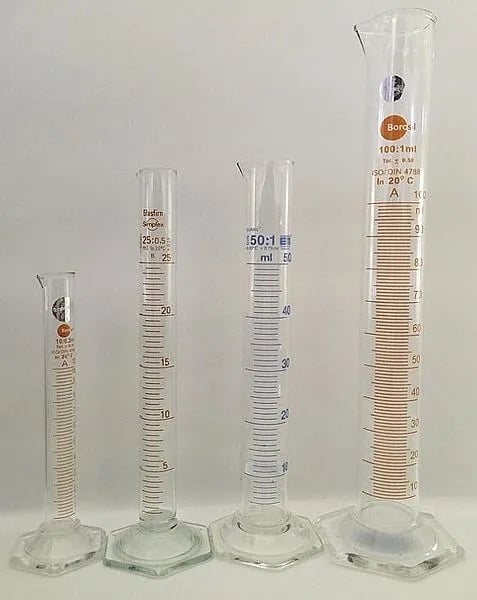 Figure: Graduated cylinder
The use of this laboratory equipment is to measure the volume of the liquids precisely. The shape of the equipment is cylinder and tall with a precise graduation mark at the 0.1 to 1 ml interval. The other term used for this equipment is measuring cylinder. Its top part is hollow with a spout for easy pouring, and the base is suitable for flat surfaces.
Read more about graduated cylinders here.
Burette
 Figure: Burette
This laboratory equipment has a long cylindrical tube-like body with a slightly pointed bottom. The tube has graduation markings, and the bottom has a stopcock, a tap that controls the flow of liquid drop by drop. It holds the solution and allows the control flow of the solutions for titration. The graduations run from zero at the top downward, so the volume delivered is read as the difference between the start and end levels. This is why a burette measures volume dispensed rather than volume held.
Conical flask
 Figure: Different types of Conical Flask
The other name of this flask is Erlenmeyer’s flask. Its shape is cone-like, with a flat bottom and a cylindrical neck. Its use is as a reaction flask. These also have graduation marks, just like beakers which could be more precise. It is available in various sizes or can hold different volumes. The flask is placed below the burette in the ring stand. It receives the solution from the burette. The flask is usually made of borosilicate glass.
Read more about conical flask here.
Burette clamp and ring stand
Like all clamps, burette clamps secure the burette in the ring stand during titration. It has an adjustable cork for changing the width of the clamp. One should be careful not to break the glass burette while tightening the cork.
A ring stand is a metal stand with a long rod to attach different clamps. The base of the stand is suitable for placing a conical flask during titration.
Volumetric flask
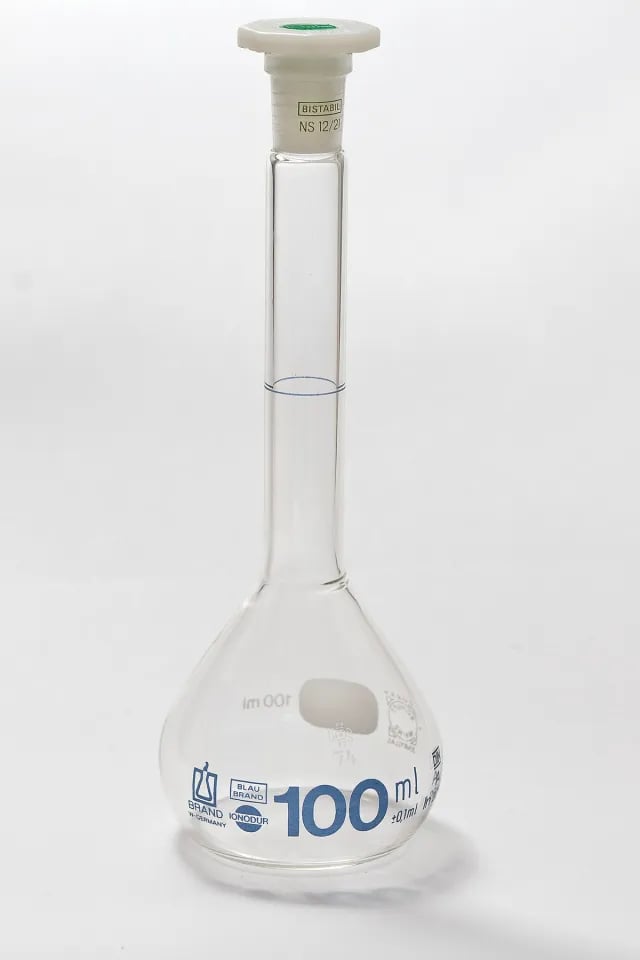 Figure: volumetric flask
This equipment helps measure/prepare precise solutions at a specific temperature. Its bottom is flat and pear-shaped. The equipment’s neck is long and cylindrical with calibrated markings. Its use is in preparing molar solutions and is available in different volumes. However, it lacks graduation marks.
Gas Preparation Equipment
The reason for gas preparation in the laboratory can vary. The type of gas prepared can vary greatly. Some specific laboratory equipment, like Woulfe’s bottle, beehive shelf, and gas jar, are designed for gas preparation.
Woulfe’s bottle
A bottle with two or three necks, named after Peter Woulfe, used as the reaction vessel for gas preparation. In the common two-necked arrangement, one neck holds the thistle funnel through which liquid reagent is added, and the other holds the delivery tube that carries the gas away. Both are sealed airtight with corks so the only exit for the gas is the delivery tube.
Thistle funnel
A long glass tube with a small funnel-shaped bulb at the top, its rim flared. It passes through a hole in the cork of the gas-generating bottle so liquid reagent, such as dilute hydrochloric acid for hydrogen preparation, can be added to the solid inside without opening the apparatus.
The critical detail: the lower end of the thistle funnel must dip below the surface of the liquid inside the bottle. If it does not, the gas being generated escapes back up through the funnel instead of leaving by the delivery tube. This is the single most common setup error with a thistle funnel, and it is a frequent exam question. The liquid seal at the funnel's lower end is what forces the gas out the intended path.
Cork
It is made of rubber. Drilling a hole in the cork similar to the delivery tube and thistle funnel helps create an airtight seal while preparing gases. It is placed on the opening of Woulfe’s bottle and round bottom flask. It comes in various sizes depending on the gas produced and the apparatus used.
Water trough
A shallow open container that holds water, used for collecting gases over water. The beehive shelf sits inside the trough, submerged, and the gas jar rests on top of the shelf, filled with water and inverted. Gas travelling up the delivery tube enters the shelf's opening, bubbles up into the inverted jar, and displaces the water downward, so the jar fills with gas from the top while water leaves from the bottom.
Why collection over water works: the method suits gases that are not appreciably soluble in water, such as hydrogen and oxygen. It does not suit gases like ammonia or hydrogen chloride, which dissolve, so those are collected by displacement of air instead.
Where students get confused: the water trough is not just a water container. Its job is to provide the water surface through which the gas bubbles and over which it is trapped. In distillation it plays a different role, holding the receiving flask and cooling the condensed liquid.
Beehive shelf
A small dome of porcelain or ceramic with a hole in the top and a notch at the base, used together with the water trough for collecting gas over water. It sits submerged in the trough. The delivery tube feeds gas into the notch at its base, and the gas rises through the hole in the top directly into the mouth of the inverted, water-filled gas jar resting on the shelf.
Why the shelf is needed at all: it holds the gas jar steady and positions its mouth over the rising gas stream, so bubbles enter the jar rather than escaping around it. Without the shelf, the jar cannot be held mouth-down over the delivery tube in a stable way.
Gas jar
As the name suggests, the jar collects gas after preparation. Its shape is a cylinder with an end hollow, and another end closed. It is usually made up of glass. The jar has a lid to protect the gas from escaping.
Kipp’s Apparatus
This apparatus aids in preparing gases in small volumes. A Dutch pharmacist, Petrus Jacobus Kipp, designed it. It helps in generating a continuous supply of gas during laboratory experiments. Nowadays, it is highly applicable in preparing hydrogen sulfide gas. It has three bulbs; bulbs A, B, and C.
The apparatus has three connected chambers stacked vertically: the lower bulb (A), the middle bulb (B), and the upper bulb (C), which extends into a long tube reaching down into A. The solid reagent sits in the middle bulb, resting on a constriction. Liquid acid is poured into the top bulb and runs down the tube into the lower bulb.
How the automatic control works, and this is the clever part: when the outlet tap on the middle bulb is opened, acid is pushed up from the lower bulb into the middle bulb, contacts the solid, and generates gas. When the tap is closed, the pressure of accumulating gas pushes the acid back down out of the middle bulb, away from the solid, and the reaction stops. So the apparatus generates gas only on demand, restarting and stopping as the tap is opened and closed. It is commonly used for hydrogen sulfide and carbon dioxide.
Distillation Equipment
Distillation is the method of separating liquid components in a mixture by selective evaporation and condensation. Some pieces of equipment used in distillation are common, like a Bunsen burner, tripod stand, and wire gauze. Others, like glass retort and condenser, are uncommon.
Glass retort
This equipment aids in dry distillation. It has a spherical vessel where the substance to be separated is placed and a long neck that acts as a condenser. There is also an inlet in the cylindrical container for pouring the substance.
Heat is applied to the vessel; vapor rises into the long neck, cools, and condenses, running down into a receiver. Historically it was used for distillation generally, including purifying water from dissolved solids, though it has largely been replaced by flask-and-condenser setups in modern laboratories.
Distillation flask
This piece of laboratory equipment aids to separate two different liquids with varying boiling points. The bottom of the flask is round for even heating. It has a long neck and side arm for condensation.
Equipment for Lassaigne’s Test
Lassaigne’s test helps to detect foreign elements present in the organic compound. It requires some equipment that is not used generally, which are ignition tubes and crucible. Other pieces of equipment are common, like test tubes, burners, and beakers.
Ignition tube
It is a glass tube similar in structure to generally used test tubes. However, the ignition tube is small in size. Its use is for heating sodium metal and an organic compound.
Crucible
A crucible is a small ceramic or porcelain container that withstands very high temperatures, used to hold a solid while it is strongly heated or ignited. In Lassaigne's test, the fused sodium-and-compound mixture from the ignition tube is prepared for analysis; the crucible provides a heat-resistant vessel for such high-temperature steps. The material used for its construction is porcelain or ceramic. It may or may not come with a cover.
Safety Equipment Required in Chemistry Laboratory
Safety should be of utmost priority in any laboratory. Chemistry laboratory deals with different chemicals and compounds that can cause harm to laboratory technicians and people dealing with these chemicals. The safety equipment includes:
Goggles
Using goggles helps protect the eyes from the splashes of chemicals. These goggles are generally tight-fitting, with clear glass. Experts recommend the use of certified goggles.
Apron
Acids used in chemistry labs can damage clothes. Likewise, colored compounds like potassium dichromate leave permanent stains on clothes. So, safety protocols recommend the use of an apron in the chemistry laboratory.
Gloves
Chemicals generally irritate the skin when frequently handled, so gloves can protect hands from being chemicals and heat related burns. Likewise, experiments relating to heating are also frequent in chemistry laboratories, so the use of gloves while handling hot equipment is necessary for one conducting the experiments.
How to remember the gas-preparation setup
Follow the gas, not the glass. Trace the path: reagent goes in through the thistle funnel, meets the solid in Woulfe's bottle, the gas leaves by the delivery tube, travels to the beehive shelf inside the water trough, and bubbles up into the inverted gas jar. Every piece has one job on that path.
The thistle funnel must drink. Its lower end sits below the liquid, forming a seal. A thistle funnel with its end in the air lets the gas escape backward. If you remember one setup rule, remember this one.
Kipp's stops itself. Open the tap and acid rises to meet the solid and make gas. Close it and the gas pressure pushes the acid back down, away from the solid. It only works when you ask it to.
Over water for the insoluble. Collect a gas over water only if it does not dissolve in water. Hydrogen and oxygen, yes. Ammonia and hydrogen chloride, no; those go by air displacement.
References
- Eastern Illinois University, Department of Chemistry. The Bunsen burner. https://www.eiu.edu/eiuchem/forms/burner.pdf
- University of Wisconsin-Madison, Environment, Health & Safety. Laboratory glassware cleaning. https://ehs.wisc.edu
- Vogel AI, Jeffery GH. Vogel's Textbook of Quantitative Chemical Analysis. 5th ed. Harlow: Longman Scientific & Technical. (Titration apparatus, volumetric glassware, and technique.)
- Furniss BS, Hannaford AJ, Smith PWG, Tatchell AR. Vogel's Textbook of Practical Organic Chemistry. 5th ed. Harlow: Longman. (Distillation and gas-preparation apparatus.)
- Nuffield Foundation / Royal Society of Chemistry. Practical chemistry: apparatus and techniques. https://edu.rsc.org
- IUPAC. Compendium of Chemical Terminology (the Gold Book). https://goldbook.iupac.org

Tankeshwar Acharya, MSc (Medical Microbiology)
Tankeshwar Acharya is an Assistant Professor in the Department of Microbiology at Patan Academy of Health Sciences (PAHS), Nepal, where he has been teaching and practicing clinical microbiology for over 14 years. He is the founder of Microbe Online, one of the leading free microbiology education resources on the web, covering bacteriology, mycology, parasitology, immunology, and clinical laboratory diagnostics written from direct experience in both the classroom and the diagnostic laboratory.
Comments
No comments yet. Be the first to share your thoughts.
Leave a comment
All comments are reviewed before they appear.