
Graduated Cylinder: Types, Uses, and How to Read It Correctly

On this page
Two students measure the same 50 ml of reagent from the same cylinder and read different volumes. Neither cylinder is faulty. One read it looking down from above, the other looking up from below, and the angle alone shifted the apparent level by a milliliter or two. The graduated cylinder is the everyday tool for accurate volume, but only if it is read correctly: at eye level, at the bottom of the meniscus. That single habit is the difference between a reliable measurement and a quiet source of error in every solution you make, and it is what this article is really about.

Laboratories require equipment like beakers, conical flasks, pipettes, and measuring or graduated cylinders for measuring, mixing, and making various specimens and chemicals.
A graduated cylinder, or measuring cylinder, is a tall, narrow vessel with volume markings, used in laboratories for reasonably accurate liquid volume measurement. It can also measure the volume of an irregular solid by water displacement. It is more accurate than a beaker or conical flask, though less accurate than a volumetric flask or pipette.
Based on volume, the graduated cylinder is of different types; 5 ml, 10 ml, 25 ml, 50 ml, 100 ml, 250 ml, etc. Another basis for division of its type is material used to make it; either plastic or glass.
Types of Graduated Cylinder
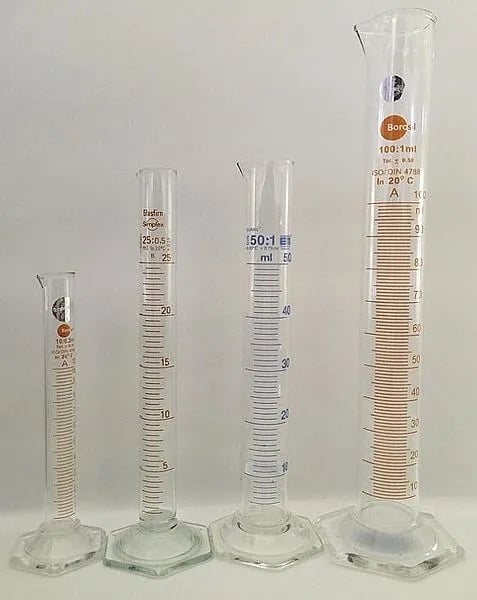 Figure: Different sizes of graduated cylinder; from left to right 10 ml, 25 ml, 50 ml, 100 ml
The laboratory equipment is divided into different types based on style, materials used, precision, and size/volume capacity. Usually, two kinds of material are used to construct measuring cylinders; glass or plastic. The variety in size range is high in measuring cylinders, from 5 ml to 4000 ml.
Based on the materials used
Usually laboratory equipment that comes in contact with chemicals and specimens are made up of either glass or plastic so, the graduated cylinder is also of two types based on the material used for its construction.
- Plastic measuring cylinder: Two types of plastic material are used in the construction of measuring cylinders;TPX® polymethyl pentene (PMP) and polypropylene. The graduated cylinder made up of clear TPX® polymethyl pentene (PMP) is expensive but easy to handle and read. The material can tolerate high heat at 177℃ and are autoclavable at 121℃. However, they are brittle in comparison to polypropylene. Polypropylene is a translucent plastic with total contained (TC) and total delivered (TD), two measurement scales for precision. These are also autoclavable; however, their thermal tolerance is lower than that of TPX® polymethyl pentene (PMP). (2) A plastic graduated cylinder is usually preferred when the volume measurement is above 1000 ml.
- Glass measuring cylinder: Made of borosilicate glass, valued for its low thermal expansion, transparency, and chemical resistance. Glass cylinders are fragile, so they are generally available up to about 1000 ml.
Based on Precision
Based on precision, volumetric glassware is graded class A or class B. Class A has a tighter tolerance (about twice as accurate) as class B.
- Class A: It is glass measuring cylinders made with borosilicate. It is more accurate than the class B types. It has more thermal and chemical resistance. These are ISO9000 compatible and usually preferred for volumetric analysis.
- Class B: It is made up of soda-line glass or borosilicate (depending on the manufacturer) and used for general laboratory purposes. The basic design is the same as class A but with fewer volumetric tolerances than class A. It is not preferred for prolonged exposure to chemicals.
Based on the measurement capacity
Graduated cylinders come in sizes from about 5 ml to 4000 ml. Larger cylinders have larger absolute tolerances, and class A tolerances are roughly half those of class B. A key practical rule: choose the smallest cylinder that holds your volume, because a volume measured in an oversized cylinder is less accurate.
| Size | Class A tolerance | Class B tolerance |
|---|---|---|
| 10 ml | ±0.10 ml | ±0.20 ml |
| 50 ml | ±0.25 ml | ±0.50 ml |
| 100 ml | ±0.50 ml | ±1.00 ml |
| 250 ml | ±1.00 ml | ±2.00 ml |
| 500 ml | ±2.00 ml | ±4.00 ml |
| 1000 ml | ±3.00 ml | ±6.00 ml |
Based on the style
The style or design greatly influence the purpose of graduated cylinder. Based on the style graduated cylinder is of three types: (1)
- Style I: The topmost (lip) is beaded with a spout for easy pouring.
- Style II: The topmost part of this style has a grounded standard tapered neck. A stopper is placed on it to prevent spillage.
- Style III: The style is similar to that of style I with the beaded lip and spout at the topmost part, except it has a reinforcing band near the top. The band is usually made of rubber or plastic.
Parts of Graduated Cylinder
Almost all graduated cylinders have three fundamental parts; base, cylinder tube, and mouth.
 Figure: Parts of a graduated cylinder
- Base: The base of the cylinder is for support and keeping the cylinder upright.
- Cylindrical tube: It consists of the graduation mark, which indicates the volume. The top part of the graduated cylinder must consist of the maximum capacity, class in the ISO number (precision), and material it is made of (in the case of a glass cylinder).
- Mouth: It is the open end of the cylinder. There is the presence of a spout for easy pouring in styles I and III, whereas a tapered neck style opening is also available.
Extra accessories
- Stopper: The stopper is used for sealing the mouth of the style II cylinder.
How to Use a Graduated Cylinder
The use of the correct measurement capacity of the cylinder depends on the purpose, availability, and logic. The graduated cylinder and thin and tall and can carry the risk of tipping over, so care must be taken when handling it. Following are some of the steps for using a graduated cylinder correctly: (1)
- Before pouring the liquid, you should always rinse it with the fluid to be poured. While pouring a liquid into the cylinder, use the non-dominant hand to hold the cylinder to prevent tipping over the cylinder.
- To see the exact amount of fluid in the cylinder, hold it around the top (where the graduation mark is not present) and bring it to eye level. Observe the lower meniscus of the fluids, which should be at the same level as your eyes. Sometimes placing black paper behind the cylinder is helpful as the reflection of the meniscus due to the paper is easier to read.
- Read the volume against the graduation marks, estimating the position between marks where needed. If you have slightly overshot or fallen short of the target volume, adjust dropwise with a pipette until the meniscus sits on the intended mark.
- Rinse the cylinder after use with deionized water.
- For drying the rinsed cylinder, you can use filter paper. Take a filter paper longer than the length of the cylinder. Then, fold the filter paper lengthwise until it reaches the circumference of the cylinder and slowly thrust it up and down along the inside of the cylinder. The filter absorbs the moisture and dries the cylinder.
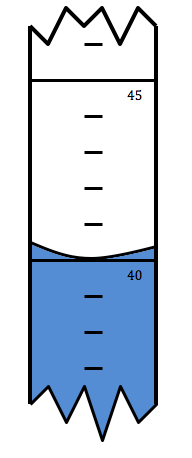 Figure: Lower meniscus reading of 40 ml in a graduated cylinder
Calibrating a graduated cylinder
A graduated cylinder is calibrated by measuring a volume of water and determining its mass. Water has a density of 1 g/ml at room temperature, so 1 ml of water weighs 1 g.
Steps for calibrating
We need a weighing balance, graph paper or computer graphing system, and distilled water to calibrate a measuring cylinder. The following are the steps to calibrate a measuring cylinder:
- Place the cylinder on the weighing balance. Tare the balance to make the reading zero.
- Pour distilled water into the cylinder, up to 25% of its total capacity (be careful to measure the exact volume). Record the volume.
- Empty the water into a clean beaker. Weigh the new mass by placing the beaker in the balance. Record the mass. Empty and dry the beaker.
- Repeat steps 1 to 3 with 50%, 75%, and 100% of the cylinder's capacity.
- The mass of the empty cylinder is subtracted from the readings, which is the mass of water. Plot the difference in graph paper or computer graphing system. Draw a straight line through the origin. Refer to the graph when necessary.
How to Read a Graduated Cylinder Correctly
Reading the volume is where most errors happen, and it comes down to three habits.
Read at eye level. Lower yourself, or raise the cylinder, so your eye is level with the liquid surface. Reading from above makes the volume look smaller than it is; reading from below makes it look larger. This angle error is called parallax, and it is the most common mistake with a graduated cylinder.
Read the bottom of the meniscus. Liquid in a narrow glass cylinder curves upward at the edges, forming a U-shaped surface called the meniscus. For water and most aqueous solutions, read the volume at the lowest point of that curve, not at the edges where it climbs the glass. Placing a piece of dark paper behind the cylinder makes the meniscus easier to see.
Choose the right size cylinder. Measure in the smallest cylinder that holds your volume. A narrow cylinder spreads the same volume over more height, so each graduation is easier to read and the measurement is more accurate. Measuring 20 ml in a 1000 ml cylinder is far less accurate than in a 25 ml one.
Uses of Graduated Cylinder
A graduated cylinder measures liquid volume with reasonable accuracy and is preferred over a beaker or conical flask, whose graduations are only approximate. It is used across chemistry, biology, microbiology, and forensic laboratories. For the most precise volume work, such as preparing a standard solution, a volumetric flask or pipette is used instead.
"To Contain" vs. "To Deliver," and Where the Cylinder Ranks
Two markings on volumetric glassware confuse students. A cylinder marked TC (to contain) holds the stated volume when filled to the mark. One marked TD (to deliver) delivers the stated volume when poured out, accounting for the small film of liquid that clings to the glass. They are not interchangeable: a TC cylinder poured out delivers slightly less than its reading. Check which one you have before relying on a pour.
For accuracy, laboratory vessels form a clear hierarchy, from least to most accurate: beaker and conical flask (approximate only), then graduated cylinder (good for general measuring), then volumetric flask and pipette (the most accurate, for standards and volumetric analysis). The graduated cylinder sits in the useful middle: accurate enough for most work, not accurate enough for preparing a reference standard.
How to Remember
Eye level, bottom of the curve. The two-part habit that makes every reading correct: get your eye level with the surface, and read the lowest point of the meniscus. Look down or up and parallax lies to you; read the edges and the meniscus lies to you.
Smallest cylinder that fits. Accuracy improves as the cylinder narrows, because the same volume is stretched over more height. When precision matters, reach for the smallest cylinder that holds the volume, not the nearest big one.
Middle of the accuracy ladder. Beaker approximate, cylinder good, volumetric flask exact. If you can place the graduated cylinder in that order, you know when it is the right tool and when it is not.
Key Exam Facts in One Table
| Fact | Detail |
|---|---|
| Purpose | Reasonably accurate liquid volume measurement |
| Reading rule | At eye level, at the bottom of the meniscus |
| Parallax error | Reading from above or below the surface; the main measurement mistake |
| Accuracy hierarchy | Beaker/flask (approximate) < graduated cylinder < volumetric flask/pipette |
| Class A vs. class B | Class A tolerance is about half that of class B (more accurate) |
| TC (to contain) | Holds the stated volume when filled to the mark |
| TD (to deliver) | Delivers the stated volume when poured out |
| Size rule | Use the smallest cylinder that holds the volume for best accuracy |
| Materials | Borosilicate glass or plastic (PMP, polypropylene); many autoclavable |
| Measuring a solid | By water displacement (measures volume, not mass) |
Where Students Get Confused
Where to read the meniscus. Students read the top edge or the middle. The correct point for water and aqueous solutions is the bottom of the curve, at eye level.
Graduated cylinder vs. volumetric flask. Both measure accurately, but a graduated cylinder has many marks for measuring a range of volumes, while a volumetric flask has one mark for one exact volume. For preparing a precise standard solution, the volumetric flask wins.
Graduated cylinder vs. beaker. A beaker's graduations are approximate; a cylinder's are meant for measuring. If the volume matters, never trust the beaker.
TC vs. TD. A "to contain" vessel holds the marked volume; a "to deliver" vessel gives out the marked volume when poured. Using a TC cylinder as if it were TD delivers slightly too little.
Bigger is not better. A larger cylinder is less accurate for a small volume, because each graduation covers more liquid. Match the cylinder size to the volume.
References
- Patnaik, P. (2004). Dean's Analytical Chemistry Handbook (2nd ed.). McGraw-Hill.
- ASTM E1272. Standard Specification for Laboratory Glass Graduated Cylinders. ASTM International.
- Cheesbrough, M. (2006). District Laboratory Practice in Tropical Countries, Part 2 (2nd ed.). Cambridge University Press.
- Dean, J. R., Jones, A. M., Holmes, D., Reed, R., Weyers, J., & Jones, A. (2011). Practical Skills in Chemistry (2nd ed.). Prentice Hall.
Frequently Asked Questions
How do you read a graduated cylinder correctly?
How do you read a graduated cylinder correctly?
Hold or place the cylinder so the liquid surface is at your eye level, then read the volume at the bottom of the meniscus, the lowest point of the curved surface. Reading from above or below causes parallax error and gives a wrong volume.
What is the meniscus, and where do you read it?
What is the meniscus, and where do you read it?
The meniscus is the curved surface a liquid forms in a narrow tube. For water and aqueous solutions it curves upward at the edges, so you read the volume at the lowest point of the curve, with your eye level with that point.
Is a graduated cylinder more accurate than a beaker?
Is a graduated cylinder more accurate than a beaker?
Yes. A graduated cylinder is narrow, so its graduations are meaningful for measurement, while a beaker's marks are only approximate. However, a volumetric flask or pipette is more accurate still for precise work.
What is the difference between TC and TD on a cylinder?
What is the difference between TC and TD on a cylinder?
TC ("to contain") means the cylinder holds the stated volume when filled to the mark. TD ("to deliver") means it delivers the stated volume when poured out, allowing for the liquid that clings to the glass. A TC cylinder poured out delivers slightly less than its reading.
Why should I use the smallest cylinder that fits my volume?
Why should I use the smallest cylinder that fits my volume?
A narrower cylinder spreads the same volume over more height, so each graduation is easier to read and the measurement is more accurate. Measuring a small volume in a large cylinder increases the reading error.

Tankeshwar Acharya, MSc (Medical Microbiology)
Tankeshwar Acharya is an Assistant Professor in the Department of Microbiology at Patan Academy of Health Sciences (PAHS), Nepal, where he has been teaching and practicing clinical microbiology for over 14 years. He is the founder of Microbe Online, one of the leading free microbiology education resources on the web, covering bacteriology, mycology, parasitology, immunology, and clinical laboratory diagnostics written from direct experience in both the classroom and the diagnostic laboratory.
Comments
No comments yet. Be the first to share your thoughts.
Leave a comment
All comments are reviewed before they appear.