Stereo Microscope: Uses, Advantages, and Disadvantages
Why a stereo microscope, not a compound microscope, is the right tool for examining whole specimens like worm segments or insects in three dimensions.
A patient reports passing pale, flat, worm-like segments in their stool. The clinical question isn't trivial: Taenia solium and Taenia saginata look similar to the naked eye, but the distinction matters enormously, T. solium carries a real risk of neurocysticercosis if the patient (or people around them) later ingest its eggs, while T. saginata does not pose that same risk. The two species are told apart largely by counting the lateral uterine branches on a single gravid proglottid, a feature that needs a magnified but three-dimensional view of the whole, intact segment.
A compound microscope can't help here. Its stage is built for a thin slide and a drop of specimen, not a several-millimeter proglottid, and its high magnification would show only a flat, extreme close-up of one tiny part of it. What's needed is low magnification, a large working stage, and true depth perception, so the whole segment can be turned, tilted, and examined as a solid object rather than a flattened slice.
That's exactly what a stereo microscope was built for. The same instrument used to dissect a flower or examine an insect is, in a clinical lab, the tool that turns "some kind of tapeworm" into a specific, actionable answer.
A microscope connects an individual to the exciting and fantastic world of cells, bacteria, viruses, and microscopic objects. There are many kinds of microscopes available nowadays. The compound microscope are high-magnification (typically 40x-1000x) microscopes useful in observing bacteria and fungi. Although they have good magnification, the sample placing area is small and unsuitable for larger samples like rocks and flowers.
A stereomicroscope helps to overcome the problem in the compound microscope of observing larger samples as it has a larger area for the stage. A stereo microscope or dissecting microscope is optical equipment used in low power magnification (in the range 6x-50x) and three-dimensional view of specimens.
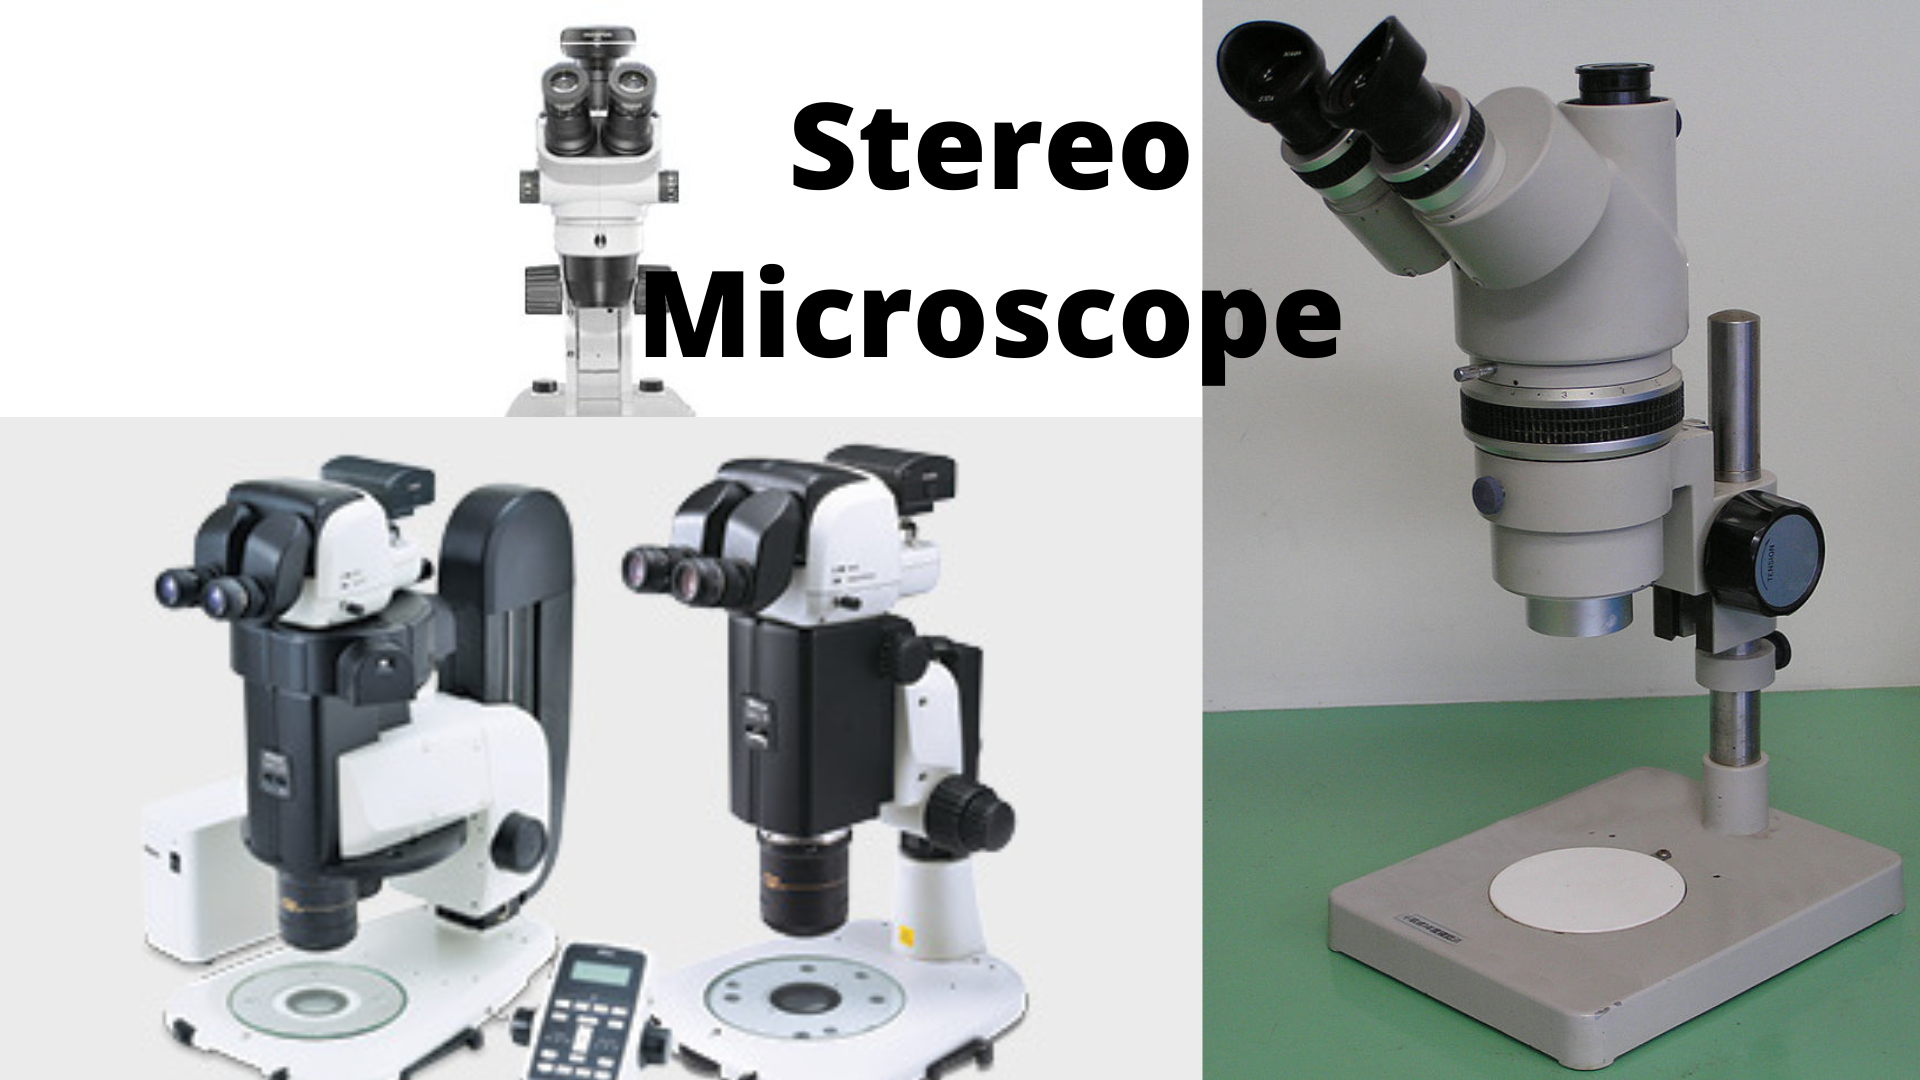 Figure: Stereo microscope
Brief History of Stereo Microscope
- A Capuchin monk, Antonius Maria de Rheita, designed an instrument similar to the binocular microscope in 1645. His fellow monk Chérubin d’Orléans applied the principle of the binocular telescope and constructed an instrument similar to a microscope in 1677. The image quality could have been better, and his goal was not to create the 3-D image.
- The concept applied in both the microscope were pseudoscopic rather than stereoscopic. So the idea of stereoscopy was described by English physicist Charles Wheatstone in 1832, where the image from the right objective goes to the right eye, and the image from the left objective goes to the left eye and is upright.
- Inspired by the description and works of Wheatstone, John Leonhard Riddel or J.L. Riddel, a chemistry professor and postmaster from New Orleans, presented a binocular microscope with a single objective and prism system in 1853. Although the image was 3-D, it was reverse (pseudoscopic).
- Francis Herbert Wenham discovered the actual stereo microscope in the mid-nineteen century in London. He used a prism (different from Riddel’s microscope) to reflect half the semi-circle of light that enters the objective into the small tube.
- American biologist and zoologist Horatio S. Greenough, 1890, introduced the Greenough principle, where two different optical systems are attached to the sample stand at an angle of 10-16°.
- Carl Zeiss Jena, in East Germany, introduced the modern CMO (common main objective) stereo microscope in the late 1940s, known as the Citoplast. A similar model was produced by the West German Zeiss company under the Opton label, a name adopted after Germany's postwar division led to a long-running trademark dispute between the East German (Zeiss Jena) and West German (Zeiss Oberkochen) companies over rights to the Zeiss name. The West German company began using the Carl Zeiss name domestically by 1953, though the trademark dispute wasn't formally resolved until 1971.
- In 1957, the American Optical Company introduced the Cycloptic, a CMO stereo microscope that came in four magnification configurations.
Parts of Stereo Microscope
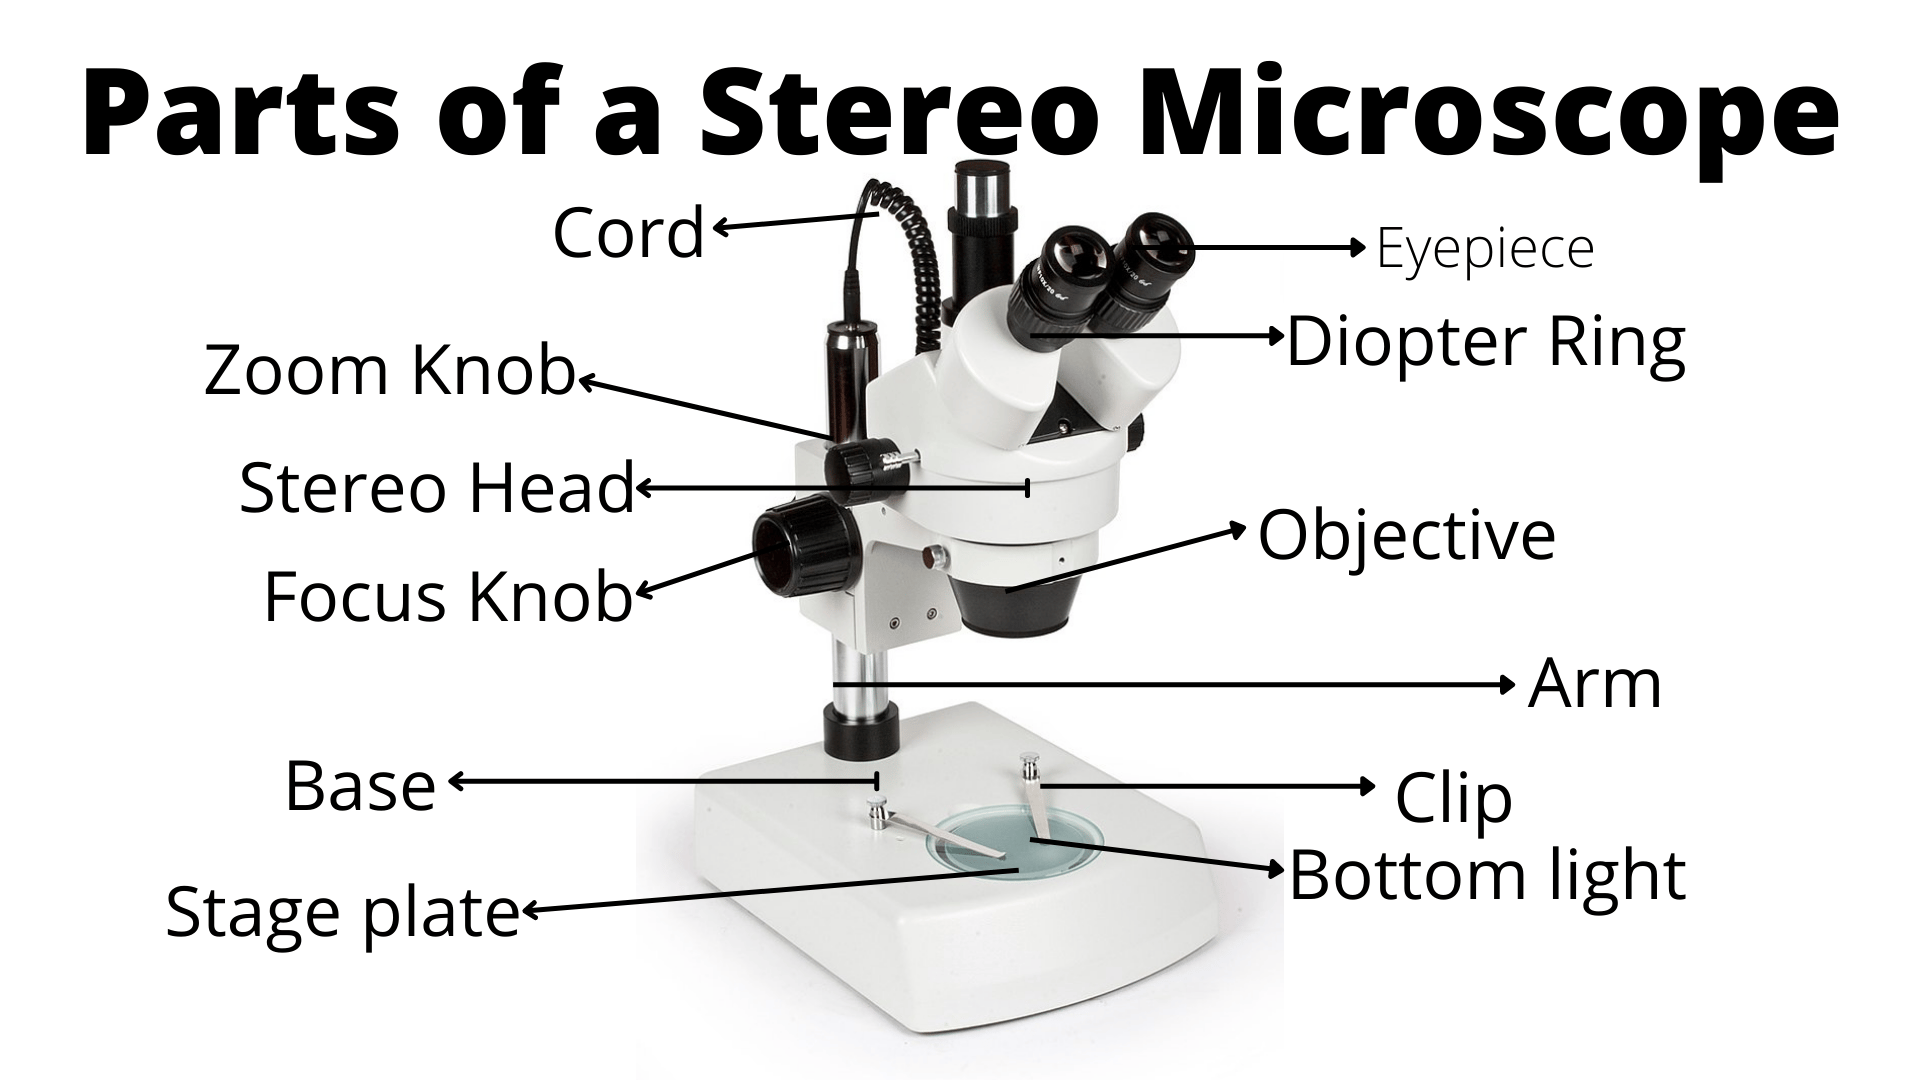 Figure: Parts of Stereo Microscope
The basic parts of the modern dissecting microscope are similar to the parts of the light microscope which have broadly three parts; head, base, and arm. The head of the stereo microscope consists of optical instruments that aid in viewing and magnifying the object. The base is the area that holds the sample and is the foundation for the microscope to stand upright. The arm connects the base and head of the microscope and has adjustment knobs.
Optical instruments
Unlike the compound microscope, the stereo microscope has two objective lenses; some even have a Barlow lens for added magnification. The optical instruments in stereo microscopes are as follows:
Eyepieces
 Figure: Carl Zeiss Jena stereo microscope (eyepiece) Image source: © Raimond Spekking
The eyepiece is one of the lenses of the microscope. It is also known as an ocular lens. There are two eyepieces in the stereo microscope. It is present at the top part of the head of the microscope. The stereo microscope has magnifying power in the range of 5-30x. Some eyepieces provide a wide field for viewing and have the label “WF.” The wide field will allow the user to view specimens in a wide area, which comes in 18 mm and 20 mm. These neither increase the magnification nor the resolution of the eyepieces. The three-dimensional structure is seen due to its binocular and trinocular styles (Amscope SM-4TZ-56S).
These are measurements of different components, not conflicting claims: the eyepiece alone contributes one magnification factor, the objective or zoom mechanism contributes another, and the two multiply together (along with any Barlow lens) to produce the instrument's total magnification, the same relationship used to calculate total magnification on a compound microscope.
Eye tubes
The eye tubes hold the eyepieces to align with the eyepieces with the objective lenses.
Diopter adjustment rings
The diopter adjustment rings are the parts of binocular stereo microscopes that help adjust the vision between two eyes. It helps in clear visualizing of the image from both the eyepieces.
Interpupillary adjustments
The binocular stereo microscope should move to maintain the distance between the two eyes because more than one individual uses the microscope. The interpupillary adjustments are the part that helps achieve the movement of eyepieces, as mentioned above.
Objectives lenses
The objective lens is the primary optical lens in any microscope. The objective lens collects the light passing through the specimen and then focuses the light beam to create a magnified image. It is the essential part of a microscope.
In contrast to the objective of the compound microscope (attached to the nose piece), the objective of a stereo microscope attaches to a column (cylindrical cone) and is not visible. The column is adjustable in a stereo microscope with more than one objective lens to change the magnification power.
Barlow lens
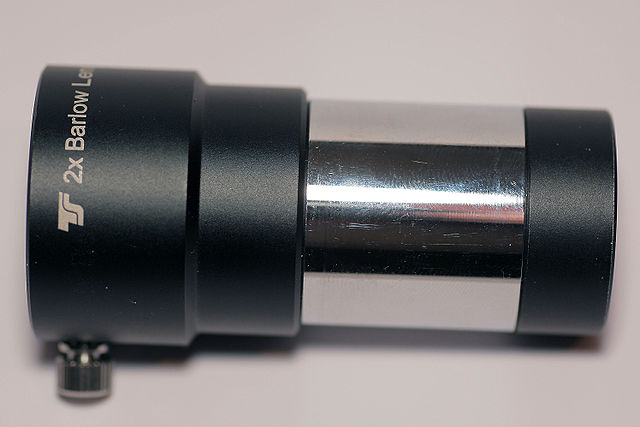 Figure: Barlow lens Image source: Kapege.de, CC BY-SA 3.0https://creativecommons.org/licenses/by-sa/3.0, via Wikimedia Commons
Some dissecting microscopes can have added Barlow lenses, increasing or decreasing the total magnification. 2x Barlow lens increases the magnification, whereas 0.5x Barlow lens decreases the magnification and increases the field view and working distance. It is easily attachable to the cylindrical cone of the objective.
The optical system of the stereo microscope
The head of the stereo microscope has two types of optical systems, namely, Greenough and the common main objective (CMO) optical system.
- Greenough optical system: It has two completely separate optical paths. The two eyepieces of the stereo microscope pair with the two objective lenses in the column. The two light paths strike the specimens at a difference of 15°. The 3-D image is generated through the optical path and the angular offset. This system is available in Zeiss’s Stemi 508 stereo microscope and Nikon’s SMZ 745/745T.
- Common main objective (CMO) optical system: It is also known as Galilean optical system. The system does not have two objective lenses. Since the eyepieces pair with a common objective lens, it is termed the common main objective. The objective has a large diameter from which the light passes for both the eyepieces. Although it is flexible and suitable for microphotography, it is costly. SZX7 from olympus life science and PM240T-8M from Amscope has CMO optical system.
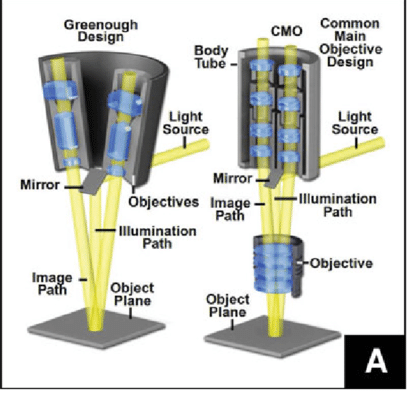 Figure: The optical systems of Stereo microscope Image source: Wilson, Erin & Chambers, William & Pelc, Radek & Nothnagle, Paul & Davidson, Michael. (2020). Stereomicroscopy in Neuroanatomy. 10.1007/978-1-0716-0428-1_9.
Adjustment knobs
Focus button
The focus button is also known as a coarse knob. This kind of knob is present in the front part of the rigid arm, and turning it raises or lowers the microscope head to bring the image into focus.
Zoom knob
The zoom knob is on both sides of the microscope head just below the eyepieces. It helps to zoom in on a particular area for a close view. The focus distance is affected while using the knob, so one should be careful to focus while using the zoom knob.
Light sources
The stereo microscope has either overhead lighting or stage lighting techniques. Light switches and intensity control are used to adjust light’s brightness and contrast. Sometimes, using an external optical fiber as a light source helps control the illumination in a particular direction and is helpful for microsurgery and dissecting. Some dissecting microscopes provide excellent illumination like the model SM-1 BSX-64S Professional binocular stereo microscope from Amscope provides 64 bulb illumination. Likewise, some microscope has the facility of the adjustable position of the LED light, like the model SE400-Z from Amscope.
Stage plate
The stage plate is the area below the objective lens that holds the specimens. Some stage plate has reversible black and white stage to provide different contrast. It also has stage clips for holding the slides or thin samples.
Additional parts
Some microscopes like the model SM-1 BSX-64S Professional binocular stereo microscope from Amscope come with an eye guard that prevents hovering over the eyepiece for a clear image. This feature is great for people wearing glasses.
How does a Stereo Microscope work?
A dissecting microscope is the kind of low magnifying light microscope that projects the 3-D image of large samples. It works on the principle that the two different light paths travel through its lenses (the objective and the eyepiece or ocular lens). The two light paths provide a different angle of viewing where the bottom light helps view the sample, and the top light helps dissect the object. The slight difference in angle converts images into 3-D by our brain.
There are two kinds of magnification available in the dissecting microscope; fixed magnification in the eyepiece, which provides different degrees of magnification, and zoom magnification which offers diverse ranges of magnifications.
The two eyepieces of dissecting microscope help in viewing the sample comfortably at different angles simultaneously. Some stereo microscope has a camera that helps capture the image in digitized form in the computer and storage for extended periods. It also helps to observe images closely on the computer.
Procedure for Using Stereo Microscope
The procedure for using a stereo microscope is as follows:
- Set the stereo microscope on a flat surface or a table that has plenty of space to work.
- Plug in the cord for turning on the stereo microscope.
- Turn on the light switch. The bottom light is suitable for transparent specimens like specimens in slides. In contrast, the top light is best for opaque or solid samples where the light reflects from the object.
- Keep the sample in the center of the stage. If the sample is slides or thin, use stage clips to secure the sample, and if the sample is solid, turn the clips out so that these hang and give you more area to work.
- Adjust the contrast based on the sample. If the sample is crystal, use the black background for contrast.
- Adjust the diopter and interpupillary adjustment ring for comfortable viewing.
- If the stereo microscope has a rotating turret objective (fixed objective), turn it to the desired magnification.
- If the stereo is zoom power, adjust the zoom to the desired magnification.
- Turn the focus knob until the specimen is visible while looking through the eyepieces. Once the outline of the specimen is visible, turn the knob for sharp focus. If the specimen is not in view, move the stage slightly to make sure the specimen is directly under the objective lens.
- Move around to view other parts of the specimen once the first focus is done. Refocusing may be necessary.
- Once viewing under the microscope finishes, turn the switch off and store the dissecting microscope by adequately covering it.
Uses of Stereo Microscope
A stereo microscope or dissecting microscope has many uses in different science laboratories. Some of the benefits of the stereo microscope in the field of science are as follows:
- Study of live insects
- Analysis of rocks, minerals, and crystals.
- Dissecting a flower
- Analysis of seeds and grains
- Examine soil
- Analysis of pond water for microorganisms
- Microsurgery
- Forensic study
- Examination of fossils
- Repairing circuit boards
Advantages of Stereo Microscope
- It helps view opaque specimens.
- A stereo microscope allows for microphotography.
- It also helps in 3-D imaging.
- A dissecting microscope enables the view of larger samples as it has a huge working distance.
Disadvantages of Stereo Microscope
- A stereo microscope is very costly.
- It is not applicable for viewing tissue structures, bacteria, and viruses.
- The dissecting microscope is bulky.
- The maintenance of a stereo microscope is expensive and time-consuming.
Things to Consider While Buying a Stereo Microscope
If you are planning to buy a stereo microscope, there are many things to consider. The things to consider while purchasing a stereo microscope are as follows:
- The area of your application. It is only applicable in laboratories or areas that handle tools or objects small enough that can be viewed without using a high-power compound microscope.
- If microphotography is required, choosing of CMO (common main objective) stereo microscope is the best option.
- The magnifying power required by your laboratory. It is a low magnifying microscope and comes in two broad types; fixed objective and zoom objective.
The fixed type is available in the set number of objectives and not any range. The fixed one is available as dual power, i.e., it has two magnification levels (10x/20x or 30x/40x). It is also cheaper than the zoom objective.
The zoom objective is available in the range of 0.6x to 45x. These require expertise as the focusing is at a finer level, but it provides greater working distance, viewing field, and magnification.
How to Remember
- When to reach for stereo vs. compound, fast: if you can pick the specimen up with forceps and turn it over in your hand, reach for stereo. If it's invisible without a stain and needs 1000x to see at all, reach for compound. A tapeworm proglottid is squarely in the first category; a bacterium never is.
- Why the Procedure section's early steps matter most: nearly every later problem during use, an out-of-focus image, mismatched eyes, a specimen that won't center, traces back to skipping one of the first few setup steps (correct light selection, diopter and interpupillary adjustment, low-power focus first). Fix the setup, and the rest of the procedure rarely causes trouble.
Where Students Get Confused
- Assuming a stereo microscope can substitute for a compound microscope on small specimens. It explicitly cannot resolve bacteria or fine tissue structure; its entire value is low-magnification, three-dimensional viewing of larger, whole specimens.
- Mixing up Greenough and CMO systems. Greenough uses two genuinely separate optical paths for true stereoscopic depth; CMO splits a single shared objective's light into two paths afterward, a different underlying principle, chosen more for flexibility (like camera attachment) than for optical purity.
- Treating the eyepiece, objective, and total magnification numbers as contradictory. They describe different components; like a compound microscope, a stereo microscope's total magnification is the product of its eyepiece and objective (or zoom) magnifications, not a single fixed number.
References and further reading
- Microscopes and Stereo Microscopes. https://neuroaula.net/wp-content/uploads/2019/04/Microscopes-Frederiksen.pdf
- Stereo Microscopes. (2022). Nikon Metrology. https://www.nikonmetrology.com/images/brochures/stereo-microscopes-en.pdf
- Stereo Microscope Manual. Home Science Tools. https://www.homesciencetools.com/content/reference/MI-13-24STERXManual_Web.pdf
- Kwon, K.-C., Lim, Y.-T., Kim, N., Yoo, K.-H., Hong, J.-M., & Park, G.-C. (2010). High-Definition 3D Stereoscopic Microscope Display System for Biomedical Applications. EURASIP Journal on Image and Video Processing, 2010. https://doi.org/10.1155/2010/724309
- Kreindler, R. J. (2012). The Stereo Microscope. http://www.microscopy-uk.org.uk/mag/artjun12/jk-stereo1.pdf
Frequently Asked Questions
Why would a stereo microscope be used instead of a compound microscope to identify a parasite?
What is the difference between the Greenough and CMO optical systems in a stereo microscope?
Who actually built the first successful stereo microscope, Greenough or Wenham?
Can a stereo microscope be used to see bacteria?
What does CMO stand for in stereo microscopy, and why does it matter?

Tankeshwar Acharya, MSc (Medical Microbiology)
Tankeshwar Acharya is an Assistant Professor in the Department of Microbiology at Patan Academy of Health Sciences (PAHS), Nepal, where he has been teaching and practicing clinical microbiology for over 14 years. He is the founder of Microbe Online, one of the leading free microbiology education resources on the web, covering bacteriology, mycology, parasitology, immunology, and clinical laboratory diagnostics written from direct experience in both the classroom and the diagnostic laboratory.