
Parts of a Microscope and Their Functions: Which Objective and Settings for Each Examination

On this page
A student is examining a Gram-stained sputum smear and cannot find anything. The slide is properly stained. The organism is there. She has been searching at 100X for ten minutes.
The problem is that she started at 100X. The oil immersion lens has a field of view narrower than a grain of rice, and she is hunting for cells across a smear she never surveyed at low power. Meanwhile her iris is closed, because that is how she set it for a wet preparation last week, and at 100X a closed iris throws away exactly the resolution she needs.
Nothing is wrong with the microscope. Every setting is wrong for the task. Knowing the parts of a microscope means knowing which knob to turn, when, and why, and that is what separates a technician who finds the organism from one who reports a negative smear.
How light travels through a compound microscope
Understanding the parts of a microscope is most meaningful when you understand the journey of light from source to eye — each part plays a specific role in that journey:
Light source (illuminator) → light is produced and directed upward
Condenser → collects scattered light rays and focuses them into a concentrated cone aimed at the specimen
Iris diaphragm → controls the width of the light cone entering the condenser — adjusting contrast and resolution
Stage aperture → light cone passes through the hole in the stage
Specimen (slide) → light interacts with the specimen — some is absorbed, some transmitted
Objective lens → collects transmitted light from the specimen and produces a magnified primary (real) image
Body tube → transmits the primary image upward, maintaining the correct optical distance between lenses
Eyepiece (ocular lens) → magnifies the primary image further and converts it into a virtual image that enters the eye
Eye → the brain interprets the final magnified image
Each step in this chain must be correctly adjusted for the final image to be sharp, clear, and properly illuminated.
The compound microscope is generally credited to Dutch spectacle-makers Hans Janssen and his son Zacharias in the late 16th century, though the attribution is debated by historians. Antonie van Leeuwenhoek, working in Delft in the 17th century, built simple single-lens microscopes powerful enough to observe bacteria for the first time, in 1676. He is known as the father of microbiology.

Do you know? Antonie van Leeuwenhoek was the first person to see bacteria, in 1676
There are different types of microscopes based on their working mechanism and functions, but the microscopes can be broadly classified into;
- Light (optical) microscope and
- Electron microscope
The Light Microscope
Light microscopes are used to examine cells at relatively low magnifications. Magnifications of about 2000X are the upper limit for light microscopes, though useful magnification rarely exceeds 1000X to 1500X; beyond that is empty magnification. The highest resolution of a light microscope is about 0.2 μm. The use of blue light to illuminate a specimen gives the highest resolution. It is because blue light is of a shorter wavelength than white or red light. For this reason, many light microscopes come fitted with a blue filter over the condenser lens to improve resolution.
The common light microscope used in the laboratory is called a compound microscope. It is because it contains two types of lenses; ocular and objective. The ocular lens is the lens close to the eye, and the objective lens is the lens close to the object. These lenses work together to magnify the image of an object.
Read more: Working Mechanism of Light Microscope
Magnification vs Resolution — the critical difference
These two terms are frequently confused but describe completely different properties:
Magnification is how much larger the image appears compared to the actual object. It is calculated by multiplying the eyepiece magnification by the objective magnification:
Total magnification = eyepiece magnification × objective magnification
For example: 10X eyepiece × 100X objective = 1000X total magnification.
Resolution (resolving power) is the ability to distinguish two closely adjacent points as separate structures. It is the most important optical property of a microscope — high magnification without good resolution produces a large blurry image with no additional detail.
The resolving power of a light microscope is approximately 0.2 μm — meaning two structures closer than 0.2 μm apart will appear as a single blurred point regardless of magnification. No amount of additional magnification can separate them.
This is why viruses (20–300 nm) cannot be seen with a light microscope — they fall below the resolution limit. Electron microscopes, which use electrons (wavelength ~0.005 nm) instead of light (wavelength ~400–700 nm), achieve resolutions of 0.1–0.2 nm — sufficient to visualize individual viral particles and even large molecules.
| Property | Light microscope | Electron microscope |
|---|---|---|
| Light source | Visible light (400–700 nm) | Electron beam (~0.005 nm) |
| Maximum magnification | ~2,000× | Up to 1,000,000× |
| Resolving power | ~0.2 μm | ~0.1–0.2 nm |
| Can visualize | Bacteria, fungi, parasites, cells | Viruses, cell organelles, molecules |
| Living specimens | Yes | No (requires vacuum) |
| Cost | Low | Very high |
Why using blue light improves resolution: Resolution is limited by the wavelength of light used. Shorter wavelengths give better resolution. Blue light (wavelength ~450 nm) gives better resolution than white or red light — this is why many microscopes have a blue filter over the condenser, and why blue light is specifically recommended for examining gram stains and blood films.
Parts of Compound Microscope
The main parts of a compound microscope are as follows:
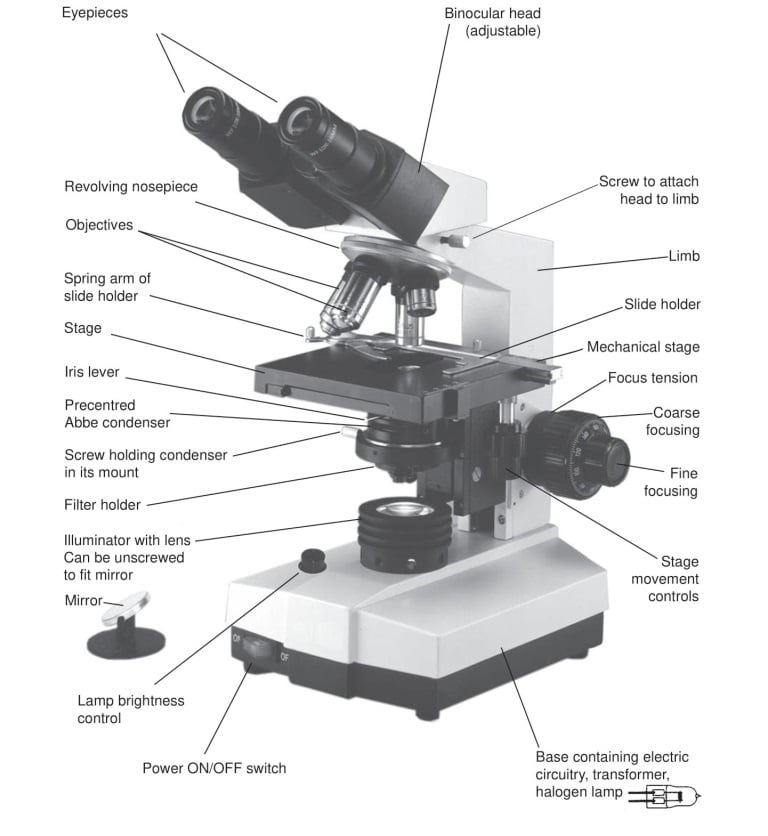 Figure: Parts of Binocular Medical Microscope with built-in Illumination
Illuminator (Light Source)
A mirror or electric bulb is provided as the source of light rays. The function of the mirror is to provide reflected light from a lamp or sunlight. Most microscopes today have built-in lamps that provide necessary illumination.
You can turn on and off the light source using a switch and adjust the illumination intensity by turning the light adjustment knob. This knob is calibrated with a scale of 1 to 10; 1 is low intensity, and 10 is high intensity.
Diaphragm (Iris)
Many microscopes have a rotating disk under the stage known as the diaphragm or iris. The diaphragm has different-sized holes that control the amount of light passing through it. Based on the transparency of the specimen, adjustment of the diaphragm setting to achieve a needed degree of contrast is possible.
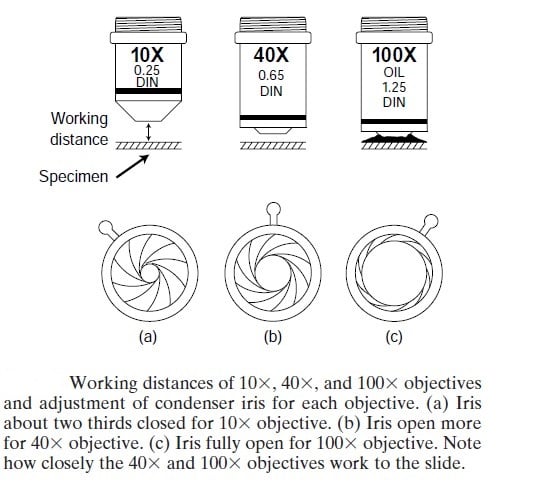 Figure: Iris in Microscope
The iris controls the condenser aperture. As a rough guide, close it to about one-third open for the 10X objective, open it further for 40X, and open it fully for 100X. One should use lamp brightness control, not the iris, to reduce the illumination intensity. If the condenser aperture is closed too much, there will be a loss of detail (resolution) in the image.
Condenser
Beneath the stage is a group of lenses that comprise the condenser. The condenser accepts parallel light rays produced by an illuminator and condenses them into a strong beam. It causes light rays from the light source to converge on the microscope slide. Image clarity improves when the condenser's numerical aperture is matched to that of the objective in use, which is why the condenser aperture is adjusted as you change objectives.
For routine transmitted light microscopy following type of condenser and fittings are recommended.
- Abbe type condenser with iris diaphragm
- Facility to center the condenser in its mount unless precentered by the manufacturer.
- Fitted with a filter holder of the swing-out type.
Abbe condenser is present in the more sophisticated microscopes with a higher magnification of 1000X. The condenser focus knob helps in the up-down movement of the condenser and aids in controlling the focus of light on the specimen.
Aperture
It is the hole present in the microscopic stage. Through the aperture, the transmitted light reaches the stage from the source.
Stage
The stage is a flat platform positioned about halfway up the arm. It is the part that holds the slides in place using simple or mechanical stage clips and enables them to be examined in a controlled way. The specimen can be moved systematically up and down and across the stage, i.e., X and Y movements.
The stage is moved up or down by the coarse and fine focus knobs to bring the specimen into focus. Separately, an operator moves the slide across the stage (X and Y) using the mechanical stage control knobs during examination. An integral, smooth-running mechanical stage, preferably with vernier scales to enable specimens to be easily located, is needed for smooth microscopic operations in a laboratory.
Objective lens
These are primary lenses that magnify the specimens. Four objective lenses are present in the compound light microscope. The shortest lens has the lowest power. Similarly, the longest one is the lens with the greatest power. The higher power objective lenses are retractable, i.e., when they hit a slide, the end of the lens will push in, thereby protecting the lens and the slide.
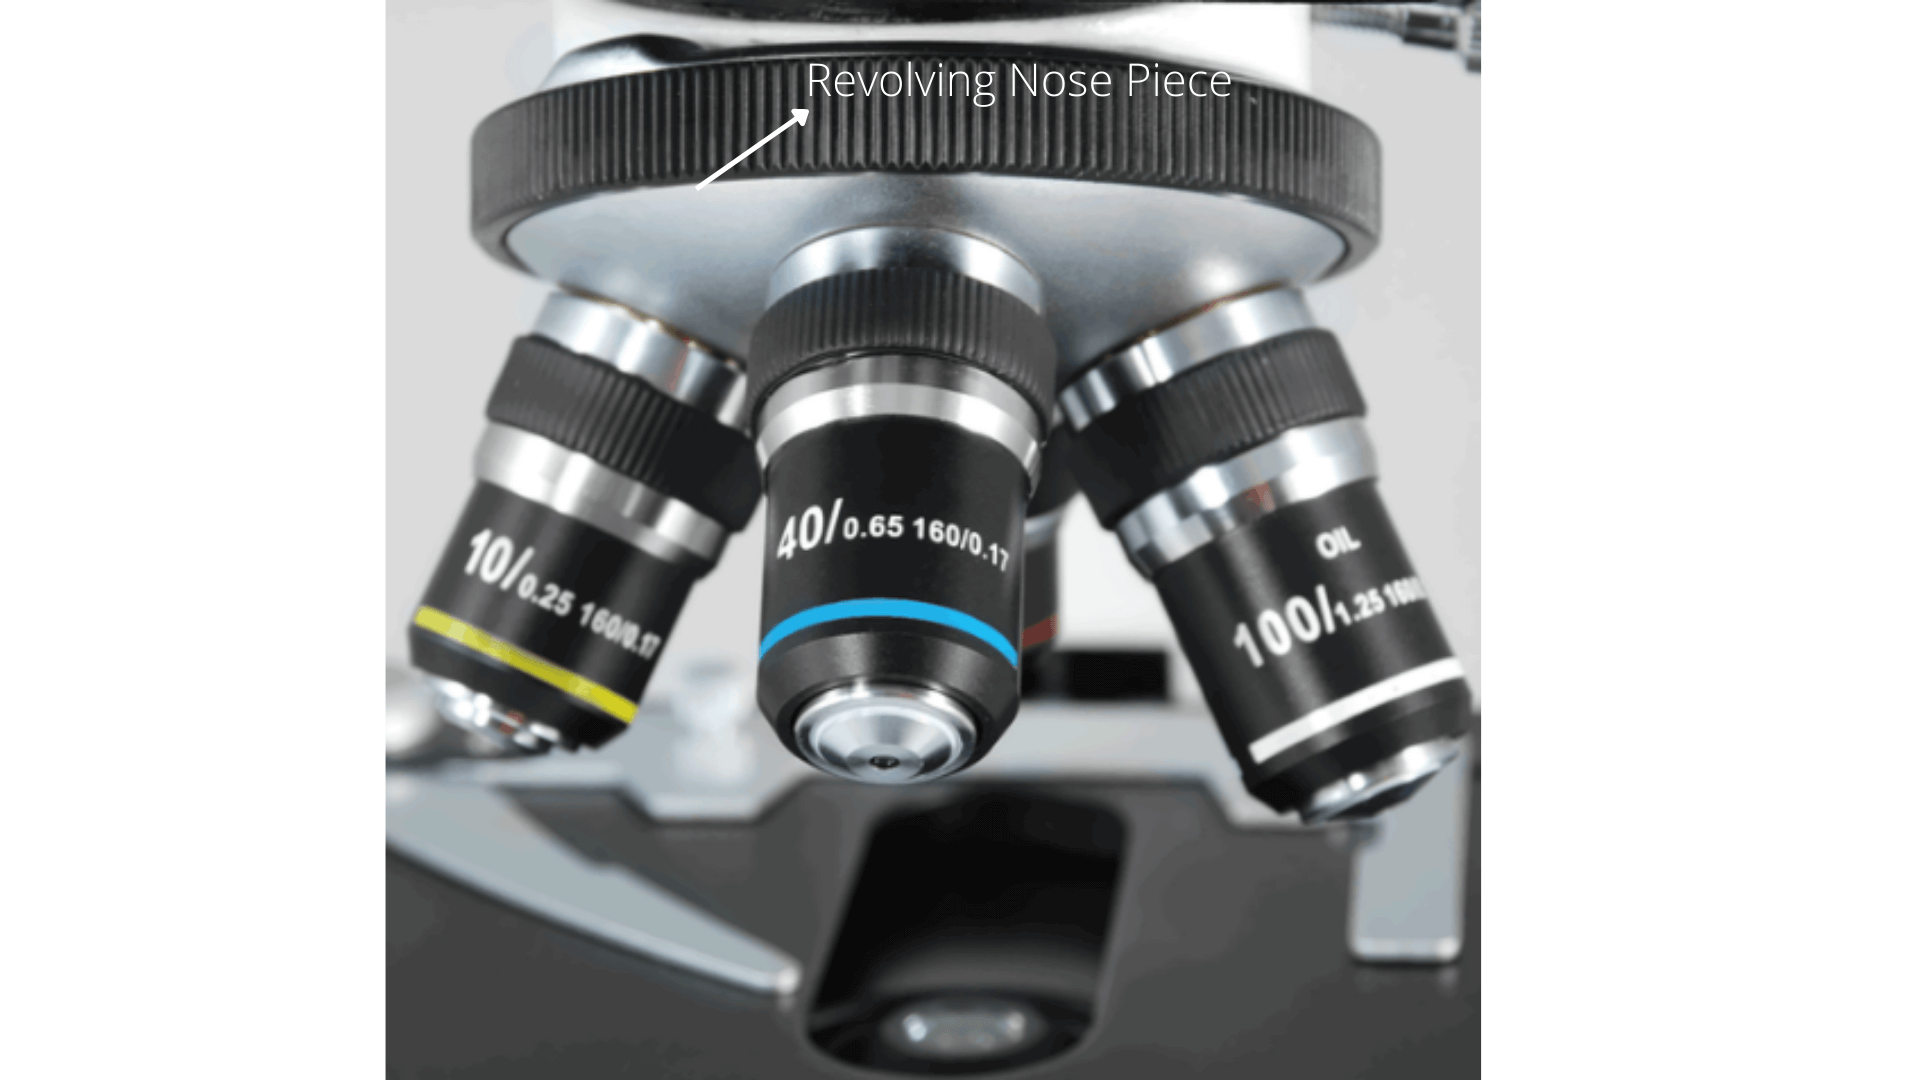 Figure: Objective lens of a microscope
- (4X): It is a scanning objective lens. It also provides the lowest magnification power of all objective lenses.
- (10X): It is a low-power lens. Lower magnifications locate specimen samples in certain areas on a microscope slide.
- (40 X): It is a high-power lens. 40X objective lens is applicable for examination of wet preparations, e.g., hanging drop, and ova and cyst examination in the stool.
- (100 X): It is the oil-immersion lens. The lenses on which oil is used are called oil-immersion lenses. Visualization of bacteria generally requires immersion oil with 100X objective (i.e. total magnification of 1000X). Magnification of 1000X is sufficient for the visualization of fungi, most parasites, and bacteria, but not for viruses. Viruses are invisible to the light microscope not because they need more magnification but because they fall below its resolution limit of about 0.2 µm. Seeing them requires an electron microscope, whose far shorter wavelength gives the necessary resolving power.
Most ocular lenses magnify the image ten times. So the total magnification of a microscope is calculated by multiplying the power of the objective lens by the power of the eyepiece (10x). For example, if you are observing an object by a scanning objective lens (4x), you are observing a 40 times magnified image (10x eyepiece lens multiplied by 4x scanning objective lens).
Oil immersion: why it is used and how it works
The 100X objective is designated the oil immersion lens because it requires a drop of immersion oil between the objective lens and the coverslip. Understanding why requires a basic concept — refractive index.
When light passes from glass (refractive index 1.515) into air (refractive index 1.0), it bends (refracts). This bending scatters some of the light that would otherwise enter the objective lens, reducing resolution and brightness. At 100X magnification this light loss is significant.
Immersion oil has a refractive index of 1.515 — identical to glass. When a drop of immersion oil fills the gap between the slide and the 100X objective lens, light passes from glass → oil → glass without bending at any interface. No light is scattered, the full numerical aperture of the lens is utilized, and maximum resolution is achieved.
Key rules for oil immersion:
- Use only the 100X objective with immersion oil (never the 40X or lower power objectives)
- Use only dedicated immersion oil; never use water, glycerol, or other liquids which have different refractive indices and will give poor results and damage the lens
- After use, clean the 100X lens immediately with lens tissue (never rough tissue or cloth); dried immersion oil is very difficult to remove and damages the lens coating
- Never use the coarse adjustment knob with the 100X objective; use fine adjustment only
Body Tube
It transmits the image from the objective lens to the ocular lens.
Ocular Lens (eye-piece)
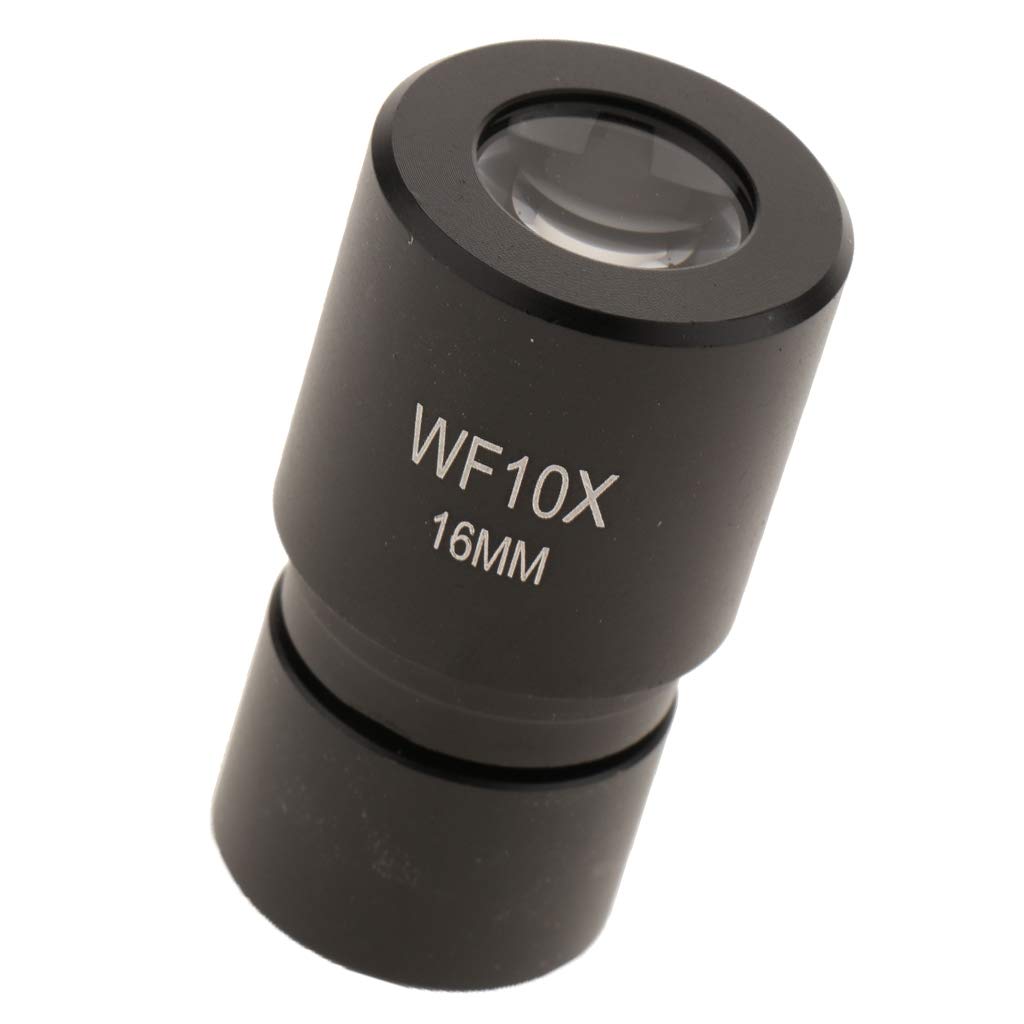 Figure: Ocular lens of a microscope
It is located at the top of the microscope, and the ocular lens or eyepiece lens is used to look through the specimen. It also magnifies the image formed by the objective lens, usually ten times (10x) or 15 times (15x). Usually, a microscope has an eyepiece of 10x magnification power. Advanced microscopes have eyepieces for both eyes and are called binocular microscopes.
A binocular microscope lets the user see the image with both eyes at once. It improves the quality of microscopical work as it is more restful, particularly when examining specimens for prolonged periods.
The eyepiece tube, also known as the eyepiece holder, holds the eyepiece lens together. They are flexible in the binocular microscope that rotates for maximum visualization. They are not flexible in the monocular microscopes.
Revolving Nose Piece
The revolving nose piece holds several objective lenses of varying magnification. It is movable, and the user can rotate it to achieve desired magnification levels. Ideally, a microscope should be parfocal, i.e. the image should remain focused when objectives are changed.
Coarse and Fine Adjustment Knob
Coarse Adjustment Knob
The coarse adjustment knob located in the arm of a microscope moves the stage up and down to bring the specimen into focus. The coarse adjustment helps to get the first focus. The gearing mechanism of the adjustment produces a large vertical movement of the stage with only a partial revolution of the knob. Because of this, the coarse adjustment should only be used with 4x (scanning), 10x objective (lower power) and never with high power lenses (40x and 100x).
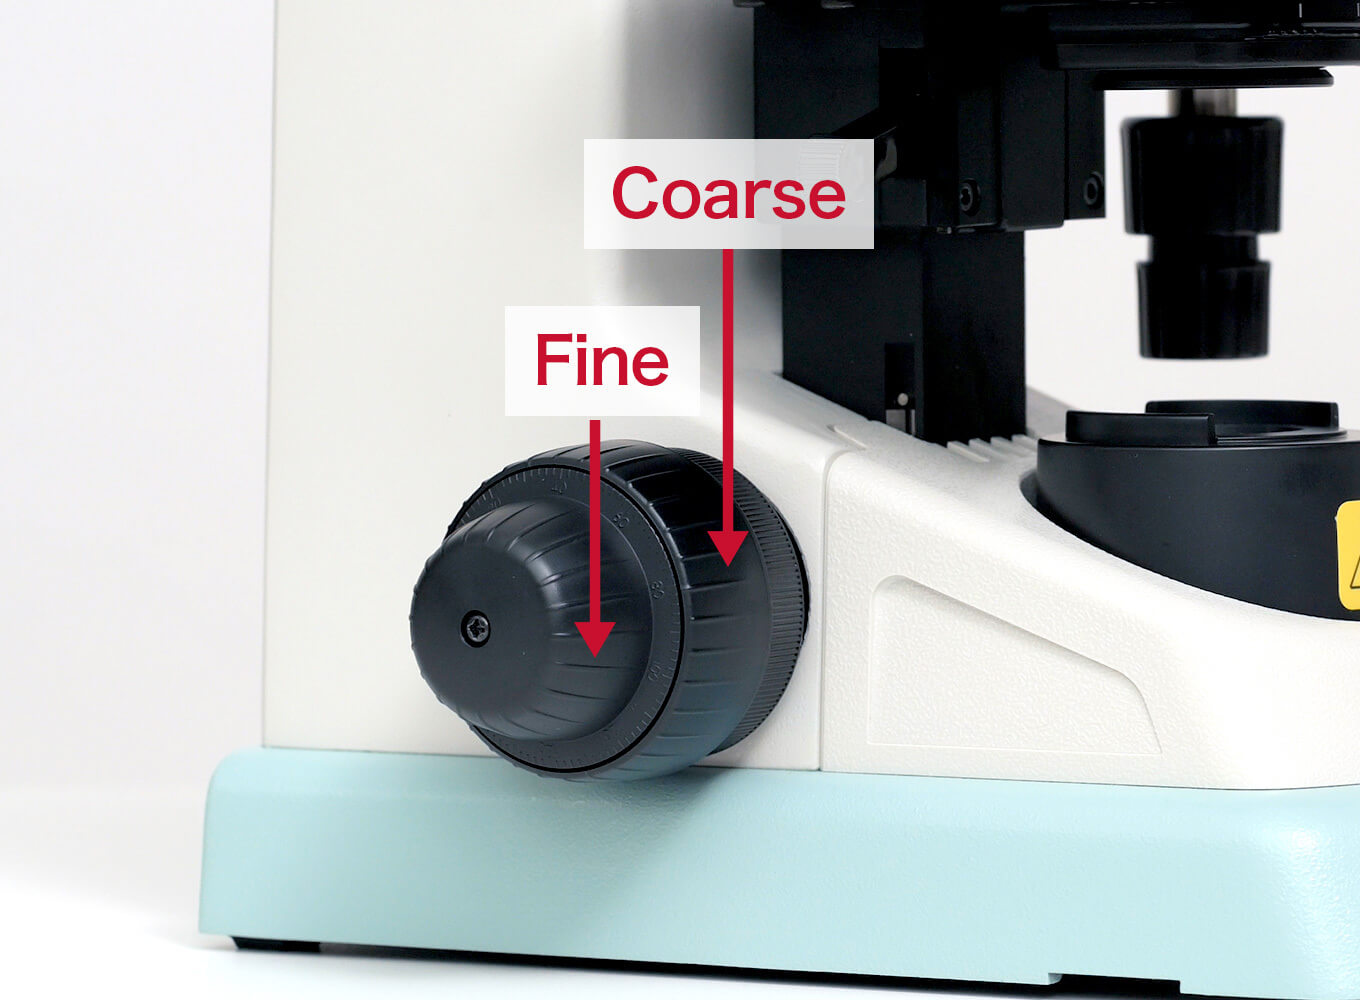 Figure: Coarse and fine adjustment knob of a microscope
Fine Adjustment Knob
A fine adjustment knob is generally present inside the coarse adjustment knob. It helps in bringing the specimen into sharp focus under lower power. It also helps for overall focusing when using a high-power lens.
Arm
The arm of the microscope supports the tube and connects it with the base. The arm as well as the base help to carry the microscope. In the case of high-quality microscopes, an articulated arm with more than one joint is present.
Base
The base is the bottom of a microscope. It helps to support the microscope. A microscopic illuminator is also present in it.
In summary, the parts of the microscope and their functions are explained below in the table:
| Name of the parts | Function |
|---|---|
| Arm (limb) | Connects ocular tube and base. It also helps carry the microscope |
| Base | Provides support to help microscope stand upright |
| Coarse adjustment knobs | Moves the stage up and down for the first, approximate focus. Used only at low power (4X, 10X), never at high power. |
| Condenser | Forming a cone of all the dispersed light rays from the illuminator |
| Diaphragm (Iris) | Controls the intensity of illuminating light |
| Eyepiece (ocular lens) | Magnification of image produced by objective lens |
| Fine adjustment knobs | Brings the specimen into sharp focus; the only focus knob used at high power (40X, 100X) |
| Illuminator | Provides high-intensity light at the field aperture |
| Mirror | Reflects light from an external source |
| Objective lens | Primary magnifier of microscope |
| Body tube | Maintains the correct distance between the ocular and objective lens |
| Revolving nose piece | Holds the objective lens. Its rotation helps to change the power of the objective lens |
| Stage | Place for holding sample |
| Stage clips | Keeps the slide with a specimen in place on the stage |
Clinical use guide: which objective for each examination
Different microscopy applications require different magnifications and settings. This table is a practical guide for medical laboratory students and technicians:
| Examination | Objective | Dry/Oil? | Key settings | What you are looking for |
|---|---|---|---|---|
| Scanning slide (initial survey) | 4X or 10X | Dry | Moderate light, iris partially open | Overall tissue/smear quality, finding areas of interest |
| Wet preparation (saline/iodine) | 10X then 40X | Dry | Reduced light, iris partially closed | Intestinal parasites; i.e., ova, cysts, trophozoites; motility at 10X |
| Hanging drop preparation | 10X then 40X | Dry | Reduced condenser, iris nearly closed | Bacterial motility. It helps to differentiate true vs Brownian movement |
| Gram stained smear | 100X | Oil | Maximum light, iris fully open, blue filter | Gram reaction, morphology, arrangement, PMN nuclei for QC |
| Ziehl-Neelsen (acid-fast) smear | 100X | Oil | Maximum light, iris fully open | Acid-fast bacilli; red on blue background |
| Giemsa stained blood smear (thin) | 100X | Oil | Maximum light | Malaria parasites, stippling, gametocyte morphology |
| Giemsa stained blood smear (thick) | 100X | Oil | Maximum light | Malaria parasite detection |
| Fungal wet preparation (KOH) | 10X then 40X | Dry | Reduced light | Fungal hyphae, pseudohyphae, spores, capsule (Cryptococcus) |
| India ink preparation | 40X | Dry | Reduced light | Cryptococcus capsule — clear halo around dark background |
| Urine microscopy | 10X then 40X | Dry | Moderate light | RBCs, WBCs, casts, epithelial cells, bacteria, crystals |
| Blood differential count | 100X | Oil | Maximum light | Leucocyte morphology and differential counting |
| Dark field examination | 10X then 40X | Dry | Dark field condenser | Treponema pallidum motility |
Why closing the iris diaphragm increases contrast
When examining unstained or lightly stained specimens (wet preparations, hanging drop), closing the iris diaphragm partially reduces the numerical aperture of the condenser. This increases contrast (making transparent organisms easier to see against the background) at the expense of some resolution. For stained specimens examined at 100X oil immersion, the iris should always be fully open to maximize resolution.
Troubleshooting common microscopy problems
| Problem | Likely cause | Solution |
|---|---|---|
| Image blurry at all magnifications | Dirty eyepiece or objective lens | Clean lenses with lens tissue only; check for dried immersion oil |
| Image blurry only at 100X | No immersion oil, or incorrect oil | Apply immersion oil; ensure oil contacts both slide and objective |
| Image dark or low contrast | Iris closed too much; low light intensity | Increase light intensity; open iris appropriately for objective used |
| Cannot find specimen at high power | Did not focus at low power first | Always start at 4X or 10X, find and center specimen, then increase magnification |
| Image sharp in center, blurry at edges | Condenser not centered; objective not parfocal | Center the condenser; if not parfocal, refocus with fine adjustment when changing objectives |
| Colored fringes (chromatic aberration) | Cheap objective lenses; wrong immersion oil | Use quality achromatic or apochromatic objectives |
| Slide drifts when moving to high power | Stage clips loose; mechanical stage slipping | Tighten stage clips; check mechanical stage tension |
| Oil immersion image worse than 40X | Immersion oil on 40X objective | Clean 40X with lens tissue; never use oil with 40X |
| Specimen not visible despite correct technique | Too thick a smear; overstained | Make thinner smear; decolorize more thoroughly |
| Dark spots in field of view | Dirt on eyepiece — moves when eyepiece rotated | Clean eyepiece with lens tissue |
How to Remember
The oil-immersion rule, as one sentence: Oil matches glass. It's used on the 100X objective because that's the only lens whose magnification is high enough for the light loss at a glass-to-air interface to actually matter. Putting oil anywhere else doesn't add clarity, it adds a smear with nothing to correct.
Coarse vs. fine, by what each one is for: Coarse adjustment gets you to the right neighborhood. Fine adjustment gets you to the exact address.
That's why coarse adjustment is only safe at low power (4X, 10X). The lens sits far enough from the slide that a big movement can't crash into it. At high power (40X, 100X), the lens sits too close. The same big movement can shatter both lens and slide, so only fine adjustment is used there.
Why the iris trades resolution for contrast: Closing the iris narrows the cone of light, which increases contrast for transparent, unstained specimens but also throws away some resolution. For stained specimens at 100X, there's no transparency problem to fix, so the iris opens fully and resolution is protected instead.
Magnification vs. resolution, in one line: Magnification makes the image bigger; resolution decides whether making it bigger reveals anything new. A blurry point stays a blurry point no matter how much you enlarge it, which is exactly why light microscopy has a hard ceiling that no amount of zooming fixes.
Key exam facts in one table
| Concept | Detail | Why it's tested |
|---|---|---|
| Oil immersion, the core reason | Immersion oil matches the refractive index of glass (1.515), preventing light from bending at the slide-to-lens interface | Explains why oil is used at 100X specifically, not just "because tradition says so" |
| Coarse adjustment restriction | Safe only at 4X/10X; never at 40X/100X | Prevents lens and slide damage from the large vertical movement per turn |
| Iris trade-off | Closing the iris increases contrast but reduces resolution | Tests whether a student understands why wet preps use a partially closed iris while stained smears use a fully open one |
| Blue light and resolution | Shorter wavelength (~450 nm) gives better resolution than white or red light | Explains the blue filter fitted to many condensers and its specific recommendation for Gram stains and blood films |
| Light microscope's hard ceiling | ~0.2 μm resolution limit, meaning viruses (20–300 nm) can never be resolved regardless of magnification | Tests the magnification-vs-resolution distinction directly |
| Total magnification formula | Eyepiece magnification × objective magnification | Frequently tested as a direct calculation (e.g., 10X × 40X = 400X) |
Where Students Get Confused
- Treating oil as something that helps whichever lens it's on. It doesn't. Oil is matched specifically to the 100X objective's refractive index needs; on any other objective it only degrades the image and risks the lens.
- Reaching for coarse adjustment out of habit at high power. The instinct to use the same knob that worked at low power is exactly what the "never use coarse adjustment with the 100X objective" rule exists to prevent.
- Assuming more magnification always means more detail. Resolution, not magnification, decides whether finer detail becomes visible. A microscope pushed past its resolution limit just produces a bigger blur, not a clearer one.
- Not connecting the iris setting to what's actually being examined. Wet preparations need contrast because they're transparent and unstained, so the iris partially closes. Stained smears at 100X need maximum resolution because contrast is no longer the problem, so the iris opens fully. Using one setting reflexively for both is a common lab mistake.
- Confusing the Body Tube with the eyepiece tube/ocular tube holder. The Body Tube transmits the image from objective to eyepiece and maintains correct optical distance; the eyepiece tube is the separate housing that holds the eyepiece lens itself and, in binocular scopes, rotates for viewing comfort. They sit in the same general area of the instrument but do different jobs.
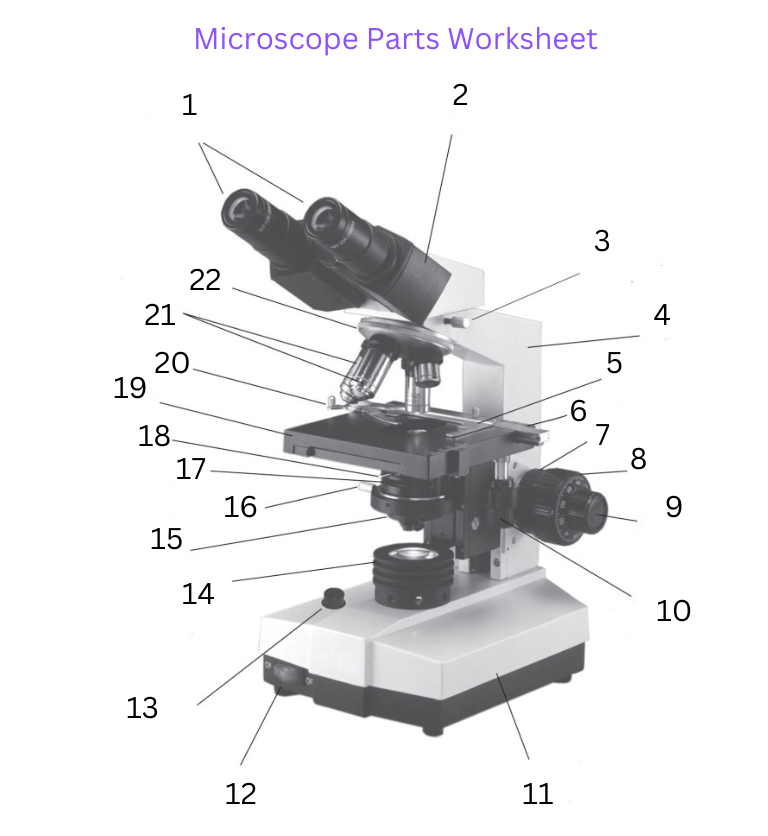
Microscope Worksheet
Download the PDF of the given Binocular Microscope and label its parts.
 Download Microscope Parts Worksheet
References and further readings
Madigan MT, Bender KS, Buckley DH, Sattley WM, Stahl DA. Brock Biology of Microorganisms. 16th ed. Pearson; 2021.
Tille PM. Bailey & Scott's Diagnostic Microbiology. 15th ed. St. Louis: Elsevier; 2022
Bailey & Scott's Diagnostic Microbiology (15th ed.). Elsevier.
Abramowitz, M., & Davidson, M. W. Introduction to Microscopy. Olympus Life Science Microscopy Resource Center. Retrieved from https://www.olympus-lifescience.com/en/microscope-resource/
World Health Organization. (2010). Basic Malaria Microscopy (2nd ed.). WHO Press.
Leber AL, editor. Clinical Microbiology Procedures Handbook. 4th ed. Washington, DC: ASM Press; 2016.
Frequently Asked Questions
What is the difference between magnification and resolution in a microscope?
Why can we not see viruses with a light microscope?
Why is immersion oil used with the 100X objective?
What is the correct order of steps when using a compound microscope?
What is the function of the condenser?
What is the function of the iris diaphragm?
What is the difference between a monocular and binocular microscope?
Why should the coarse adjustment knob never be used with high-power objectives?

Tankeshwar Acharya, MSc (Medical Microbiology)
Tankeshwar Acharya is an Assistant Professor in the Department of Microbiology at Patan Academy of Health Sciences (PAHS), Nepal, where he has been teaching and practicing clinical microbiology for over 14 years. He is the founder of Microbe Online, one of the leading free microbiology education resources on the web, covering bacteriology, mycology, parasitology, immunology, and clinical laboratory diagnostics written from direct experience in both the classroom and the diagnostic laboratory.
Comments
No comments yet. Be the first to share your thoughts.
Leave a comment
All comments are reviewed before they appear.