
Microtome: Parts, Sectioning Steps, Types, and Common Errors

On this page
A trainee sets the microtome to 4 micrometers, turns the wheel, and gets sections that are thick, thin, thick, thin in an alternating pattern, some rolling up, some folding on themselves. Nothing on the dial is wrong. The problem is almost always one of a handful of predictable faults: a loose block, a dull spot on the knife, the wrong clearance angle, or wax that is too warm or too cold. Reading a microtome is mostly reading its failures. This article covers the parts and types, then the part that actually decides whether you get a usable slide: how to cut a section, and how to fix the common ways it goes wrong.
Histology studies biological tissues that are preserved carefully, usually by embedding them in paraffin wax. These methods of careful preservation maintain relationships between cells and their various components and also helps in passing illuminating radiation through them.
Since most biological tissues are optically dense, these require thin slicing so that the microscopic details of each cell can be easily studied. The mechanical device, microtome, helps achieve the thin slicing of the tissues for studying under a microscope.
Micro means small, and tome means cut in Greek. The instrument has sharp blades or a microtome knife for making the thin slice. Traditionally, the microtomes helped in free-hand sectioning of the tissues using a sharp razor.
Modern microtomes are precise instruments that cut uniform thin sections, most often at 3 to 5 micrometers for routine paraffin histology. Every microtome, whatever its type, has three functional parts: a knife, a base or body, and a specimen holder, plus an advance mechanism that moves the block a set distance before each cut.
It has many different types based on operating mode and knife material; manual, automated, semi-automated microtome with steel, diamond, glass, tungsten carbide, or sapphire knife. The instrument is mainly used in histological and pathological studies and analyses.
Parts of Microtome
The instrument has mainly three parts; the base/body of the microtome, the knife in the knife holder, and the tissues/material holder.
- Base/body: The body/base of the microtome helps to keep the instrument upright. It has a part for the attachment of the knife holder. It has a scale where the distance for movement of the material holder is set.
- Knife and knife holder: The knife holder holds the knife fixed on the body. The knife/blade can be made up of diamonds, glass, or metals. It is of different types.
- Tissue/material holder: The material holder holds the specimen. Unlike any other cutting appliance, it is the movable part of the microtome. The cutting action can be vertical or horizontal, and the holder moves at a pre-selected distance in the body.
Types of Knife and Its Angle
The materials used in making of the knife are either stainless steel, diamond, tungsten, sapphire, or glass. Likewise, its profile also decides the types of a knife; plano-concave, biconcave, wedge, and tool edge knives.
Based on the material used for construction
- Steel knife: The material used for this kind of knife is from high-quality carbon or tool-grade steel. The steel should be rust-resistant and heated to harden the edge. The hardening of the edge of the steel determines its sharpness.
- Tungsten knife: These knives are made of tungsten carbide. These are non-magnetic and considerably harder and more wear-resistant than steel. These types are highly brittle. It is resistant to wear and can make up to 30,000 serial sections of undecalcified bone embedded in methacrylate after each sharpening.
- Diamond knife: The knife is made of gem-quality diamond. The blades are expensive but very durable due to their hardness. The knife is used for cutting very thin sections.
- Sapphire knife: The knife is produced from a single piece of sapphire created artificially from alumina monocrystal under computer-controlled thermal conditions. It is harder than glass and tungsten, which ensures its durability. The knife can only cut smaller-sized blocks, and the edge is limited to 11 mm.
- Glass knife: It is used in ultramicrotomy. Its cutting edge is placed against/across the thickness of the glass. It is also called the Ralph knife, and different profiles of the knife are used for cutting sections from various embedded materials. The knives are hard but brittle. However, the knife is susceptible to storage for an extended period. So, it should be treated before use.
- Disposable knife: The knife is made of stainless steel and has replaced conventional knives. Teflon coating is preferred for cryostats.
- Non-corrosive knife: The non-corrosive blade is used for cryo-microtome and is made of heat-treated stainless steel, free from all impurities. It has 12-15% chromium.
Knife profiles
Traditional reusable knives came in different cross-sectional profiles matched to the material: plano-concave and biconcave edges for soft, celloidin- or paraffin-embedded tissue, and the more rigid wedge and tool-edge profiles for harder blocks. In most modern laboratories these have been replaced by disposable blades in a standard low-profile or high-profile format, chosen for the tissue hardness rather than reground by hand.
The practical rule remains the same: softer tissue tolerates a finer edge, and harder tissue needs a more robust one.
Types of Microtome
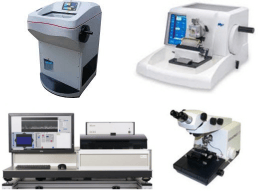 Figure: Different types of microtome
Microtomes are classified two ways, and mixing them up is a common source of confusion. One axis is the operating mode: how the instrument is driven. The other is the design type: how it is built and what tissue it is meant for. Any given design can come in more than one operating mode, for example a rotary microtome may be manual, semi-automated, or fully automated.
By Operating Mode
Manual microtome: every stage is driven by hand. The operator turns the handwheel and controls the motion. Most teaching and many routine laboratories use manual instruments; they are simple and reliable but depend on the operator's steady rhythm for even sections.
Semi-automated microtome: the sectioning stroke is motorized while the operator retains manual control of trimming and positioning, or the reverse. It reduces hand fatigue and improves consistency over a long run of blocks.
Automated microtome: the cutting and feed are motor-driven and set electronically. The operator enters the section thickness and count, and the instrument sections with minimal intervention, giving high reproducibility. Computerized and laser microtomes (below) are automated designs.
By Design Type
The design is chosen mainly by how the tissue is prepared and how large or hard the block is.
Rocking microtome
It has the oldest design and is relatively cheaper than other types of the microtome. It is named due to its rocking action due to cross-arm presence and is exclusively applicable in slicing paraffin blocks. Here the specimen swings through an arc as the arm moves it toward a fixed knife. Because the cutting path is an arc rather than a straight line, sections can come out slightly curved, which limits the flat viewing surface. Although highly reliable, lightweight, and low maintenance, their lightweight might lead to unstableness and vibration while operating it. Nowadays, the rotary microtome significantly replaces the rocking microtome.
Rotary microtome
It is the most commonly used instrument in routine laboratories, and the blade is kept horizontally. The paraffin block with tissue moves up and down with the help of a rotatory handle in the microtome. One half-turn of the handwheel moves the block down across the knife edge to cut the section; the return half-turn raises it and advances it by the set thickness for the next cut. This action helps in cutting the tissue as thin as a ribbon. The rotary microtome can be automated or semi-automated by adjusting and controlling the block's movement and the knife's angle. The section comes out thin (routinely 3 to 5 μm) as good-quality ribbons. The microtome is highly stable and can easily cut various types of tissue. However, the microtome is not ideal for cutting large blocks of tissue. Likewise, it is expensive and can cause accidents as the knife faces up.
Sledge microtome
This instrument is used to cut sections of large blocks of tissue. Here the block is fixed in a static position within a steel carriage. The carriage slides backward and forward against a fixed horizontal knife. The knife is large (usually 24 cm long) and wedge-shaped, reducing the vibration and requiring less sharpening. The knife holders are adjustable and tiltable to the desired angle of the knife to the block. The whole instrument is heavy and hence very stable. Its main disadvantage is that it is relatively slow compared to the rocking or rotary microtome.
Sliding microtome
In this instrument, the knife moves horizontally against a fixed block. The movement progresses in an inclined plane. It was designed for cutting celloidin-embedded sections and paraffin-embedded sections.
Hand microtome
This kind of microtome is only applicable in sectioning rigid botanical material. Although thin tissue sections can be obtained from plant cells, thin sections from animal tissues are difficult to obtain.
Vibrating microtome
This microtome is applicable for producing thin slices from unfixed, unprocessed, or unfrozen tissue samples from animal and botanical sources. It is assumed to replace the hand microtome. Its name is derived from the high-speed vibration of the blade, which can increase the cutting speed. The vibration speed is adjusted by altering the electrical voltage applied to the knife. The fresh tissue sample is immersed in fluid to prevent tearing of the material and to dissipate the heat produced during vibration.
Cryostat
In this type of microtome, cutting occurs inside a deep-freeze cabinet. The cabinet has a double glass window and a door for passing samples in and out. The inside of the cabinet has a fluorescent light and a fan; the fan provides proper cool air circulation. The chamber is held cold, commonly between -15°C and -30°C (colder for fatty tissue), by mechanical (compressor or Peltier) refrigeration, not by liquid nitrogen. It is used as an alternative to the freezing microtome. It became popular after the development of fluorescent antibody staining techniques, for making thin sections of fresh frozen tissue free of ice crystals. In effect, a cryostat is a rotary microtome housed inside a refrigerated cabinet.
Freezing microtome
This older instrument cuts frozen tissue by freezing the block directly on the stage. Classic freezing microtomes used a jet of carbon dioxide gas delivered through a flexible tube to freeze the block; some modern designs instead use a thermoelectric (Peltier) element, where current passing through paired dissimilar metals moves heat away from the stage to freeze it electrically, with no gas or liquid coolant needed. Freezing microtomes produce usable frozen sections but with less consistency and flatness than a modern cryostat, which is why cryostats have largely replaced them for diagnostic frozen sections.
Ultramicrotome
This instrument obtains ultrathin sections, typically 50 to 100 nanometers (0.05 to 0.1 micrometers), for the transmission electron microscope. It uses a diamond or glass knife. The embedded specimen is first trimmed to a very small block face (around 1 by 1 millimeter), then sectioned. The ultramicrotome itself carries a stereo microscope so the operator can watch the sections form; the finished ultrathin sections are floated onto a small water-filled boat at the knife edge and picked up on a metal grid for the electron microscope. Its advance mechanism is either thermal or mechanical. In the thermal mechanism, the specimen arm is heated to induce a controlled expansion that feeds the block forward; in mechanical advancement, a microprocessor coupled to a precise stepping motor feeds the block for even, reproducible sections.
Computerized microtome
An automated design with an advanced thermostatic switch, cryo-scalpel, cryoplate, and semiconductor freezing. It cuts sections in the range of 1 to 25 μm and can carry out both freezing and routine paraffin sectioning. It operates once the technical staff feed in the required section size and number. The cryo-scalpel and cryoplate temperatures range from 0°C to -18°C and -10°C to -40°C, respectively.
Laser microtome
This design cuts biological specimens using a laser, giving non-contact sectioning without thermal damage and very precise slices. An infrared laser beam with a short pulse duration is used, so there is almost no heat generation. Depending on the type, the tissue is sliced at about 5 to 100 μm, and it can cut tissue in its native state without prior embedding.
How a Section Is Cut: The Sectioning Steps
Most routine histology uses a rotary microtome and paraffin-embedded tissue. The sequence below is the standard workflow.
1. Trim (rough facing). Set a thicker cut, around 15 to 30 micrometers, and advance the block until the full tissue face is exposed and flat. This removes excess wax and reaches the plane of the tissue.
2. Cool the block. Place the trimmed block face-down on a cold plate or ice for a few minutes. Chilled wax is firmer and cuts cleaner, giving flatter sections with less compression. This single step prevents many sectioning faults.
3. Set the section thickness. Return to the routine setting, usually 3 to 5 micrometers for paraffin. Thinner sections (2 to 3 micrometers) suit cellular detail such as renal or hematolymphoid work; thicker are rarely needed in routine practice.
4. Check the clearance angle. The knife sits at a small clearance angle (commonly 3 to 8 degrees) so that only the cutting edge, not the whole bevel, contacts the block. Too little angle and the block face rubs and compresses; too much and the knife digs and chatters.
5. Cut the ribbon. Turn the handwheel at a smooth, steady speed. Successive sections adhere edge to edge and form a ribbon. A steady rhythm matters more than speed; jerky turning produces uneven thickness.
6. Float and mount. Transfer the ribbon to a warm water bath (around 40 to 45 degrees Celsius, below the wax melting point). The warmth relaxes and flattens the section. Pick it up onto a clean slide, drain, and dry.
7. Between blocks. Wipe the knife, move to a fresh area of the edge if it has dulled, and re-check the block is clamped tight before the next specimen.
For frozen sections, the same logic applies inside a cryostat: the chamber and block are held cold (typically -15 to -25 degrees Celsius depending on tissue fat content), and an anti-roll plate replaces the water bath to keep the section flat as it is cut.
Uses of Microtome
Microtome is used in different laboratories to study other tissues’ histopathology (animal and plant). Different types of microtomes are used in various laboratories for different purposes.
- In ophthalmology, sledge microtome helps study tissue sections of the eyes.
- Sliding microtome helps in sectioning brain tissues better by this type of microtome.
- Cryomicrotome is used in nerve biopsy.
- Rocking, rotary, hand, and vibrating microtome is helpful in general biological laboratories for studying tissue sections embedded in paraffin. It is also used in performing a small biopsy.
- Sledge microtome is also helpful in the study of tissues embedded in celloidin.
- Electron microscopy requires ultrathin sections, so the ultramicrotome produces slices of about 50 to 100 nanometers for transmission electron microscopy.
Advantages
Sectioning of tissue using blades and knives may prove to be difficult because of the preservation methods used. Some tissues are preserved in paraffin blocks, which can be hard to cut into thin pieces. Likewise, frozen specimens prove to be very difficult to cut. The use of microtomes may help in achieving thin slices of biological samples.
Besides helping cut thin slices of biological specimens, its different types carry different advantages. The advantages of different kinds of microtomes are as follows:
- Laser microtome helps obtain non-contact processing of the tissue and cut the tissue in its native forms without thermal damage. It also enables secure sub-micrometer precision, is less time-consuming, and has fewer artifacts.
- Rocking microtome is easy to operate, requires low maintenance, and is relatively inexpensive.
- Sledge microtome helps in cutting hard and large tissue.
- Like sledge microtome, sliding microtome helps in cutting large tissues. It is easy to operate and inexpensive. It is also applicable for tissue embedded in celloidin.
- Ultramicrotome helps obtain ultra-thin slices of the tissue specimens for observation under an electron microscope.
- Cryomicrotome and freezing microtome help obtain a thin slice of the freshly frozen specimens.
Disadvantages of Microtome
Although the microtome is a handy instrument, microtome has some disadvantages depending on the type of microtome used. Some of them are:
- Some microtomes are expensive. Cryostat, Ultramicrotome, and laser microtome are some of the expensive instruments. One must be mindful of purchasing the right kind of microtome.
- Some are lightweight so that they can be unsteady. The rocking microtome is one of the lightest microtomes, which can cause vibration, which leads to uneven tissue sectioning.
- Most of them require a skilled workforce. Since many commonly used microtomes are manually operated, the technical staff managing these must be experienced to obtain even thin sections.
- Without much care, the blades of the microtome may lead to accidents. Sharpening and fixing of edges may lead to accidents in the laboratory. The accidents can be avoided if the procedure of tissue sectioning is done carefully.
How to Remember
Every microtome is knife + block + advance. Whatever the type, it holds a knife, holds a block, and advances one by a set distance before each cut. The type just changes which one moves and how it is cooled.
The type is chosen by the tissue's state, not the tissue's organ. Paraffin block, room temperature? Rotary. Frozen, need it in minutes? Cryostat. Resin block for the electron microscope? Ultramicrotome. Huge or very hard block? Sledge. Match the microtome to how the tissue is prepared.
Cold block, warm bath. The two temperature rules that fix most problems: chill the block before cutting (firm wax cuts clean), float the ribbon on a warm bath just below the wax melting point (to relax and flatten it). Cold to cut, warm to flatten.
Read the failure. Chatter means something is loose. Compression means the knife is dull or the block is warm. Alternating thick and thin means the block clamp is loose. The fault names its cause.
Where students get confused
"Thinner sections are always better." No. Routine histology is 3 to 5 micrometers because that gives one clean layer of cells with enough contrast. Cutting too thin loses staining intensity and tears fragile tissue. Thickness is chosen for the tissue and the question, not minimized for its own sake.
Cryostat vs freezing microtome. They are not the same. The cryostat is essentially a rotary microtome inside a refrigerated cabinet and is what modern labs use for rapid frozen sections. The freezing microtome is the older stand-alone instrument (CO2 or Peltier cooled) that it replaced. Exam questions test whether you know the cryostat is the current standard.
Ultramicrotome units. Ultrathin sections are measured in nanometers (50 to 100 nm), not micrometers. A routine paraffin section (3 to 5 µm) is roughly fifty times thicker than a TEM section. Mixing up the units is a common slip.
"The dial thickness is the section thickness." The dial sets the advance distance, but the actual section thickness also depends on a tight block, a sharp knife, and steady turning. A loose block gives sections thinner or thicker than the dial says, which is why alternating thick-thin sections point to a clamping fault, not a dial error.
Clearance angle is not the knife's sharpness. The clearance angle is how the whole knife is tilted relative to the block, not how sharp the edge is. A perfectly sharp knife at the wrong clearance angle still compresses or chatters.
References
- Dey P. Tissue Microtomy: Principle and Procedure. In: Basic and Advanced Laboratory Techniques in Histopathology and Cytology. Singapore: Springer; 2018. https://doi.org/10.1007/978-981-10-8252-8_5
- Mohammed F, Thapasum Fairozekhan A, Mohamed S. Microtomes and microtome knives. Annals of Dentistry. 2012;19:62-65. https://doi.org/10.22452/adum.vol19no2.4
- McMillan DB, Harris RJ. Introduction. In: An Atlas of Comparative Vertebrate Histology. Academic Press; 2018. p. ix-xxix. https://doi.org/10.1016/B978-0-12-410424-2.00018-4
- Suvarna SK, Layton C, Bancroft JD, editors. Bancroft's Theory and Practice of Histological Techniques. 8th ed. Elsevier; 2019.

Tankeshwar Acharya, MSc (Medical Microbiology)
Tankeshwar Acharya is an Assistant Professor in the Department of Microbiology at Patan Academy of Health Sciences (PAHS), Nepal, where he has been teaching and practicing clinical microbiology for over 14 years. He is the founder of Microbe Online, one of the leading free microbiology education resources on the web, covering bacteriology, mycology, parasitology, immunology, and clinical laboratory diagnostics written from direct experience in both the classroom and the diagnostic laboratory.
Comments
No comments yet. Be the first to share your thoughts.
Leave a comment
All comments are reviewed before they appear.