
Pour Plate Method: Principle, Procedure, Uses, Advantages, and Disadvantages

On this page
A food technologist receives a batch of pasteurized milk from a dairy and needs to determine the total viable bacterial count (TVC); a regulatory requirement before the product can be released for sale. The sample likely contains heat-tolerant organisms that survived pasteurization at low concentrations. The technologist needs to enumerate them precisely across a known volume, without any prior isolation step.
The pour plate method is the standard technique for this application: it mixes the inoculum directly with cooled molten agar before pouring, allowing colonies to develop throughout the depth of the medium as well as on the surface; effectively increasing the volume sampled per plate compared to the spread plate technique.
Pour plate method is usually the method of choice for counting the number of colony-forming bacteria present in a liquid specimen. Because the sample is mixed with the molten agar medium, a larger volume can be used than the spread plate.
Principle
In the pour plate method, a fixed amount of inoculum (generally 1 ml) from a broth/sample is placed in the center of a sterile Petri dish using a sterile pipette. Molten cooled agar (approx. 15mL) is then poured into the Petri dish containing the inoculum and mixed well.
After the agar solidifies, the plate is inverted and incubated for 24–48 hours. For food and dairy total viable counts, the standard incubation is 30–35°C (per APHA/ISO methods); for clinical isolates, 35–37°C is used. Choose the temperature to match the target organisms and the standard you are following.
Microorganisms will grow both on the surface and within the medium. Colonies that grow within the medium are generally small and may be confluent; the few that grow on the agar surface are larger and resemble those on a streak plate. Each (both large and small) colony is carefully counted (using magnifying colony counter if needed). Each colony represents a “colony-forming unit” (CFU).
The number of microorganisms in the original sample is calculated as:
CFU/mL = colonies counted × (reciprocal of the dilution) ÷ volume plated (mL)
The "reciprocal of the dilution" is the number you multiply back by to undo the dilution: for a 10⁻⁴ dilution, that is 10⁴. The worked example below shows the full calculation, and the common notation trap is explained under "Where Students Get Confused."
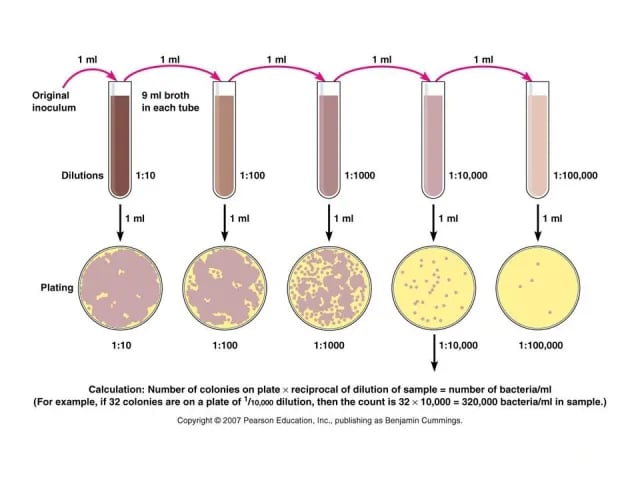 Figure: Pour plate technique
For accurate counts, the optimum count should be within 30-300 colonies/plate. To ensure a countable plate, plate a series of dilutions. The pour plate is a quantitative counting method, unlike the streak plate, which isolates but does not count. Compared with the spread plate, the pour plate samples a larger volume (1.0 mL versus 0.1 mL) but tends to give a slightly lower count, because some heat-sensitive organisms die on contact with the molten agar.
Uses of the Pour plate method
The pour plate technique can determine the number of microbes/mL in a specimen. It has the advantage of not requiring previously prepared plates and is often used to assay bacterial contamination of foodstuffs.
Materials and Equipment
- Test sample
- Plate count agar (PCA) or nutrient agar
- Water bath holding molten agar at 45–50°C
- Sterile Petri dishes
- Flame
- Colony counter with a magnifying glass
- Sterile capped 16 × 150 mm test tubes
- Pipettes of various sizes (e.g., 0.1, 1.0, and 2.0 mL)
Procedure of Pour plate technique
- Prepare the dilution of the test sample expected to contain between 30-300 CFU/mL by following serial dilution technique.
- Inoculate the labeled empty Petri dish with 1.0 mL of the diluted specimen (the pour plate typically uses 1.0 mL; 0.1 mL is the spread-plate volume).
Pouring the molten agar and incubation
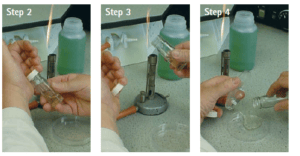 Figure: Pouring the molten agar medium
- Collect one bottle of sterile molten agar *(containing 15 mL of melted Plate Count Agar or any other standard culture media)*from the water bath (45°C).
- Hold the bottle in the right hand; remove the cap with the little finger of the left hand.
- Flame the neck of the bottle.
- Lift the lid of the Petri dish slightly with the left hand and pour the sterile molten agar into the Petri dish and replace the lid.
- Flame the neck of the bottle and replace the cap.
- Gently swirl the plate on the benchtop to thoroughly mix the culture and medium. Ensure the medium covers the plate evenly, and do not slop the agar over the edge of the Petri dish.
- Allow the agar to gel completely without disturbing it. It will take approximately 10 minutes.
- Seal and incubate the plate in an inverted position for 24–48 hours at the temperature appropriate to the sample (30–35°C for food and dairy counts; 35–37°C for clinical isolates).
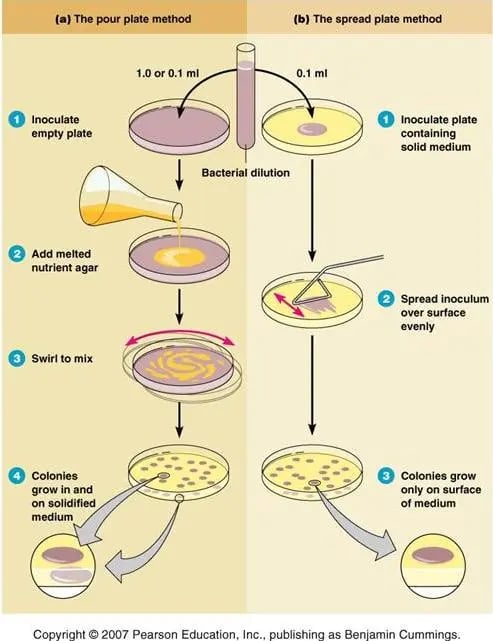 Figure: Overview of Pour plate method and spread plate method
Results
After 24-48 hours, count all the colonies (note that the embedded colonies will be much smaller than those on the surface). A magnifying colony counter can aid in counting small embedded colonies.
Calculate CFU/mL using the same formula: CFU/mL = colonies counted × (reciprocal of the dilution) ÷ volume plated (mL)
Worked example: suppose the plate made from the 10⁻⁴ dilution yielded 32 colonies, and 1 mL was plated. The reciprocal of a 10⁻⁴ dilution is 10⁴, so:
CFU/mL = 32 × 10⁴ ÷ 1 = 3.2 × 10⁵ CFU/mL in the original sample.
Advantages of the Pour Plate Method
- Larger sample volume. Because the inoculum (usually 1.0 mL) is mixed into the agar rather than spread on top (0.1 mL for a spread plate), the pour plate samples about ten times more volume per plate, making it more sensitive for detecting organisms present in low numbers.
- No pre-prepared or pre-dried plates needed. The agar is poured at the time of plating, so plates do not have to be prepared and dried in advance, unlike the spread plate.
- Suitable for enumerating facultative anaerobes and microaerophiles. Colonies embedded in the depth of the agar grow under reduced-oxygen conditions, so organisms that prefer lower oxygen can be counted.
- Good reproducibility for total viable counts. It is the standard method for total viable counts of liquids such as milk, water, and food homogenates, where a precise count across a known volume is required.
Disadvantages of Pour plate method
- Preparation for the pour plate method is time-consuming compared with the streak plate/and or spread plate technique.
- Loss of viability of heat-sensitive organisms coming into contact with hot agar. The organism to be counted must be able to withstand brief exposure to the temperature of molten agar (∼45°C to 50°C)
- Embedded colonies are much smaller than those which happen to be on the surface. Thus, one must be careful to count these so that none are overlooked.
- The reduced growth rate of obligate aerobes in the depth of the agar.
Pour Plate vs Spread Plate: Choosing the Right Method
Both methods quantify bacteria from a diluted sample, but they differ in procedure, colony appearance, and optimal application:
| Feature | Pour Plate | Spread Plate |
|---|---|---|
| When inoculum added | Before agar pours, mixed into molten agar | After agar solidifies, spread on surface |
| Colony location | Both within agar (subsurface) AND on surface | Surface only |
| Colony appearance | Surface colonies: normal size; subsurface: small, lenticular (lens-shaped) | All colonies normal size and surface-type |
| Volume plated | 1.0 mL (larger volume → more sensitive for low counts) | 0.1 mL (smaller volume → less sensitive) |
| Heat effect | Molten agar (~45°C) may kill heat-sensitive organisms | No heat effect, inoculum never exposed to molten agar |
| Anaerobes | Subsurface colonies grow anaerobically so suitable for anaerobe counting | Surface only, aerobic conditions |
| Pre-dried plates needed | No | Yes. Plates must be pre-dried to absorb 0.1 mL without pooling |
| Best for | Food microbiology TVCs; anaerobe enumeration; low-count samples | Water microbiology; fecal coliforms; heat-sensitive organisms |
Key practical difference: The pour plate's larger inoculum volume (1.0 mL vs 0.1 mL) gives it a 10-fold sensitivity advantage for detecting low-count organisms. However, subsurface colonies are smaller and harder to pick for further testing. Spread plate colonies are all full-size and accessible.
How to Remember
Pour plate = agar poured ONTO the inoculum. Spread plate = inoculum spread ONTO solidified agar. The sequence difference determines everything; colony location, heat exposure, volume used.
The 45–50°C critical window: agar sets at about 40 to 42°C and stays liquid above 50°C, so pour plates work in the narrow band that is hot enough to pour but cool enough not to kill most bacteria.
Count both colony types together. The small lens-shaped (lenticular) subsurface colonies are normal, not contamination, and are the same organisms as the larger surface colonies. Both must be counted together for the total viable count.
Where Students Get Confused
- 10⁻⁴ vs 10⁴, the notation trap. The dilution is written 10⁻⁴ (a ten-thousand-fold dilution). The number you multiply the colony count by is its reciprocal, 10⁴. Students often write "10⁴ dilution," which is wrong. Dilute by 10⁻⁴, multiply back by 10⁴.
- "The little colonies are contamination." No. The small lens-shaped colonies inside the agar are the same organisms as the big surface ones, just confined by the agar. They are counted, not discarded. Missing them undercounts the sample.
- "Counting only the surface colonies." The whole point of the pour plate is that colonies grow throughout the depth. Count surface and subsurface colonies together for the total viable count. Counting only the surface defeats the method.
- "Hotter agar grows more, so pour it hot." Backwards. Agar above 50°C kills the bacteria you are trying to count before it sets, giving falsely low or empty plates. Pour in the 45–50°C window, not hotter.
- "Confusing pour-plate and spread-plate volumes." Pour plate uses 1.0 mL mixed into the agar; spread plate uses 0.1 mL on the surface. Plating the wrong volume throws the final CFU/mL off by tenfold.
- "Reading plates outside the 30–300 window." A plate with fewer than 30 or more than 300 colonies is not counted; run more dilutions. Counting an over-crowded plate always undercounts because merged colonies read as one.
Key exam facts
| Concept | Key exam fact and why it holds |
|---|---|
| What it is | A viable count method where the inoculum is mixed into molten agar before it sets, so colonies grow both within the agar and on its surface. |
| Sequence (vs spread plate) | Pour plate: agar poured onto the inoculum in an empty dish. Spread plate: inoculum spread onto set agar. The order determines colony location, heat exposure, and volume. |
| Volume plated | 1.0 mL (about ten times the spread plate's 0.1 mL), which is why the pour plate is more sensitive for low counts. |
| Agar temperature | Pour in the 45–50°C window: hot enough to stay liquid, cool enough not to kill most bacteria. Above 50°C causes thermal killing; below 42°C it sets too soon. |
| Countable range | 30–300 colonies per plate. Fewer is statistically unreliable; more merge and undercount. Run a dilution series to land in range. |
| CFU/mL formula | CFU/mL = colonies counted × (reciprocal of the dilution) ÷ volume plated. For a 10⁻⁴ dilution, multiply by 10⁴. |
| Colony appearance | Surface colonies: normal size and shape. Subsurface: small, lens-shaped (lenticular). Both are the same organism and both are counted. |
| Incubation | 24–48 hours; 30–35°C for food and dairy counts, 35–37°C for clinical isolates. |
| Key advantage | Larger sample volume and no pre-dried plates needed; can enumerate lower-oxygen-preferring organisms in the agar depth. |
| Key limitation | Heat-sensitive organisms may die in the molten agar, so counts run slightly lower than the spread plate for stressed or fragile cells. |
| Best used for | Total viable counts of liquids: milk, water, and food homogenates. |
References and further readings
- Sanders, E. R. (2012). Aseptic laboratory techniques: plating methods. Journal of Visualized Experiments, (63), e3064. https://doi.org/10.3791/3064
- Madigan, M. T., Bender, K. S., Buckley, D. H., Sattley, W. M., & Stahl, D. A. (2021). Brock Biology of Microorganisms (16th ed.). Pearson.
- Sutton, S. (2011). Accuracy of plate counts. Journal of Validation Technology, 17(3), 42–46.
- Society for General Microbiology. (2001). Basic Practical Microbiology: A Manual. SGM.

Tankeshwar Acharya, MSc (Medical Microbiology)
Tankeshwar Acharya is an Assistant Professor in the Department of Microbiology at Patan Academy of Health Sciences (PAHS), Nepal, where he has been teaching and practicing clinical microbiology for over 14 years. He is the founder of Microbe Online, one of the leading free microbiology education resources on the web, covering bacteriology, mycology, parasitology, immunology, and clinical laboratory diagnostics written from direct experience in both the classroom and the diagnostic laboratory.
Comments
No comments yet. Be the first to share your thoughts.
Leave a comment
All comments are reviewed before they appear.