
McIntosh and Fildes' Anaerobic Jar: Principle, Procedure, and Uses
McIntosh and Fildes' anaerobic jar achieves anaerobiosis by evacuating air and replacing it with H₂/CO₂/N₂. Residual oxygen is removed by palladium catalyst. Learn the step-by-step procedure, how to verify anaerobiosis, and how it compares to the GasPak system.

On this page
A reference laboratory receives a pus specimen from a patient with a liver abscess. Direct Gram stain shows gram-negative rods. After 48 hours, aerobic blood agar shows no growth. The anaerobic jar cultures, however, grow Bacteroides fragilis, an obligate anaerobe killed within minutes by atmospheric oxygen. Without the sealed anaerobic environment of the jar, the causative organism would never have been isolated and appropriate metronidazole therapy would not have been guided by culture results.
Anaerobic jars are the workhorses of anaerobic bacteriology in most clinical laboratories. Understanding the McIntosh-Fildes jar (the original and most mechanistically transparent design) provides the conceptual foundation for understanding all subsequent anaerobic systems.
McIntosh and Fildes' anaerobic jar is one of the classical methods for generating anaerobic conditions in a clinical or research microbiology laboratory. First described by McIntosh and Fildes in 1921, it achieves complete anaerobiosis through a two-stage process: evacuation of atmospheric air followed by replacement with a mixture of hydrogen, CO₂, and nitrogen, with residual oxygen removed catalytically.
The method remains in active use in many laboratories, particularly in settings where gas cylinder supply is reliable, where large numbers of plates must be processed simultaneously, or where the reusable jar system is more cost-effective per run than commercial single-use sachets. Where neither gas supply nor vacuum pump is available, the GasPak system offers a more convenient alternative.
About the equipment
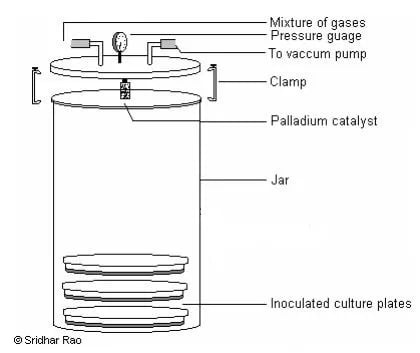 Figure: McIntosh and Fildes’ Jar
McIntosh and Fildes’ jar consists of a 85 inch (2012.5 cm) jar of stout glass or metal with a tight-fitting metal lid. The lid can be clamped airtight with a screw and is fitted with two tubes with taps, one for the introduction of the gas inside (inlet) and the other as an outlet for the vacuum valve. The lid also contains two terminals that can be connected to an electric supply. A capsule containing alumina pellets coated with palladium (palladinised alumina) is suspended under the lid by stout wires which are connected with the terminals to heat the catalyst for its activity. Nowadays, catalysts that are active at room temperature are also available.
Principle
McIntosh and Fildes’ anaerobic jar works on the principle of evacuation and replacement, where the air inside the chamber is evacuated and replaced with mixture of gases (consisting of 5% CO2, 10% H2, and 85% N2).It is practically impossible to evacuate all the air so some amount of oxygen will still be left behind. The residual oxygen left behind is converted to water using spongy palladium or platinum catalyst. The catalyst acts as a catalyzing agent causing slow combination of hydrogen and oxygen to form water. Reduced methylene blue is generally used as an indicator (mixture of NaOH, methylene blue, and glucose). It becomes colorless anaerobically but regains blue color on exposure to oxygen.
Procedure
- Keep the inoculated culture plates inside the jar along with an indicator.
- Screw tight the lid
- Close the inlet tube and connect outlet tube to a vacuum pump (at least three quarters of the air of the jar can be removed).
- Note the pressure on a vacuum gauze and when the pressure is reduced to 100 mm Hg (i.e., 600 mm below atmospheric), tightly close the outlet tap.
Understanding the vacuum gauge reading: Atmospheric pressure is 760 mmHg. When the gauge reads 100 mmHg, the absolute pressure inside the jar has been reduced to 100 mmHg; meaning approximately 87% of the air has been removed (600 mmHg reduction from 760 mmHg). The instruction "reduce to 100 mmHg (600 mm below atmospheric)" means the gauge reading is 100 mmHg absolute, not that 100 mmHg has been removed. This distinction matters when reading the gauge, aim for a gauge reading of 100 mmHg, not a reduction of 100 mmHg. - Connect the inlet tap is to a hydrogen supply and then open it. Hydrogen is passed through a small wash bottle.
- Bring the reduced pressure up to 760 mm Hg (i.e., atmospheric) by monitoring the vacuum gauze as 0.
- Switch on the electric terminals for heating the palladinised crystal (When room temperature catalyst is used heating is not required). The catalyst helps the combination of hydrogen and residual oxygen to form water. This process is allowed to continue for 20 minutes.
- Incubate the McIntosh and Fildes’ jar in an incubator at 37°C for 48 hours.
Monitoring efficacy of anaerobiosis
Reduced methylene blue indicator is used to check the efficacy of anaerobiosis. A tube containing reduced methylene blue solution had to kept inside the jar along with the culture plates. Methylene blue is colorless in reduced conditions and turns blue when oxidized.
Advantages and Disadvantages
| Advantages | Disadvantages |
|---|---|
| Reusable jar, lower cost per run over time | Requires vacuum pump (expensive, requires maintenance) |
| Large capacity, accommodates many plates simultaneously | Requires hydrogen gas cylinder. Safety risk; supply dependency |
| Mechanistically reliable, evacuation ensures thorough O₂ removal | More complex procedure than GasPak: more steps, more failure points |
| Catalyst can be reactivated by heating (160°C, 2h) | Electric supply required for heated catalyst (unless room-temperature catalyst used) |
| Original validated method, well-documented performance | Bulky equipment, not portable |
| Suitable for strict anaerobes requiring thorough anaerobiosis | Hydrogen leak risk if fittings deteriorate |
McIntosh-Fildes vs GasPak: Which to Choose?
| Feature | McIntosh-Fildes Jar | GasPak System |
|---|---|---|
| Principle | Evacuation + gas replacement + catalysis | Chemical sachet generates H₂ + CO₂; catalysis removes residual O₂ |
| Equipment required | Jar + vacuum pump + H₂ cylinder + electric supply | Jar + commercial sachet only |
| Anaerobiosis quality | Excellent, thorough evacuation | Excellent, equivalent results |
| Cost per run | Low (reusable; only gas cost) | Moderate (sachet per use) |
| Setup complexity | More complex (multiple steps) | Simple (add sachet, seal, incubate) |
| Portability | No | Yes. No gas or electrical supply needed |
| Capacity | Large (multiple plates) | Standard jar capacity |
| Catalyst reactivation | Yes. Heat at 160°C for 2h | Replace sachet, not reusable |
| Best for | High-volume labs with gas/pump infrastructure | Routine labs; resource-limited settings without gas supply |
For the full GasPak procedure and sachet mechanism, see: GasPak Anaerobic System
Troubleshooting
| Problem | Likely Cause | Action |
|---|---|---|
| Methylene blue indicator remains blue after incubation | Insufficient vacuum; gas leak; catalyst failure | Check jar seal and tap tightness; verify vacuum gauge reading; regenerate catalyst (heat at 160°C for 2h); check H₂ supply |
| Anaerobic organisms fail to grow despite blue indicator turning colorless | Plates exposed to air during inoculation; too long between inoculation and jar sealing | Inoculate and seal jar within 15–20 minutes; pre-reduce plates before use for strict anaerobes |
| Vacuum cannot be achieved | Tap or seal failure; cracked jar | Check all taps and O-rings; inspect jar for cracks; replace faulty components |
| Condensation flooding jar | Hydrogen gas not dried through wash bottle | Ensure H₂ passes through wash bottle with water before entering jar |
| Catalyst inactive (no heat generation) | Catalyst poisoned by H₂S or volatile substances | Replace palladinised alumina; do not use with H₂S-producing cultures if possible |
| Explosive risk | H₂ leak | Never use open flame near jar during H₂ filling; check all connections before gas introduction |
Safety note: Hydrogen gas is flammable and explosive at concentrations of 4–75% in air. All connections must be checked before introducing H₂. No open flames in the vicinity.
How to Remember: McIntosh-Fildes Jar
"Evacuate, Replace, Catalyze" — three steps in sequence:
- Evacuate: vacuum pump removes ~87% of air (gauge reads 100 mmHg)
- Replace: hydrogen + CO₂ + N₂ mixture fills the evacuated space
- Catalyze: palladium catalyst combines residual H₂ + O₂ → water
The indicator rule is same as all anaerobic systems: Methylene blue colorless = reduced = anaerobic conditions achieved ✓ Methylene blue blue = oxidized = O₂ still present (do not proceed)
The catalyst memory: Palladium is the catalyst. It can be poisoned (by H₂S, volatile substances) and must be regenerated by heating at 160°C for 2 hours. A poisoned catalyst is the most common reason for failed anaerobiosis despite correct procedure.
Key Exam Facts in One Table
| Feature | Detail |
|---|---|
| Named after | James McIntosh and Paul Fildes (1921) |
| Principle | Evacuation and replacement — air evacuated; replaced with H₂ + CO₂ + N₂; residual O₂ removed by catalyst |
| Gas mixture used | 10% H₂ + 5% CO₂ + 85% N₂ |
| Vacuum target | 100 mmHg absolute (600 mmHg below atmospheric), removes ~87% of air |
| Catalyst | Palladinised alumina (palladium-coated aluminium oxide), heated or room temperature type |
| Catalyst reaction | H₂ + O₂ → H₂O (water) |
| Catalyst regeneration | Heat at 160°C for 2 hours if poisoned |
| Indicator | Reduced methylene blue — colorless = anaerobic; blue = O₂ present |
| Incubation | 37°C for 48 hours (or longer for slow-growing anaerobes) |
| Advantage over GasPak | Reusable; higher capacity; lower cost per run in high-volume labs |
| Disadvantage vs GasPak | Requires vacuum pump + H₂ cylinder + electric supply |
| Safety concern | H₂ is flammable (4–75% explosive range), no open flames; check connections |
References
- Fildes, P., & McIntosh, J. (1921). An Improved Form of McIntosh and Fildes’ Anaërobic Jar. British journal of experimental pathology, 2(3), 153–154.
- Saha, U. S., Misra, R., Tiwari, D., & Prasad, K. N. (2016). A cost-effective anaerobic culture method & its comparison with a standard method. The Indian journal of medical research, 144(4), 611–613. https://doi.org/10.4103/0971-5916.200881
- Forbes BA, Sahm DF, Weissfeld AS. Bailey & Scott's Diagnostic Microbiology. 14th ed. Elsevier; 2023.
- Murray PR, Rosenthal KS, Pfaller MA. Medical Microbiology. 9th ed. Elsevier; 2020.
- Garcia LS. Clinical Microbiology Procedures Handbook. 4th ed. ASM Press; 2016.

Tankeshwar Acharya, MSc (Medical Microbiology)
Tankeshwar Acharya is an Assistant Professor in the Department of Microbiology at Patan Academy of Health Sciences (PAHS), Nepal, where he has been teaching and practicing clinical microbiology for over 14 years. He is the founder of Microbe Online, one of the leading free microbiology education resources on the web, covering bacteriology, mycology, parasitology, immunology, and clinical laboratory diagnostics written from direct experience in both the classroom and the diagnostic laboratory.
Comments
No comments yet. Be the first to share your thoughts.
Leave a comment
All comments are reviewed before they appear.