pH Meter: How Calibration Actually Works and Why Your Reading Drifts
Why a pH meter needs two buffers not one, what the slope really tells you, and how to fix a reading that will not stabilize. The calibration logic behind the button.
A student needs Mueller-Hinton broth at pH 7.3 for a sensitive assay. They switch on the pH meter, dip the probe, and it reads 7.28. Close enough, they think, and move on. The plates fail. The meter was not broken and the student was not careless. The meter had simply not been calibrated that day, and a one-point check would have shown the electrode was reading half a pH unit low across the range.
This is the gap between a pH meter and a pH reading you can trust. The instrument does not measure pH directly. It measures a voltage and then relies on a calibration you performed to translate that voltage into a number. If the calibration is wrong, or missing, the display is confidently wrong. Understanding what calibration actually does, and why it needs two buffers rather than one, is the difference between a reading and a guess.
A pH is a unit used to measure hydrogen ion concentration in a water-based solution. Simply, it is a scale that determines the acidity and basicity of a solution. The pH scale runs from 0 to 14, where pH 7 is neutral, pH below 7 is acidic, and pH above 7 is basic. (Strongly acidic or alkaline solutions can even fall slightly outside this range, but 0 to 14 covers almost everything you will meet at the bench.) A higher concentration of hydrogen ions in a liquid means the pH of the solution is lower. In contrast, higher pH implies the presence of less hydrogen ion concentration in a liquid. The pH of the solution is measured in two ways; a pH strip (pH indicator) and a pH meter. As the pH reading of the pH strip is not very accurate, for more accurate and precise pH reading pH meter was discovered.
A pH meter is a piece of laboratory equipment used to measure hydrogen ion concentrations (i.e., acidity and alkalinity) in a water-based solution expressed as pH. It measures the difference in electrical potential between the pH electrode and the reference electrode. Thus, the calculated difference in electrical potential relates to the pH of the solution.
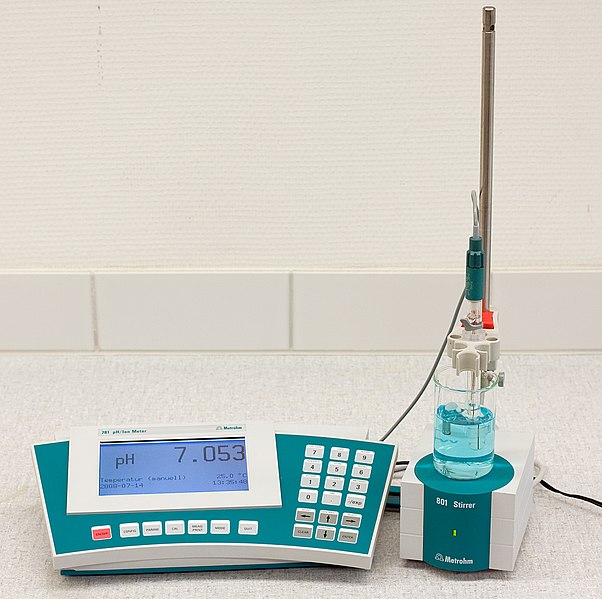 Figure: pH meter
Parts of the pH meter
pH meter consists of an electrometer, glass electrodes, reference electrodes, or combination electrodes as their major component. Previously, pH meters were designed consisting of the glass electrodes and reference electrodes separately. Later, more user-friendly pH meters were designed with the glass electrode, and reference electrode in a single probe called a combined or combination electrode.
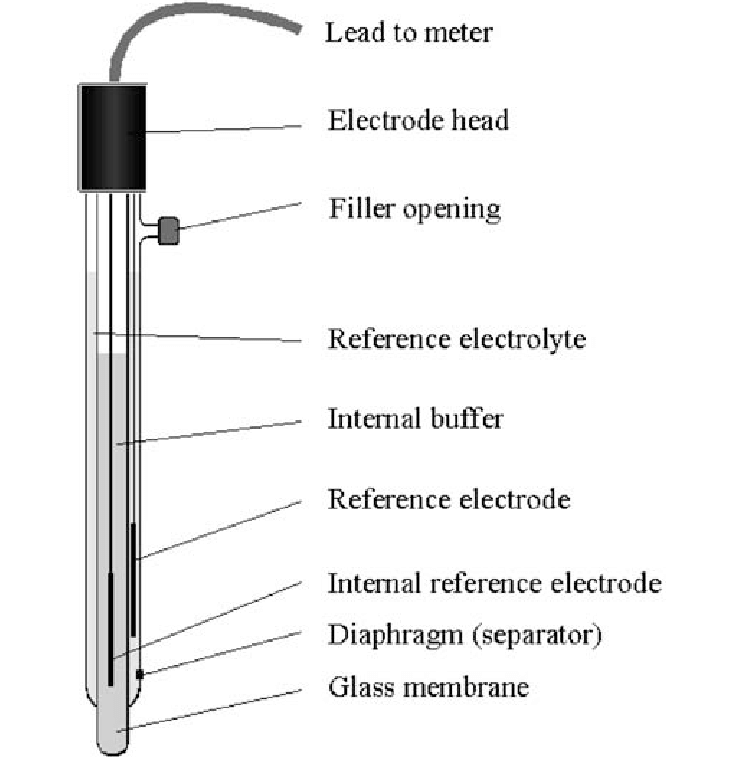 Figure: Parts of the pH meter
- Probe: The probe, designed as a three-in-one combination, consists of a glass electrode, reference electrode, and temperature probe. One end of the probe consists of a sensitive tip glass that detects the solution’s acidity or alkalinity. In contrast, another end of the probe is connected to the electronic meter that measures and displays the pH value. The temperature detector in a probe helps to detect the temperature of the solution.
Temperature matters because it changes the electrode's slope (see the Nernst equation below). Calibration buffers are defined at 25°C, so calibrating at or near 25°C is ideal. Samples themselves can be measured at other temperatures as long as the meter has automatic temperature compensation (ATC) or you record the temperature and correct for it. The probe's built-in temperature sensor exists precisely so the meter can make this correction. - Glass electrode: It is a narrow tube-like structure usually made up of glass consisting of a highly sensitive glass bulb at the end. Inside the bulb sits a silver wire coated with silver chloride (an Ag/AgCl internal reference) bathed in a fixed internal buffer, usually around pH 7 in potassium chloride solution. The glass membrane is the sensing part; the internal reference simply gives it a stable point to measure against. The glass electrode helps measure potential changes across the glass membrane.
- Reference electrode: It is a tube containing a silver wire coated with silver chloride (Ag/AgCl) immersed in a concentrated potassium chloride (KCl) filling solution. It contacts the sample through a small porous ceramic junction. Its job is to hold a fixed, stable potential regardless of the sample's pH, giving the circuit a constant reference to measure the glass electrode against. This electrode only comes in contact with the test solution through a ceramic junction. The reference electrode is used to provide a stable zero voltage connection and helps to complete the circuit. Therefore, it is insensitive to the solution’s pH.
- Electrometer/Voltmeter: It is attached to the pH electrode that can measure minimal differences in electrical potential in a circuit.
- Filling hole: It is an opening used to refill the electrolyte.
Working Principle of pH Meter
The primary working mechanism of the pH meter is based on the exchange of ions from the sample solution to the inner solution (pH seven buffer) of the glass electrode through the glass membrane that generates electric voltage. Therefore, the result of the pH meter is based on the combined relation between electric voltage, ion concentration, and pH reading.
 Figure: Working setup of pH meter
The sensing glass bulb has a thin, hydrated gel layer on both its outer and inner surfaces. When the electrode sits in a solution, hydrogen ions in that solution interact with this outer gel layer, and hydrogen ions in the fixed internal buffer interact with the inner gel layer. The two surfaces are exposed to different hydrogen ion activities, and this difference sets up a small electrical potential across the glass membrane, called the boundary potential. Importantly, hydrogen ions do not travel all the way through the glass; it is the difference in H⁺ activity on the two sides that generates the voltage.
This membrane potential is measured against the stable, unchanging potential of the reference electrode, which completes the circuit. The meter reads the voltage difference between the two and converts it to a pH value using the Nernst equation. Because the internal side is held constant, any change in the measured voltage reflects the hydrogen ion activity of the sample alone.
At 25°C, the relationship is close to ideal: the voltage changes by about 59 mV for every one-unit change in pH (this figure, the slope, matters a great deal for calibration, as you will see below). A perfect electrode reads 0 mV in pH 7 buffer and swings roughly +59 mV per unit as the sample becomes more acidic and -59 mV per unit as it becomes more alkaline.
In conclusion, it infers that a decrease in voltage means fewer hydrogen ions, a reduction in acidity, an increase in alkalinity, and an increase in pH value. In the same way, an increase in voltage means more hydrogen ions, an increase in acidity, and a decrease in pH value.
↓ voltage = less H+ /more OH – = ↓ acidity = ↑pH
↑Voltage= more H+/ less OH– = ↑ acidity = ↓pH
The Nernst equation for the electrode is:
E = E₀ − (2.303 RT / nF) × pH
where E is the measured potential, E₀ is a constant offset for the electrode, R is the gas constant, T is temperature in kelvin, n is the ion charge (1 for H⁺), and F is the Faraday constant. The term (2.303 RT/nF) is the slope; at 25°C it works out to about 59 mV per pH unit. The single most useful thing this equation tells you is that temperature sits inside the slope, which is why temperature compensation is not optional and why a reading taken at the wrong temperature drifts.
Types of pH Meter
Based on portability
- Pen tester pH meter: These types of pH meters are designed with a pH meter, display, and electrode all in one form, making them easy to transport and use. They are pocket size and usually the cheapest pH meter.
- Handheld/Portable pH meter: They are usually slightly larger than pen tester and consist of a separate electrode from the meter. Depending on pH measuring needs, its electrode can be changed.
- Benchtop/Desktop pH meter: These types of pH meters have more accuracy than other pH meters. Therefore, they are well-suited to laboratories or professionals. Similarly, they can be fitted on a desk or wall.
Based on usage
- Laboratory pH meter: This type of pH meter has a high measurement range and also gives a more accurate and precise reading
- Industrial online pH meter: They are environment-friendly, have higher efficiency, and have digitalized functions.
On the basis of modernization
- Economical pH meter
- Intelligent pH meter
- Precision pH meters are also of two types; digital and pointer pH meters.
Procedure for the operation of the pH meter
- Turn on the pH meter and wait for an adequate time for it to initialize (check your pH meter operating manual for the exact time).
- Remove the electrode from the storage solution and clean it with deionized water.
- After rinsing, blot the dry electrode with non-abrasive Kimwipes or Shurwipes to remove excess water.
- Ideally measure at or near 25°C, or use a meter with automatic temperature compensation (ATC) so it corrects the slope for the actual sample temperature.
- Place the electrode in a test solution, stir the test solution and also press the measure button to measure the pH value.
- Then, wait until the reading gets stabilized for 1 to 2 minutes.
- Once the reading gets stabilized press the measure button and record the pH value and also the temperature.
- When done, remove the electrode, rinse it with deionized water, and blot dry with a Kimwipes.
- Lastly, immerse the probe in a 3M potassium chloride storage solution.
Procedure for calibration of pH meter
Why two buffers, not one
A pH meter measures voltage and converts it to pH using a straight line: the offset (where the line crosses zero) and the slope (how steep it is). One buffer can only fix one of these. Calibrating in pH 7 alone tells the meter where zero is but says nothing about the slope, so readings far from 7 can still be wildly off.
That is why you calibrate with at least two buffers. The pH 7 buffer sets the zero point (offset). A second buffer sets the slope. Which second buffer you choose depends on your samples:
- Measuring acidic samples? Use pH 7 and pH 4.01.
- Measuring alkaline samples? Use pH 7 and pH 10.01 (some standards use pH 9.21 borate buffer instead).
- Not sure, or measuring across the range? A three-point calibration (4.01, 7.00, 10.01) is best.
The one number worth reading off every calibration: the slope. A healthy electrode reports a slope of about 95 to 105 percent (that is, close to the ideal 59 mV per pH unit). If your meter shows a slope well below 95 percent, the electrode is aging or dirty and your readings are no longer trustworthy, even if the pH 7 point looks perfect. Learning to glance at the slope after calibration is the single habit that separates reliable pH work from button-pushing.
It is essential to calibrate the pH meter with the appropriate buffer before measuring each test solution. Mainly, more than one buffer solution is required to calibrate the pH meter.
The first is always the neutral pH 7.00 buffer, which sets the zero point. The second is chosen near your expected sample: pH 4.01 for acidic samples, or pH 10.01 (or pH 9.21 borate standard) for alkaline samples. The second buffer is what sets the slope. The procedure to calibrate the pH meter includes the following;
- First, rinse the electrode with deionized water, and blot it to dry.
- Maintain the temperature of the buffer and solution at 25°C.
- Immerse the electrode in a buffer solution of pH 7 or 4. Make sure the entire electrode is immersed in a buffer solution.
- Slowly stir the buffer solution to create a homogeneous mixture.
- Enter the CAL/MEAS button to start the calibration.
- Wait for pH to stabilize and press HOLD/ENTER to stop reading for further fluctuation.
- Now the meter is calibrated.
- Finally, wash the electrode with the buffer, which is further used to determine the pH of the test sample.
Applications of pH meter
- To measure the quality of municipal drinking water, swimming pools, and rainwater.
- To measure the pH of biological fluid such as urine, blood, etc., to know the type of biological conditions.
- To know the pH of the soil to increase productivity.
- It is used in the chemical industry, neutralizing effluent in the paper, steel and pulp, pharmaceutical manufacturing, biotechnology, and petrochemical industries.
- It is used to determine the pH value of food products to maintain a high level of safety and quality.
- Also valuable for the determination of the concentration of substances by pH measurement.
- It is also used to prepare the reagents of exact pH values in microbiology laboratories.
Advantages of pH meter
- pH meters are portable and user-friendly.
- If properly handled, it can be used for a longer duration of time.
- pH meter provides highly accurate and more precise values than a pH strip.
- Do not require high installation charges. Therefore, they are cost-effective.
Limitations of pH meter
- Requires regular calibration that consumes an extra amount of time
- Electrodes must be cleaned regularly to remove deposits.
- It is equipped with a highly sensitive probe. Therefore, proper handling is required.
- Fluctuation in reading might occur due to temperature variations and carbon dioxide absorption.
- They are more expensive than pH strips.
Precautions
- Proper pH meter calibration is required by using a buffer solution of known pH.
- Always store the electrode immerging inside the storage buffer solution after use. Never leave the electrode exposed directly to the air; that might dehydrate it. If by chance the electrode gets dehydrated, soak it overnight in a storage buffer before use, but dehydration often decreases the electrode’s lifespan.
- Never leave electrodes dirty after use.
- Always clean the electrode with deionized water and wipe it gently before reading because excessive wiping of storage solution from the electrode might introduce a small charge in the glass electrode that will maximally fluctuate the task.
- Never immerse the electrode in a sticky solution like milk, agar, etc., because such solutions deposit on the surface of the glass electrode, and the electrode will stop working.
- Do not store the electrode in deionized water for a more extended time. Because the electrode has ionic properties, when dipped in water, ions leaving the electrode will try to maintain the ionic solution in water to create more equilibrium. This will deplete the pH-maintaining property of the electrode. So in a shortage of storage solution, electrodes can be stored in deionized water but not for a long time.
- The electrode should be entirely immersed in a storage buffer to avoid dehydration.
- The pH reading should be done at an appropriate temperature because temperature variations can be inaccurate.
- Constantly stir the electrodes in a test solution for proper homogenization of the mixture in order to obtain an accurate reading.
When the reading will not behave
Most pH meter problems are electrode problems, not meter problems. The common ones:
- Reading drifts and will not settle. Usually a dirty or aging glass bulb, or a clogged reference junction. Clean the electrode, check the fill solution, and recalibrate. A slope below 95 percent confirms an aging electrode.
- Sluggish, slow response. The glass bulb may be dried out. Rehydrate it overnight in storage solution (pH 4 buffer or 3M KCl), never plain water.
- Reading is offset by a fixed amount. Recalibrate. This is exactly what one-point calibration in pH 7 is for.
- Readings unstable in poorly buffered or very pure samples. Low-ionic-strength solutions (like deionized water) genuinely are hard to measure and drift by nature; stir gently and allow extra time, or use a low-ionic-strength electrode.
- Probe stored dry by mistake. A dehydrated electrode loses response. Soak overnight in storage solution before use, and accept that repeated drying shortens its life.
How to Remember
The meter measures volts, not pH. You supply the translation. This is the whole article in one line. The electrode produces a voltage; calibration is the dictionary that turns that voltage into a pH number. No calibration, no dictionary, and the display is confidently wrong.
One buffer sets zero, two buffers set the line. A single point can only tell the meter where pH 7 is. It takes a second buffer to fix the slope, the steepness of the voltage-to-pH line. That is why "calibrate with two buffers" is not fussiness, it is geometry: two points define a line.
Bracket your sample. Pick the second buffer on the same side as your sample. Acidic sample, use pH 4. Alkaline sample, use pH 10. You want your sample to sit between (or near) your calibration points, not far outside them.
Slope is the electrode's health check. After calibrating, read the slope. Near 100 percent means a healthy electrode. Well under 95 percent means it is tired, no matter how good the pH 7 point looked.
Key exam facts in one table
| Question a student actually gets asked | The answer, with the reasoning that makes it stick |
|---|---|
| What does a pH meter actually measure? | A voltage (potential difference) between the glass and reference electrodes. It converts that voltage to pH using the Nernst equation; it does not measure H⁺ directly. |
| What is the working principle? | A boundary potential across the hydrated glass membrane. Different H⁺ activity on the two sides of the bulb creates a voltage. H⁺ does not pass through the glass; the activity difference generates the potential. |
| What is the slope, and its ideal value? | The mV change per pH unit. At 25°C the ideal is ~59 mV/pH. A healthy electrode calibrates to 95 to 105 percent of this; a low slope means an aging electrode. |
| Why calibrate with two buffers? | One buffer (pH 7) sets the zero/offset; a second sets the slope. Two points define the voltage-to-pH line. One point cannot. |
| Which second buffer for which sample? | pH 4.01 for acidic samples, pH 10.01 (or 9.21 borate) for alkaline samples. Bracket the sample. |
| Why does temperature matter? | Temperature is inside the Nernst slope, so it changes mV per pH unit. Meters use automatic temperature compensation (ATC) to correct for this. |
| How should the electrode be stored? | In storage solution (pH 4 buffer or 3M KCl), never dry and never long-term in deionized water. Drying and pure water both damage the glass response. |
| Role of the reference electrode? | Provides a fixed, stable potential (Ag/AgCl in KCl) so the meter has a constant baseline to measure the glass electrode against. Insensitive to sample pH |
Where Students Get Confused
"The meter reads pH, so if it shows a number it must be right." No. The meter reads voltage and translates it using your calibration. An uncalibrated meter will still show a confident, precise, and wrong number. Precision on the display is not accuracy.
"One-point calibration in pH 7 is enough." It fixes the zero point only. Readings away from 7 can still be badly off because the slope is unset. Use at least two buffers.
"pH 7 buffer means the electrode is filled with pH 7 liquid." The internal reference buffer is near pH 7, but the KCl filling solution of the reference electrode is not "pH 7", it is a concentrated salt solution whose job is a stable potential, not a pH.
"Hydrogen ions pass through the glass." They do not. The voltage comes from the difference in H⁺ activity on the two sides of the hydrated glass, not from ions travelling through it. This is the corrected modern explanation; the older "ion exchange through the membrane" wording is inaccurate.
"I must always measure at exactly 25°C." Calibration buffers are defined at 25°C, but samples can be read at other temperatures if the meter has ATC or you record and correct for temperature. The probe's temperature sensor exists for exactly this.
"Store the probe in distilled water to keep it clean." This is one of the most common electrode-killers. Pure water pulls ions out of the electrode and degrades its response. Store in pH 4 buffer or 3M KCl.
References
- Iowa State University, Holme Group. pH meter instrument guide.
- Instrument Choice. What types of pH meters are there?
- Mettler Toledo. A Guide to pH Measurement: Theory and Practice of Laboratory pH Applications.
- Skoog DA, West DM, Holler FJ, Crouch SR. Fundamentals of Analytical Chemistry. (Glass electrode, boundary potential, and the Nernstian response.)
- 5. Bailey & Scott's Diagnostic Microbiology. 15th ed. St. Louis: Elsevier; 2022. (Reagent and culture media pH adjustment in the laboratory.)
Frequently Asked Questions
Why does a pH meter need to be calibrated with two buffers instead of one?
Which calibration buffers should I use?
What is the slope, and what value is healthy?
Does the pH meter measure hydrogen ions directly?
Can I measure pH at temperatures other than 25°C?
How should I store the electrode?
Why is my pH reading drifting and not stabilizing?

Tankeshwar Acharya, MSc (Medical Microbiology)
Tankeshwar Acharya is an Assistant Professor in the Department of Microbiology at Patan Academy of Health Sciences (PAHS), Nepal, where he has been teaching and practicing clinical microbiology for over 14 years. He is the founder of Microbe Online, one of the leading free microbiology education resources on the web, covering bacteriology, mycology, parasitology, immunology, and clinical laboratory diagnostics written from direct experience in both the classroom and the diagnostic laboratory.