
Hot Plate: Parts, Types, Uses, and Hot Plate vs. Bunsen Burner and Stirrer

On this page
A technician sets a flask of nutrient agar on a hot plate turned to maximum to melt it quickly, the way you would rush a pot on a stove. The agar at the bottom scorches and browns before the top has melted, the batch is discarded, and an hour is lost. A hot plate is not a stove: it heats by direct contact from the bottom up, so the surface touching the plate always runs hottest. Understanding that one fact, and knowing when a hot plate is the wrong tool entirely, is what separates using it from ruining a batch of media with it.
A hot plate is a portable tabletop machine that uniformly heats solutions and materials. They are safer than the bunsen burner because they do not consist of open flame but instead consist of the hot plate only.
Most laboratory hot plates reach a maximum surface temperature of around 350°C. Because the surface can far exceed the boiling and flash points of common solvents, hot plates are not used to heat volatile flammable liquids such as diethyl ether, acetone, pentane, or hexane, which can ignite. Many hot plates also include a built-in magnetic stirrer to mix liquids automatically while heating.
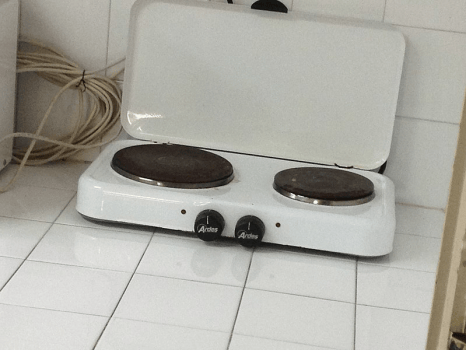 Figure: A Hot Plate
Parts of Hot Plate
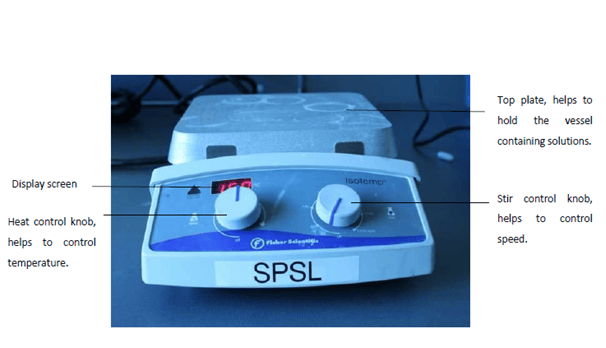 Figure: Parts of Hot Plate
A hot plate is a simple device consisting of a flat surface with a heating element. It consists of various parts to function that includes;
Controls and indicators
- Power indicator: It illuminates continuously after turning on the switch.
- Heat control knob: It helps to adjust the desired temperature by turning clockwise and counter-clockwise as per requirement.
- Stir control knob: It helps adjust the stir bar’s rotation speed.
- Stirring speed display: It is generally present in a hot plate stirrer that helps to display the stirring speed.
- Heating temperature display: It is in a digital type that helps display the temperature.
- Hot top indicator: It illuminates when the top of the plate is too hot to touch (hotter than 60℃).
- Temperature probe in use indicator: When the external temperature probe attaches to the unit, this indicator illuminates
Connections
- External temperature control input: An optional external temperature control input plugs into the connector.
- Power cord input: The power connector of the hot plate attaches to this connector.
Top Plate
The top plate is the flat heated surface that holds the vessel and transfers heat to it. It is made of aluminum, ceramic, stainless steel, or a chemical-resistant coating, and the material chosen depends on the temperature and the chemicals involved. This is the part that determines how evenly and how safely the plate heats.
Accessories
Hot plates are available with various accessories to conduct multiple experiments. These include; the vertical support rod, holding rod, external temperature controller, and thermometer holder.
Vertical support rod and holding rod help to provide support to the glassware used in conducting experiments. Similarly, an external temperature controller helps to adjust the temperature and a thermometer helps to hold the thermometer.
Principle of the Hot Plate
The main principle of a hot plate is based on heating through conduction. When you place the sample on a hot plate, heat transfers from the container to the sample through direct contact.
In a hot plate, the temperature control knob is connected to a heating element enclosed within the plate. Turning it on activates the heating element, and the plate heats up until it reaches the set temperature, at which point the control cycles the element on and off to hold that temperature. The sample is then placed at the top of the plate, transferring heat from the plate to the sample.
Whereas, in the case of a hot plate stirrer, along with a heating element, there is an electromagnet that fits in the internal structure of the hot plate. In this type, a small magnetic bar called a stir bar is dropped into the beaker of solution. The rotating electromagnet beneath the plate makes the stir bar spin, which mixes the solution while it heats. Two knobs of heat control and rotation control, respectively, fits in a hot plate to control heat and rotation. When the hot plate switch is turned on, a heating knob helps to adjust the temperature. In comparison, the rotation control knob is used to adjust the rotation of the stir bar.
Types of Hot Plate
Hot plates are of various types, but we have to choose based on the material we heat, which are as follows;
Based on Display
Hot plates are of two types based on display;
- Analog-type hot plates: These are the most simple and cost-effective type. They consist of a knob to adjust temperature and rotation speed. These types of hot plates lack a readout screen to report the exact temperature and speed. However, they consist of an indicator light that helps to know the heating element and operating stirring mechanism.
- Digital type hot plates: This type consists of a temperature and speed control knob and a readout screen. This type of hot plate helps to achieve exact temperature and speed.
Based on Design
Hot plates are of three types based on the designs;
- Standard hot plates: These types of hot plates are only used to heat the sample. These do not have a stirring function. Further, such types of hot plates require less maintenance and re-calibration routines.
- Hot plate with magnetic stirrer (hot plate stirrer): This type combines a heating element with an electromagnet beneath the surface. The electromagnet spins a stir bar placed in the solution, so the sample is heated and mixed at the same time. This gives more uniform heating, especially for high-volume or viscous samples, and is the type most used in microbiology media preparation.
Based on materials used
These instruments are of four types based on the material used to make hot plate surfaces;
- Ceramic hot plates: These plates can endure temperatures up to 350℃ and resist corrosion. These types of hot plates are suitable for glass beakers.
- Polypropylene hot plates: These types of plates cannot withstand high temperatures like ceramic and aluminum plates but has a high tolerance to chemicals, acids, and solvents. These types of hot plates are primarily used in the wet chemistry lab for various purposes.
- Stainless steel hot plates: These plates are highly resistant to corrosion, ether, and alcohol. They are suitable for ISO-grade cGMP spaces.
- Aluminum hot plates: The aluminum plate provides more uniform heat and is tough to crack. It is appropriate for high-throughput lab operations.
Procedure for Operating Hot Plate
The procedure involved in operating hot plates is as follows;
- Place the hot plate on a clean and flat surface.
- Then, switch on the plug connected to the instrument.
- After that, fill the solution on a vessel. Then, place it on top of the intrument (plate where heating occurs), and wait for heating.
- To adjust the temperature, turn the heat control knob clockwise or anticlockwise as per requirement.
- Similarly, in the case of a hot plate stirrer, place the stir bar into the vessel containing the solution and adjust temperature and rotation by turning the temperature control knob and rotation control knob, respectively, into clockwise or anticlockwise directions.
- After the completion of heating, switch off the device.
- Lastly, clean up the device and working area.
Applications of Hot Plate
The hot plate is commonly used in chemistry, zoology, microbiology, physics lab, and also in other areas for the following purposes;
- In the microbiology laboratory, hot plates are used to prepare and melt culture media and to warm reagents.
- They heat specimens for histological, pathological, and cytological work.
- With a magnetic stirrer, they dissolve solutes evenly into buffers and solutions while heating.
- In the chemistry laboratory, they melt solids, boil liquids, drive reactions, and dry samples.
Hot Plate vs. Bunsen Burner, Magnetic Stirrer, and Water Bath
The most useful thing to know about a hot plate is when to reach for it instead of another heating tool. Each has a job it does best.

| Tool | How it heats | Best for | Avoid when |
|---|---|---|---|
| Hot plate | Dry conduction from a heated surface | Melting media, boiling and heating solutions in glassware, drying | Heating volatile flammable solvents; anything needing precise gentle warming |
| Hot plate with magnetic stirrer | Conduction plus a spinning stir bar | Dissolving solutes evenly while heating, preparing buffers and media | Viscous mixtures a stir bar cannot turn; very large volumes |
| Bunsen burner | Open flame, direct high heat | Flaming loops and tube mouths, rapid sterilization, very high temperatures | Flammable material nearby; when soot or uneven heat would spoil the work |
| Magnetic stirrer (no heat) | Spinning stir bar only | Mixing at room temperature | Anything that must be heated |
| Water bath | Surrounding warm water, gentle and even | Precise, gentle incubation at a set temperature (for example 37°C or 56°C), heat-sensitive samples | High temperatures; when direct boiling is needed |
The key distinctions to carry into an exam or the bench: a hot plate gives dry, direct, bottom-up heat and can scorch; a water bath gives gentle, even, wet heat and cannot scorch but cannot reach high temperatures; a Bunsen burner gives an open flame that a hot plate deliberately replaces when flammable media or even heating make a flame unsafe.
Where Labs Get It Wrong With a Hot Plate
A hot plate is simple, which is exactly why it is misused. These are the common failures.
Scorching media. Setting the plate too high melts agar unevenly and burns the layer touching the plate before the top melts. Use moderate heat and stir, or melt agar in a water bath or by autoclaving instead.
Boil-over. Media left unattended on high heat boils over, loses volume, and changes concentration. Heat gradually and watch it, especially as it approaches boiling.
Cracked glassware. Placing cold or thick glassware on an already hot plate, or using non-borosilicate glass, causes thermal-shock cracks. Use borosilicate glassware and check for existing cracks before heating.
Forgotten stir bar. Running a hot plate stirrer without adding the stir bar, or adding it after the solution is already hot, gives uneven heating and a solute that will not dissolve properly. Add the stir bar before heating.
Assuming the surface is cool. The plate stays dangerously hot after being switched off, and many plates lack a clear cool indicator. Treat the surface as hot until proven otherwise; use the hot-top indicator where present.
Heating flammable solvents. The 350°C surface easily exceeds the flash point of common solvents. Never heat ether, acetone, or similar volatile liquids on an open hot plate.
Wrong tool for gentle warming. Using a hot plate for a task that needs precise, gentle, even heat (such as holding serum at 56°C) risks overshoot and denaturation. A water bath is the correct tool.
Advantages
Hot plates have a wide range of advantages, which are as follows;
- They are very cost-effective.
- Hot plates are portable devices.
- They are simple to use.
- This laboratory equipment is an essential device in various laboratory procedures.
- They do not require any other source to operate except electricity.
- They are easy to clean and maintain.
Limitations
Some of the limitations of a hot plate are given below;
- They can produce burns, fires, and electric shocks, resulting in accidents.
- They have a limited temperature range to operate compared to Bunsen burners.
Precautions While Handling
Some precautions that we need to follow while handling hot plates are as follows;
- Always unplug the device when not in use.
- Regularly check the cords and plugs of the device to see if they are damaged or worn out. Similarly, make sure to keep any electrical cord away from the heat.
- Never keep flammable or combustible material near the instrument.
- Always use glassware made up of heat-resistant material, and check its crack before use.
- Make sure to check the thermostat that might have been corrupted by long-term use.
- Do not place aluminum foil or metal containers directly on the plate, as they can damage the surface and reflect heat unevenly.
- Use thermal gloves or tongs to remove a hot object from the instrument.
How to Remember
A hot plate is a stove, not an oven or a bath. It heats from the bottom by direct contact, so the surface touching the plate is always hottest and most likely to scorch. If you remember "bottom-up, dry heat," the rules follow: stir to even it out, watch for boil-over, and choose a water bath when you need gentle, even warmth instead.
Flame for loops, plate for media. The one-line division of labor in a micro lab: reach for the Bunsen burner to flame loops and tube mouths, and the hot plate to melt and prepare media. The hot plate exists precisely so you are not holding flammable media over an open flame.
Key Exam Facts in One Table
| Fact | Detail |
|---|---|
| Working principle | Heating by conduction from a heated surface; dry, bottom-up heat |
| Maximum surface temperature | About 350°C |
| Hot plate stirrer | Adds an electromagnet that spins a stir bar to heat and mix at once |
| Plate materials | Aluminum (even heat), ceramic (corrosion-resistant), stainless steel, chemical-resistant coatings |
| Main microbiology use | Preparing and melting culture media, warming reagents |
| Do not heat | Volatile flammable solvents (ether, acetone, pentane, hexane) |
| Hot plate vs. water bath | Hot plate is high, dry, direct heat; water bath is gentle, even, wet heat |
| Hot plate vs. Bunsen burner | Hot plate replaces the flame when flammable media or even heating make a flame unsafe |
| Main failure mode | Scorching media from heat that is too high with no stirring |
| Glassware | Use borosilicate; check for cracks before heating |
Where Students Get Confused
Hot plate vs. hot plate stirrer. A plain hot plate only heats. A hot plate stirrer also has an electromagnet that spins a stir bar to mix while heating. In a media-preparation setting, the stirrer version is usually what you want.
Hot plate vs. water bath. Both apply heat, but a hot plate gives high, direct, dry heat that can scorch, while a water bath surrounds the sample with warm water for gentle, even heating at a controlled temperature. Heat-sensitive or precise work goes in the water bath.
Why not just use a Bunsen burner. A Bunsen burner reaches higher temperatures, but its open flame is unsafe near flammable media and heats unevenly. The hot plate exists to give controlled, flame-free heat.
The plate looks off but is still hot. Students assume a switched-off plate is safe to touch. The surface holds heat for a long time after power is cut. Always treat it as hot.
References
- Tille, P. M. (2022). Bailey & Scott's Diagnostic Microbiology (15th ed.). Elsevier.
- Cheesbrough, M. (2006). District Laboratory Practice in Tropical Countries, Part 2 (2nd ed.). Cambridge University Press.
- Centers for Disease Control and Prevention & National Institutes of Health. (2020). Biosafety in Microbiological and Biomedical Laboratories (BMBL) (6th ed.). U.S. Department of Health and Human Services.
- University of California, San Diego. Hot Plate Safety Requirements. Retrieved from https://blink.ucsd.edu/safety/fire/requirements/hot-plates.html
Frequently Asked Questions
What is a hot plate used for in a microbiology laboratory?
What is a hot plate used for in a microbiology laboratory?
A hot plate is used mainly to prepare and melt culture media and to warm reagents. With a built-in magnetic stirrer, it also dissolves solutes evenly into buffers and solutions while heating them.
What is the difference between a hot plate and a hot plate stirrer?
What is the difference between a hot plate and a hot plate stirrer?
A plain hot plate only heats the sample. A hot plate stirrer adds an electromagnet beneath the surface that spins a magnetic stir bar in the solution, so the sample is heated and mixed at the same time. For media and buffer preparation, the stirrer version is usually preferred.
When should I use a water bath instead of a hot plate?
When should I use a water bath instead of a hot plate?
Use a water bath when a sample needs gentle, even heating at a precise temperature, such as holding serum or reagents at 37°C or 56°C. A hot plate gives high, direct, dry heat that can scorch or overshoot, so it is the wrong tool for heat-sensitive work.
Why should flammable solvents not be heated on a hot plate?
Why should flammable solvents not be heated on a hot plate?
A hot plate surface can reach about 350°C, which is well above the flash point of common solvents like ether, acetone, and hexane. Heating these on an open hot plate can ignite them, so they are heated by other means such as a water bath in a fume hood.
Why does my agar scorch on the hot plate?
Why does my agar scorch on the hot plate?
Scorching happens when the heat is set too high and the media is not stirred. Because a hot plate heats from the bottom by direct contact, the layer touching the plate burns before the rest melts. Use moderate heat with stirring, or melt agar in a water bath or by autoclaving.

Tankeshwar Acharya, MSc (Medical Microbiology)
Tankeshwar Acharya is an Assistant Professor in the Department of Microbiology at Patan Academy of Health Sciences (PAHS), Nepal, where he has been teaching and practicing clinical microbiology for over 14 years. He is the founder of Microbe Online, one of the leading free microbiology education resources on the web, covering bacteriology, mycology, parasitology, immunology, and clinical laboratory diagnostics written from direct experience in both the classroom and the diagnostic laboratory.
Comments
No comments yet. Be the first to share your thoughts.
Leave a comment
All comments are reviewed before they appear.