
Western Blot Technique: Principle, Procedure, Interpretation, Advantages
Western blot explained for students: full step-by-step procedure, how to read the bands, HIV result interpretation, plus advantages and disadvantages.
On this page
A patient's HIV screening test comes back reactive. Before anyone is told they have HIV, the lab runs a second, different test to be sure the first result is real. For years, that confirming test was the Western blot.
The screening test asks "are there any anti-HIV antibodies here?" The Western blot asks a harder question: "which exact viral proteins does this person have antibodies against?" That shift, from a yes/no answer to a protein-by-protein fingerprint, is the whole idea behind Western blotting. This article walks through how it works, how to run it, and how to read the result.
The term “blotting” refers to the transfer of biological samples from a gel to a membrane and their subsequent detection on the surface of the membrane. Southern blot is used for transferring DNA, Northern blot for RNA, and Western blot for Protein. Western blotting (also called immunoblotting, because an antibody is used to specifically detect its antigen) was introduced by Towbin, et al. in 1979 and is now a routine technique for protein analysis.
 Western blotting can produce qualitative and semi-quantitative data about the protein of interest. It is an important technique used in cell and molecular biology. It enables the researchers to identify the specific protein from a mixture of proteins extracted from cells as well as evaluation of their size and amount. The SDS PAGE technique is a prerequisite for western blotting.
Principle
Western blotting (protein blotting or immunoblotting) is a rapid and sensitive assay for the detection and characterization of proteins. It works by combining two steps: first, proteins are separated by gel electrophoresis according to their molecular weight, and second, the separated proteins are detected on a membrane using antibodies. This second step, using a specific antibody to find one target protein in a crowd, is why the method is also called immunoblotting.
The protein thus separated are then transferred or electrotransferred onto nitrocellulose membrane and are detected using a specific primary antibody and secondary enzyme-labeled antibody and substrate.
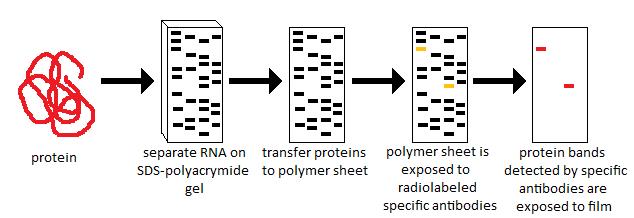 Figure: Western blot workflow
Procedure
Western blotting has five stages:
| Stage | What happens | Why it matters |
|---|---|---|
| 1. Sample preparation | Cells are broken open and proteins are released, reduced, and denatured | Proteins must be unfolded and negatively charged so they separate by size alone |
| 2. Gel electrophoresis (SDS-PAGE) | Proteins are pulled through a gel by an electric field | Smaller proteins move faster, so proteins separate by molecular weight |
| 3. Transfer (blotting) | Separated proteins are moved from the gel onto a membrane | The membrane is sturdy and can be probed with antibodies; the gel cannot |
| 4. Immunoblotting | The membrane is blocked, then probed with primary and secondary antibodies | This is the specific step: the antibody finds only the target protein |
| 5. Detection | A signal (usually light) is produced where the antibody bound | This is what you actually see and measure as a band |
Stage 1: Sample preparation (preparation of sample lysate)
- Take the sample, add ice-cold PBS and a lysis buffer such as RIPA buffer, which is a commonly used buffer for maximum protein yield. The choice of lysis buffer largely depends on where the protein of interest sits in the cell. Membrane-bound proteins need stronger detergents to dissolve them than free cytoplasmic proteins do.
- Always use freshly prepared protease inhibitors, keep samples on ice, and work quickly. The lysis buffer should contain protease inhibitors to stop enzymes in the sample from degrading the protein of interest.
- Lyse the cells by incubating on ice, then apply shear pressure with a pipette.
- Centrifuge the cell mixture and discard the pellet. The supernatant is the lysate. This is what you carry forward.
- Reduce and denature the sample. Western blots are typically run under reduced and denatured conditions so that proteins separate by molecular weight, not by their folded shape or native charge. Dilute each sample in a loading buffer such as Laemmli sample buffer. This buffer contains:
- beta-mercaptoethanol or DTT, to break the disulfide bridges between cysteines (reduction),
- SDS, to denature the protein and coat it with a net negative charge,
- glycerol, to make the sample sink neatly into the well,
- bromophenol blue, to make the sample visible as you load it, and an ionic buffer.
- Vortex each sample and incubate at 95°C for five minutes to fully denature the proteins. The sample is now ready to load into an SDS-PAGE gel.
Stage 2: Gel electrophoresis (SDS-PAGE)
This step separates the proteins by molecular weight. A positive electrode attracts the negatively charged proteins, pulling them through the gel.
- Choose the right gel. Gels come in fixed percentages or gradients of acrylamide. A higher acrylamide percentage means a smaller pore size. So high-percentage gels are better for small proteins, low-percentage gels are better for large proteins, and gradient gels handle proteins of all sizes because their pore size varies across the gel.
- Set up the gel. Insert it into the electrophoresis apparatus and fill with a running buffer suited to your gel chemistry. Rinse the wells with running buffer and add buffer to the chambers.
- Load the samples. Load your prepared protein samples into the wells, and load a pre-stained molecular weight ladder into one well. The ladder lets you watch the separation as it runs and check protein sizes later during analysis.
- Run the gel. Close the unit and connect it to a power supply. Most units run 45 to 60 minutes at 200 volts, or until the loading dye reaches the bottom of the gel. During this time the negatively charged proteins migrate toward the positive electrode, moving through the gel matrix by size.
Stage 3: Transfer (blotting)
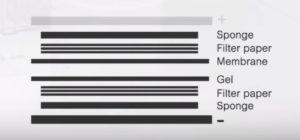 This step moves the separated proteins out of the gel and onto a solid membrane. It uses the same idea as electrophoresis: an electric field pulls the negatively charged proteins toward the positive electrode, this time out of the gel and into the membrane. Transfer can be done wet or semi-dry. The traditional wet transfer method:
- Remove the gel from its cassette and cut off the top portion that holds the wells.
- Notch the top left corner to mark the gel's orientation.
- Float the gel in transfer buffer while you prepare the transfer sandwich. You will need a cassette, sponges, filter paper, the gel, and a PVDF or nitrocellulose membrane.
- Notch the top left corner of the membrane to mark its orientation, and soak the membrane in transfer buffer for 10 minutes.
- Build the stack. Working from the black (negative, cathode) side to the red (positive, anode) side, layer: sponge, filter paper, gel, membrane, filter paper, sponge. Do not touch the gel or membrane with bare hands. Use clean tweezers or a spatula. Touching the membrane at any point can contaminate the blot and cause a high background signal.
- Roll out bubbles. Use a clean roller on each layer to push out any air bubbles, because bubbles block protein transfer at that spot.
- Lock and load the cassette. Lock the cassette and place it in the transfer apparatus filled with cold transfer buffer, correctly oriented from negative to positive. To prevent heat building up, transfer with a cold pack in the apparatus or in a cold room, with the stir bar at the bottom of the chamber.
- Run the transfer. Close the chamber, connect to the power supply, and transfer according to the manufacturer's instructions, normally around 100 volts for 30 to 120 minutes.
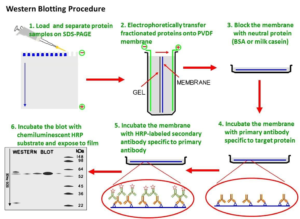 Figure: Western Blotting Technique Test Procedure
Stage 4: Immunoblotting
Now the membrane carries the separated proteins. This stage blocks the empty spaces, then uses a primary antibody to find the target protein and a secondary antibody to make it detectable.
- Rinse the membrane. Remove it from the cassette and rinse three times in water.
- (Optional) Check the transfer worked. Stain the membrane with Ponceau red for five minutes, then wash with water until bands are clear. Once confirmed, de-stain by continuing to wash with water or TBS-Tween until the dye is gone.
- Block. Cover all parts of the membrane that do not already carry protein. This stops the antibody from sticking where it should not and lowers background. Common blocking buffers are 5% non-fat dry milk or BSA in TBS-Tween. Do not use milk when probing with phospho-specific antibodies, because milk contains casein, a phosphoprotein, which raises background.
- Incubate with blocking solution for one hour at room temperature with gentle agitation, then decant and wash with TBS-Tween for five minutes.
- Add the primary antibody. Dilute it in blocking buffer at the concentration on the datasheet and incubate overnight at 4°C with gentle shaking. (Optional but recommended: also probe a loading control antibody. It confirms equal protein was loaded in each well and helps troubleshoot later.)
- Wash. The next day, decant the primary antibody and wash the membrane with large volumes of TBS-Tween with vigorous agitation, five times, five minutes each. These stringent washes are essential for removing non-specific background.
- Add the secondary antibody. Dilute it in blocking solution at the datasheet concentration and incubate one hour at room temperature. In this example the secondary antibody is conjugated to HRP for detection.
- Wash again. Decant and wash with large volumes of TBS-Tween, vigorous agitation, five times, five minutes each. The membrane is now ready for detection.
Detection
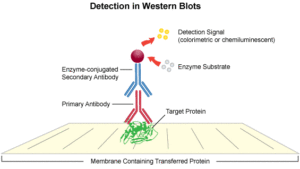 The most common, most sensitive, and cheapest method is the enhanced chemiluminescence (ECL) reaction. The HRP enzyme on the secondary antibody catalyzes the ECL reaction and produces light. That light is captured on X-ray film or by a specialized camera.
- Mix equal parts of the two ECL reagents in a 1:1 ratio, per the manufacturer's instructions.
- Incubate the membrane in the ECL mixture for 3 to 5 minutes without agitation.
- Decant the ECL mixture and wipe excess solution from the corner of the membrane with a lab wipe.
- Place the membrane in clear plastic wrap or a sheet protector to stop it drying out.
- Roll out any bubbles or excess solution.
- Develop immediately.
Both film and camera systems let you adjust exposure time to get a clean image. Relative band densities can then be measured with commercial software, and protein size can be checked against the molecular weight ladder.
Detection can be done by other methods such as
Colorimetric detection
It depends on the incubation of the western blot with a substrate that reacts with the reporter enzyme (such as peroxidase) that is bound to the secondary antibody. This converts the soluble dye into an insoluble form of a different color that precipitates next to the enzyme and thereby stains the membrane. Development of the blot is then stopped by washing away the soluble dye. Protein levels are evaluated through spectrophotometry.
Radioactive detection
Radioactive labels do not require enzyme substrates, but rather, allow the placement of medical X-ray film directly against the western blot, which develops as it is exposed to the label and creates dark regions which correspond to the protein bands of interest. The importance of the radioactive detection method is declining due to its hazardous radiation because it is very expensive, health and safety risks are high, and ECL (enhanced chemiluminescence) provides a useful alternative.
Fluorescent detection
The fluorescently labeled probe is excited by light and the emission of the excitation is then detected by a photosensor such as a CCD camera equipped with appropriate emission filters which captures a digital image of the western blot and allows further data analysis such as molecular weight analysis and quantitative western blot analysis. Fluorescence is considered to be one of the best methods for quantification but is less sensitive than chemiluminescence.
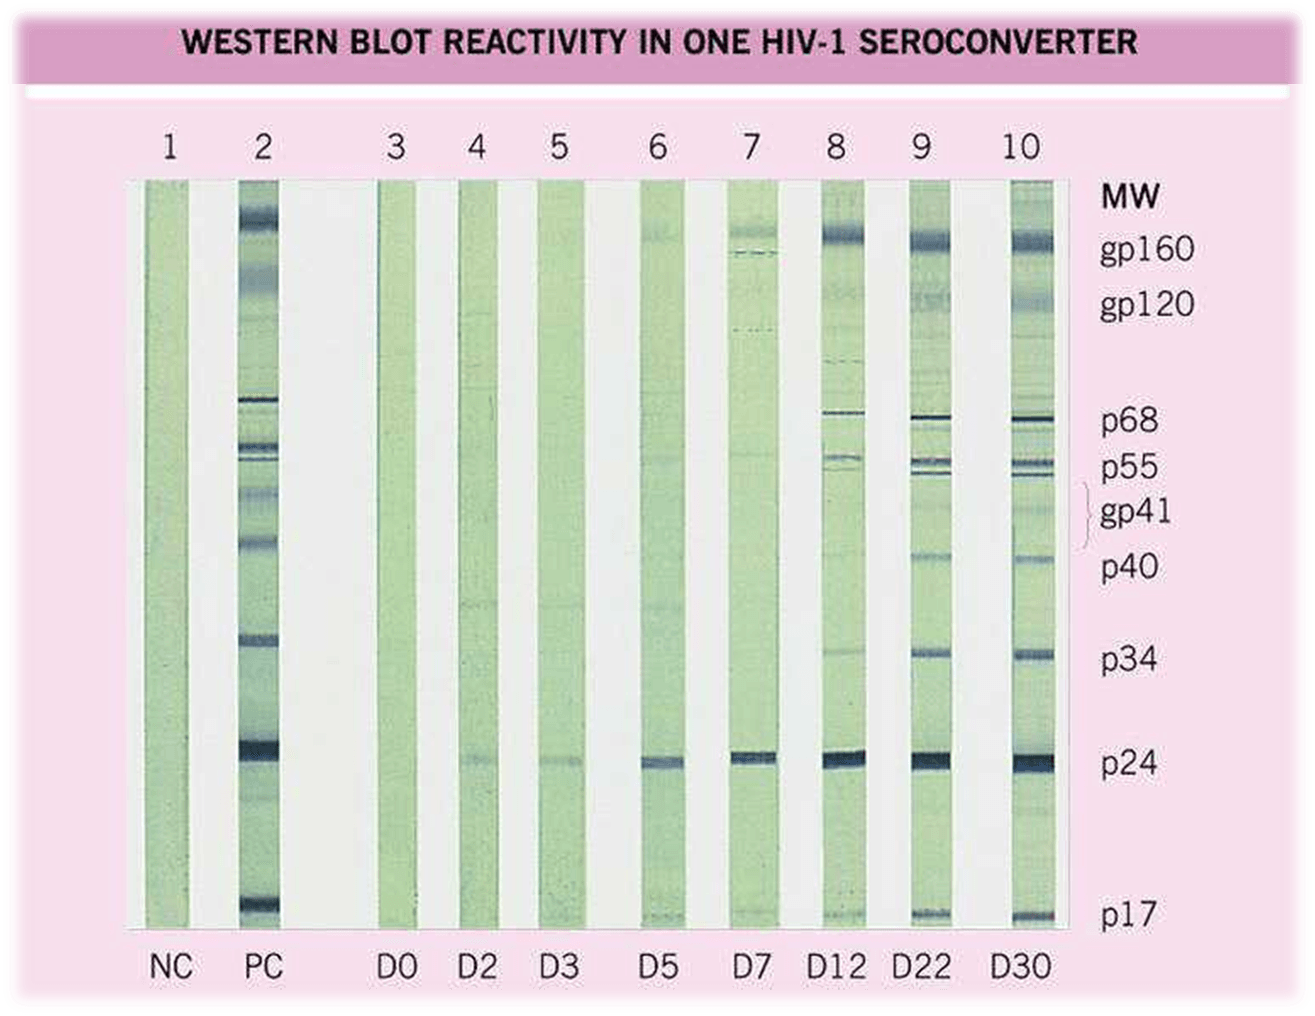 Figure: Western Blot Test for HIV diagnosis
How to read a western blot result
A western blot result is a pattern of bands on a membrane. Reading it means answering three questions in order.
1. Is the run valid?
Before reading the sample, check the controls. The molecular weight ladder should show clean, separated marker bands. The loading control (if used) should be present and roughly equal across lanes. If a positive control lane is blank or a negative control lane shows bands, the run is not valid and the sample bands cannot be trusted. Stop and repeat.
2. Where is the band, and how strong is it?
Each band sits at a specific molecular weight, read off against the ladder. The position tells you which protein it is. The thickness and darkness tell you roughly how much of that protein is present. A band at the expected weight means the target protein is there. A band at the wrong weight may be a different protein, a degradation product, or non-specific binding.
3. Does the pattern meet the rule for a positive result?
This is where judgment comes in, and it depends on what you are testing for. A single band is rarely enough on its own. Diagnostic western blots use defined criteria that state which bands, and how many, must be present.
Worked example: reading an HIV western blot
The HIV western blot is the classic teaching example because its interpretation rule is precise and it shows why a pattern, not a single band, decides the result.
The membrane carries separated HIV proteins. Antibodies in the patient's serum bind to whichever HIV proteins they recognize, producing bands. The important bands fall into three groups:
| Band | HIV protein | Gene it comes from |
|---|---|---|
| gp160, gp120 | Envelope glycoproteins (outer coat) | env |
| gp41 | Envelope glycoprotein (transmembrane) | env |
| p24 | Core capsid protein | gag |
| p31, p51, p66 | Enzymes (integrase, reverse transcriptase) | pol |
The CDC/ASTPHLD positivity rule: the blot is read as positive when antibodies to at least two of these three bands are present: p24, gp41, and gp120/gp160 (a band at gp160 and/or gp120 counts as one of the three). Bands must be at least as strong as the low-positive control to count.
Three possible outcomes:
- Positive (reactive): at least two of p24, gp41, gp120/160 are present. The pattern confirms antibodies against multiple HIV proteins.
- Negative (non-reactive): no bands, or only bands that do not meet the rule. Nothing HIV-specific is confirmed.
- Indeterminate: one or more bands are present, but the pattern does not reach the positive rule. This is the hard one. It cannot be called positive or negative. It can happen in very early infection, when the antibody response is still developing (an isolated p24 or a single band may appear first and fill in over weeks), or as a non-specific reaction in an uninfected person. An indeterminate result is followed up with repeat testing over time or additional tests, not reported as a diagnosis.
Why two bands and not one: requiring a pattern across at least two proteins is what makes the result specific. A single non-specific band can appear by chance or cross-reaction. Antibodies against two separate HIV proteins at the same time is far harder to explain by anything other than real infection. That built-in demand for a pattern is the whole reason a confirmatory blot was trusted over a single screening reaction.
Important status note: the HIV western blot is a superb teaching model, but it is no longer the standard HIV confirmatory test in the United States. Since 2014, the CDC laboratory algorithm has replaced the western blot with a rapid HIV-1/HIV-2 antibody differentiation assay as the supplemental test, because the western blot missed early (acute) infections and misclassified many HIV-2 infections as HIV-1. Some laboratories and national programs, including in parts of South Asia, still use it. Learn the band logic because it teaches interpretation clearly and it still appears in exams, but know where it sits in current practice.
Uses
- It is the most sensitive and specific test for determining the size and amount of protein present in any material.
- Detecting anti-HIV antibodies in serum. The western blot was for many years the confirmatory HIV test, and it is still used in some laboratories and national programs. In the current US algorithm it has been replaced by a rapid HIV-1/HIV-2 antibody differentiation assay (see the status note above).
- A western blot is also used as the definitive test for Creutzfeldt-Jakob Disease, Lyme disease, hepatitis B infection, and HSV-2 (Herpes Type 2) infection.
Advantages and disadvantages of western blotting
Advantages
- High specificity. Detection depends on an antibody binding one target protein, and the protein is also sized by the gel. Two independent checks, identity and molecular weight, make a false positive unlikely.
- Confirms both size and presence. Unlike a test that only says "antibody present," the blot shows the protein's molecular weight, so you know you have the right protein and not a similar one.
- Semi-quantitative. Band density gives a rough measure of how much protein is present, which can be compared across samples when a loading control is used.
- Detects a target within a mixture. It can pull out one specific protein from a complex mixture of hundreds of proteins in a cell lysate.
Disadvantages
- Labor-intensive and slow. The full procedure takes many steps across one to two days, with several points where technique errors ruin the result.
- Needs a good antibody. The result is only as good as the primary antibody. A non-specific antibody gives extra bands; a weak one gives no signal.
- Misses very early antibody responses. In diagnostics, the blot may be negative or indeterminate before the antibody response has fully developed, so it cannot detect the earliest (acute) infections. This is a key reason the HIV algorithm moved away from it.
- Prone to technical artifacts. Bubbles during transfer, uneven blocking, touching the membrane, or over-exposure all produce misleading bands or high background.
- Semi-quantitative, not fully quantitative. It gives relative amounts, not precise concentrations.
How to remember
The blot is a relay race in five legs. Prepare (unfold and charge the runners) → Separate (race them by size) → Transfer (move the race onto paper you can work with) → Probe (send an antibody to tag your runner) → Detect (turn on the light so you can see who is there). If you can name the five legs in order, you have the whole procedure.
"Two bands, not one" for HIV. The reason a single band is never enough: one band can lie, two bands agreeing is hard to fake. This one idea explains the whole positive rule and the existence of the indeterminate result.
Direction of transfer: black to red, protein runs to the red. The negatively charged proteins always move toward the positive (red, anode) electrode, in both the gel and the transfer. Set the stack black-to-red and the proteins move the right way. Get this backward and the proteins leave the membrane instead of entering it.
Key exam facts
| Point | Fact | Memory aid |
|---|---|---|
| What it detects | Protein | Southern = DNA, Northern = RNA, Western = protein. Alphabet order S-N-W matches D-R-P (think "SNoW falls on Protein" for Western) |
| Also called | Immunoblotting | Because an antibody (immuno) finds the protein on the blot |
| Introduced by | Towbin et al., 1979 | "Towbin towed proteins onto the membrane" |
| Separation principle | By molecular weight, via SDS-PAGE | SDS coats every protein with negative charge, so size alone decides speed |
| Transfer direction | Negative to positive (black cathode → red anode) | Protein runs to the red |
| Detection (most common) | Enhanced chemiluminescence (ECL), using HRP | HRP makes light; a camera or film catches it |
| HIV positive rule | At least 2 of: p24, gp41, gp120/160 | Two bands, not one |
| Indeterminate result | Bands present but rule not met; cannot call positive or negative | Common in early infection; follow up, do not report as diagnosis |
| Current HIV status | No longer the US standard confirmatory test since 2014 (replaced by Ag/Ab differentiation assay) | Great teaching model, outdated frontline tool |
| Main limitation | Slow, labor-intensive, antibody-dependent | Only as good as your antibody |
Where students get confused
"Is the transfer the same as the electrophoresis?" They use the same force (an electric field pulling negative proteins toward the positive electrode) but do different jobs. Electrophoresis separates proteins inside the gel by size. Transfer moves those already-separated proteins sideways out of the gel onto a membrane, keeping the pattern intact. Same physics, different purpose: one sorts, one relocates.
"Why block the membrane at all?" The membrane grabs protein anywhere on its surface. After transfer, the spaces between your protein bands are still bare and sticky. If you add antibody now, it sticks everywhere and the whole membrane goes dark. Blocking fills those empty spaces first, so the antibody can only bind your actual target. Skip blocking and you get high background that hides the real bands.
"What is the difference between the primary and secondary antibody?" The primary antibody is the specific one: it recognizes your target protein and nothing else. But the primary antibody usually carries no signal of its own. The secondary antibody recognizes the primary antibody (not the target) and carries the enzyme (like HRP) that makes light. So the primary finds the target, and the secondary makes it visible. One aims, the other lights up.
"Positive, negative, and indeterminate: why three outcomes?" A yes/no test would be simpler, but antibody responses build up over time and can appear partially. Indeterminate is the honest answer for "bands are there, but not enough of the right ones to be sure." It is not a diagnosis. It usually means test again later or use another method. Treating an indeterminate result as positive is a serious error.
"Western blot confirms HIV, right?" It did, and it still teaches interpretation better than anything else, but it is no longer the frontline confirmatory test in the US algorithm. Say "was the confirmatory test, now largely replaced" and you are both correct and current.
Frequently Asked Questions
What is the western blot technique used for?
What is the western blot technique used for?
It identifies a specific protein within a mixture and confirms both its presence and its molecular weight. It is used in research to study proteins and in diagnosis to confirm certain infections, including as a former confirmatory test for HIV and a definitive test for conditions like Creutzfeldt-Jakob disease and Lyme disease.
What is the principle of western blotting?
What is the principle of western blotting?
Proteins are first separated by size using gel electrophoresis (SDS-PAGE), then transferred to a membrane, and finally detected using an antibody that binds only the target protein. Separation by size plus antibody-based detection together make the result specific.
What are the steps of western blotting?
What are the steps of western blotting?
Five stages: sample preparation (lyse cells, denature proteins), gel electrophoresis (separate by size), transfer (move proteins to a membrane), immunoblotting (block, then probe with primary and secondary antibodies), and detection (produce a visible signal, usually light via ECL).
Why is it called immunoblotting?
Why is it called immunoblotting?
Because an antibody (immuno) is used to detect the target protein on the blot. The two names, western blot and immunoblotting, mean the same technique.
How do you read a western blot result?
How do you read a western blot result?
Check the controls to confirm the run is valid, locate each band against the molecular weight ladder to identify the protein, and check whether the band pattern meets the rule for a positive result. For HIV, a positive result needs at least two of the bands p24, gp41, and gp120/160.
What does an indeterminate western blot mean?
What does an indeterminate western blot mean?
Some bands are present, but the pattern does not meet the rule for a positive result. It cannot be called positive or negative. It can occur in very early infection before the full antibody response develops, or as a non-specific reaction. It is followed up with repeat or additional testing, not reported as a diagnosis.
Is western blot still used to confirm HIV?
Is western blot still used to confirm HIV?
It was the standard confirmatory test for years and is still used in some laboratories and national programs. In the United States, since 2014 the CDC algorithm has replaced it with a rapid HIV-1/HIV-2 antibody differentiation assay, because the western blot missed early infections and misclassified some HIV-2 cases.
What is the difference between the primary and secondary antibody?
What is the difference between the primary and secondary antibody?
The primary antibody binds the target protein specifically but carries no signal. The secondary antibody binds the primary antibody and carries the enzyme (such as HRP) that produces the detectable signal. The primary aims; the secondary lights up.
References
- Towbin H, Staehelin T, Gordon J. Electrophoretic transfer of proteins from polyacrylamide gels to nitrocellulose sheets: procedure and some applications. Proc Natl Acad Sci USA. 1979;76(9):4350-4354.
- Tille PM. Bailey & Scott's Diagnostic Microbiology. 15th ed. St. Louis: Elsevier; 2022.
- Procop GW, Church DL, Hall GS, et al. Koneman's Color Atlas and Textbook of Diagnostic Microbiology. 7th ed. Philadelphia: Wolters Kluwer; 2017.
- Centers for Disease Control and Prevention and Association of Public Health Laboratories. Laboratory Testing for the Diagnosis of HIV Infection: Updated Recommendations. 2014. Available at: https://stacks.cdc.gov/view/cdc/23447
- Branson BM, Owen SM, Wesolowski LG, et al. Detection of acute HIV infection in two evaluations of a new HIV diagnostic testing algorithm. MMWR. 2013;62(24):489-494.
- National HIV Curriculum. HIV Diagnostic Testing: Screening and Diagnosis. University of Washington. Available at: https://www.hiv.uw.edu/go/screening-diagnosis/diagnostic-testing/core-concept/all

Tankeshwar Acharya, MSc (Medical Microbiology)
Tankeshwar Acharya is an Assistant Professor in the Department of Microbiology at Patan Academy of Health Sciences (PAHS), Nepal, where he has been teaching and practicing clinical microbiology for over 14 years. He is the founder of Microbe Online, one of the leading free microbiology education resources on the web, covering bacteriology, mycology, parasitology, immunology, and clinical laboratory diagnostics written from direct experience in both the classroom and the diagnostic laboratory.
Comments
No comments yet. Be the first to share your thoughts.
Leave a comment
All comments are reviewed before they appear.