
Thick and Thin Blood Smear for Malaria: Preparation, Staining, and Microscopic Examination
Step-by-step guide to preparing thick and thin blood smears for malaria diagnosis: making the smear, Giemsa staining, microscopic examination, species identification, and parasitaemia calculation.
A 9-year-old child is brought to a district hospital in rural Africa with three days of high fever, rigors, and headache. Her rapid diagnostic test (RDT) for malaria is positive for P. falciparum. The clinician now needs to know one more thing before deciding on treatment intensity: what percentage of her red blood cells are infected? An RDT cannot answer that. Only a blood smear can.
The thick and thin blood smear, stained with Giemsa, has been the gold standard for malaria diagnosis for over a century — not because better tools don't exist, but because no other widely available method simultaneously confirms the diagnosis, identifies the species, and quantifies the parasite burden. In resource-limited settings where this child is being seen, it remains the definitive test.
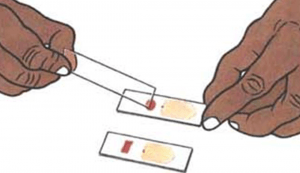 Figure: Preparation of Thick and Thin Blood Smear
Why Use Both a Thick and a Thin Smear?
Students often ask why two smears are needed at all. Each does a job the other cannot:
| Thick smear | Thin smear | |
|---|---|---|
| Purpose | Screening — detect parasites | Identification — identify species and stage |
| Blood volume sampled | ~6× more than thin | Smaller volume |
| RBC status | Dehemoglobinised (lysed) — RBCs destroyed | Intact — RBC morphology preserved |
| Sensitivity | Higher — better for low parasitaemia | Lower — may miss light infections |
| Species ID possible? | Difficult; unreliable | Yes — RBC size, inclusions, and parasite morphology all visible |
| Methanol fixation | Never — fixes RBCs and prevents lysis | Required — preserves RBC morphology |
| Used for parasitaemia count? | Yes (WBC method) | Yes (RBC method) |
The workflow is always: thick smear first to screen → thin smear to confirm species and stage. A positive thick smear with an unexamined thin smear is an incomplete result.
Thick Blood smear
Thick blood film samples a relatively large volume of blood, thus allowing more efficient detection of parasites (increased sensitivity).
Thick smears consist of a thick layer of dehemoglobinized (lysed) red blood cells (RBCs), which provides a better opportunity to detect parasitic forms against a more transparent background. However, they do not permit an optimal review of parasite morphology.
Making Thick Blood Smear
- Using the corner of a clean slide, spread the drop of blood in a circle the size of a dime (diameter 1-2 cm). Do not make the smear too thick or it will fall off the slide. (you should be able to read newsprint through it.)
- Allow the smear to dry thoroughly. Insufficiently dried smears (and/or smears that are too thick) can detach from the slides during staining. You can accelerate the drying by using a fan or hairdryer. Do not fix thick smears with methanol or heat.
- If there will be a delay in staining smears, dip the thick smear briefly in water to hemolyse the RBCs.
Quality Control
Visually, the smear should appear as a round to oval smear of blood about 2 cm in diameter. It should be of such thickness that newsprint can barely be seen through the wet or dry smear.
Limitation of Thick Smear
- Making a species identification of malarial parasites may be impossible, even for experienced technicians.
- A thin film should always be examined if a definitive identification based on morphology is required.
- Smears must be prepared from anticoagulated blood within one hour after venipuncture. The morphology of parasitic forms and the erythrocytes become atypical after that time from the direct action of the anticoagulant.
Blood smears should be stained as soon as possible after they are prepared. Storage of unstained slides for a few days in the hot and humid atmosphere without staining will result in auto-fixation, and the thick film will be useless for microscopy.
Thin Blood Smear
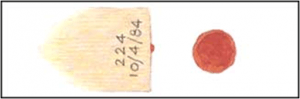 Figure: Prepared smear
Thin smears consist of blood spread in a layer such that the thickness decreases progressively toward a monolayer. It allows optimal assessment of the morphology of any parasitic forms that may be present. Thin blood film is prepared similarly to the differential white cell count.
Making Thin Blood Smear
- Bring a clean spreader slide, held at a 45° angle, toward the drop of blood on the specimen slide.
- Wait until the blood spreads along the entire width of the spreader slide.
- While holding the spreader slide at the same angle, push it forward rapidly and smoothly.
- Wait until the thin films are completely dry before staining.
- Fix the thin film with methanol (100% or absolute) for 15-30 seconds and let it dry completely before staining.
Note: fixation time for ethanol is 20 minutes
Limitation of a thin smear
- Parasitic forms may be missed in light infections. In such instances, a thick film must be examined.
- Smears must be prepared from anticoagulated blood within 1 hour after venipuncture. The morphology of parasitic forms and the RBC become atypical after that time from the direct action of the anticoagulant.
Giemsa Staining of Thick and Thin Blood Smear
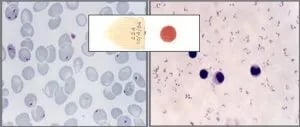 Figure: P. falciparum trophozoite stage in thick (right) and thin (left) smear.
Giemsa stain is the most reliable method for staining thick and thin blood films. Giemsa solution is composed of eosin and methylene blue (azure). The cytoplasm appears blue (stained by methylene blue), and the nucleus appears red (stained by eosin).
Counts the number of slides to be stained. Each slide requires approximately 3 mL of stain. If you have 16 slides to stain, you can prepare 50 mL Giemsa working solution. Two commonly used working solutions are;
- 10% Giemsa stain working solution: It is used in hospital/diagnostic laboratories for a quick diagnosis. It is slightly costly, as more stain is consumed.
- 3% working solution: This cost-effective slow method is mostly used to stain slides for teaching or epidemiological purposes.
Read details: Giemsa stain preparation and dilutions
Microscopic examination
Examining the thick film
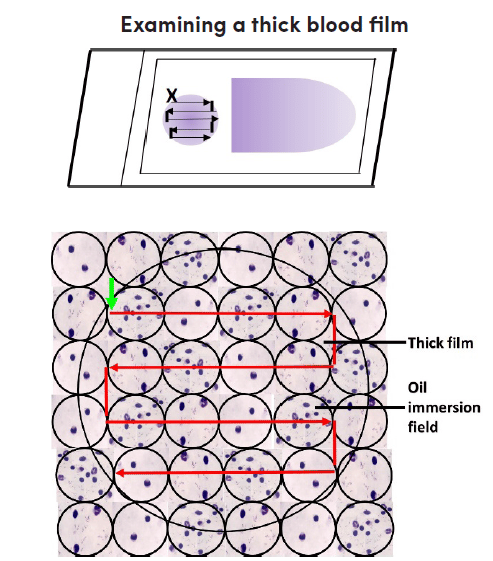 Figure: Examining the thick blood films
- Place the Giemsa-stained blood film to be examined on the microscope stage, with the label to the left. Position the thick film in line with the 10X objective lens.
- Switch on the microscope, adjust the light source optimally and find the focus by looking through the ocular and the 10x objective.
- Scan the blood film for parasites and blood elements. Select part of the film that is well stained and has evenly distributed white blood cells.
- Place a small drop of immersion oil on the thick film. To avoid cross-contamination, ensure that the immersion oil applicator never touches the slide. Do not allow the 40x objective to touch the oil.
- Switch the 100x oil immersion objective over the selected portion of the thick film. Use the fine focus adjustment to see the image. Raise the mechanical stage to avoid damaging the slide.
- Using the fine adjustment, focus on the cell elements, and confirm that the film is acceptable for routine examination; 15-20 white blood cells per thick film field will give a satisfactory film thickness. Films with fewer white blood cells per field will require more extensive examination.
- Examine the slide systematically. Start at the top left of the film (marked with a vertical green arrow) and begin at the periphery of the field, then move horizontally to the right, field by field.
- When the other end of the film is reached, move the slide slightly downwards, then to the left, field by field, and so forth. For efficient examination, continuously focus and refocus with the fine adjustment throughout the examination of each field.
- Examine the thick film under the oil immersion objective, field by field, horizontally or vertically. Use the fine adjustment to focus.
- A minimum of 100 high-power fields must be examined before a thick film can be declared as having “no malaria parasites seen.” If possible, the whole thick film should be scanned.
- If parasites are found, scan additional 100 fields to increase the chance of identifying mixed infections.
- Identify all species and stages observed, and record them.
Examining Thin Films
The thin blood film should always be examined to identify parasite species or mixed infections after examining the thick film. Unlike the thick film, the thin film allows visualization of parasite and red cell morphology. Perform an examination at the feathery end or edge of the thin film.
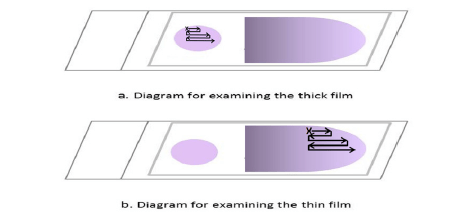 Figure: Examining the thin blood films
- Place a drop of immersion oil on the feathered edge of the thin film.
- Move from the 10x lens to the 100x oil immersion lens.
- Examine the feathery end of the edge of the thin film where red cells lay side by side, and there is minimal overlap. Follow the pattern of movement shown in Fig. 2. Move along the edge of the film, then move the slide outwards by one field, inwards, returning in a lateral movement, and so on.
- Continue examining the thin film until the presence and species of malaria parasites have been confirmed. Identify and record all species and stages observed in the malaria microscopy blood register.
For an alternative concentration method using fluorescence, see QBC Test
Calculating Parasitaemia
Quantifying the percentage of infected RBCs is a critical step in severe malaria management. WHO defines severe malaria (for P. falciparum) as parasitaemia >5% of RBCs, though clinical severity can occur at lower levels.
Method 1: WBC Count Method (Thick Smear)
This is the standard WHO field method.
Count the number of asexual parasites against 200 white blood cells (WBCs) in the thick smear (use 500 WBCs if the count is less than 10 parasites per 200 WBCs).
Formula:
Parasites/μL of blood = (Number of parasites counted ÷ Number of WBCs counted) × Assumed WBC count (8,000/μL)
Example: 150 parasites counted against 200 WBCs → (150 ÷ 200) × 8,000 = 6,000 parasites/μL
Method 2: RBC Count Method (Thin Smear)
Count the number of parasitised RBCs per 1,000 RBCs in the thin smear.
Formula:
Parasitaemia (%) = (Number of parasitised RBCs ÷ 1,000) × 100
Example: 25 parasitised RBCs out of 1,000 counted = 2.5% parasitaemia
Clinical significance of parasitaemia level:
| Parasitaemia | Interpretation |
|---|---|
| <1% | Uncomplicated malaria (P. falciparum) |
| 1–5% | High parasitaemia; close monitoring needed |
| >5% | Severe malaria threshold (WHO); intensive management |
| >10% | Hyperparasitaemia; consider exchange transfusion in some guidelines |
Important: Parasitaemia is clinically significant only for P. falciparum. For P. vivax, P. malariae, and P. ovale, parasitaemia is generally low (<1–2%) and not used as a severity criterion in the same way.
Identifying Malaria Species on the Smear
Once parasites are confirmed on the thick smear, species identification is performed on the thin smear. The following features distinguish the four human Plasmodium species:
| Feature | P. falciparum | P. vivax | P. malariae | P. ovale |
|---|---|---|---|---|
| RBC size | Normal or reduced | Enlarged (up to 2×) | Normal or reduced | Slightly enlarged, oval/fimbriated |
| RBC inclusions | Maurer's dots (6–12, coarse, brick-red) | Schüffner's dots (fine stippling, pink) | Ziemann's dots (rare, faint) | James's dots (similar to Schüffner's) |
| Trophozoite | Small rings; appliqué/accolé (ring at RBC margin); multiple rings per RBC (2–6) | Large, irregular amoeboid ring | Band form (crosses the RBC diameter) | Compact, oval |
| Schizont | Rarely seen in peripheral blood (sequestered) | 12–24 merozoites; "daisy head" | 6–12 merozoites; "rosette/daisy" | 4–16 merozoites |
| Gametocyte | Crescent/banana-shaped ← pathognomonic | Round, fills the cell | Round, smaller | Round |
| Stages in peripheral blood | Ring forms only (mature forms sequestered) | All stages visible | All stages visible | All stages visible |
| % RBCs infected | Can exceed 5–10% | Usually <1–2% | <1% | <1% |
Three single-feature identifiers to memorise:
- Crescent gametocyte = P. falciparum — no other species produces this shape
- Band-form trophozoite = P. malariae — the parasite stretches across the RBC
- Enlarged + amoeboid + Schüffner's dots = P. vivax — the combination is characteristic
For full species comparison including pathogenesis, see Plasmodium life cycle and species differences
Where Students Actually Get Confused
1. Applying methanol to the thick smear This is the most common and most damaging procedural error students make. Methanol fixes the RBCs — it prevents them from lysing during Giemsa staining. A methanol-fixed thick smear cannot be dehemoglobinised, leaving a dark, opaque background where parasites are invisible. The thick smear becomes useless.
The rule: Never fix the thick smear. Only fix the thin smear.
The practical confusion arises because the thick and thin smears are often prepared on opposite ends of the same slide. Students apply methanol to the thin end and let the vapour or overflow reach the thick end. Technique: apply methanol only to the thin film area, keep the slide flat, and let it dry in a vertical position with the thin end down — this prevents methanol from migrating toward the thick end.
2. "100 fields is enough for a negative result." The 100-field rule is a minimum, not a guarantee. The WHO protocol states a minimum of 100 high-power fields before declaring negative. In high-suspicion cases (e.g., returned traveller with fever, even with low initial parasitaemia) the entire thick film should be scanned. A single missed field with a single parasite can be the difference between diagnosis and a missed case.
3. "I can identify species on the thick smear." Species identification on the thick smear alone is unreliable even for experienced microscopists because RBC morphology is destroyed during lysis. The crescent gametocyte of P. falciparum can be identified on thick smear. All other species differences require an intact thin smear.
4. "The feathered edge is where I start on the thick smear." No — the feathered edge is the correct starting point for the thin smear only. For the thick smear, begin at any well-stained area with approximately 15–20 WBCs per field. The feathered edge of a thick smear does not exist in the same way; the smear should be circular and uniform.
5. Timing of blood collection Blood should ideally be collected at the onset of fever, not during the afebrile period. During apyrexia, parasites sequester in deep capillaries (especially for P. falciparum) and peripheral parasitaemia drops. Collecting during the cold or hot stage of the fever paroxysm maximises the number of circulating parasites visible on the smear.
6. Giemsa staining: buffer pH matters The quality of Giemsa staining is critically dependent on the pH of the buffer used. The optimal buffer pH is 7.0–7.2. At lower pH (<6.8), the stain gives poor nuclear staining; Schüffner's dots may not appear. At higher pH (>7.4), background staining is too heavy. This is particularly important in field settings where tap water is used — in alkaline water areas, results are consistently suboptimal unless a phosphate buffer is prepared.
Key Exam Facts in One Table
| Fact | Detail | Memory hook |
|---|---|---|
| Gold standard for malaria diagnosis | Thick + thin blood smear, Giemsa stained | Cannot be replaced by RDT alone |
| Thick smear purpose | Screening / detection (high sensitivity) | More blood = more chance of finding parasite |
| Thin smear purpose | Species ID + stage ID + RBC morphology | Intact RBCs = readable morphology |
| Methanol fixation | Only the thin smear — never the thick smear | Thick = no fix; Thin = fix |
| Giemsa optimal buffer pH | 7.0–7.2 | Too acid = poor nuclear stain; too alkaline = dark background |
| 10% Giemsa (rapid method) | 10 minutes staining time | Hospital/diagnostic lab use |
| 3% Giemsa (slow method) | 45–60 minutes staining time | Teaching/field epidemiology |
| Minimum fields for negative thick smear | 100 high-power fields | Minimum, not maximum |
| WBC density QC for thick smear | 15–20 WBCs per 100× field | Too few = smear too thin |
| Parasitaemia >5% | Severe malaria threshold (P. falciparum) | WHO criterion for severe disease |
| Crescent gametocyte on smear | P. falciparum only — pathognomonic | Banana shape = falciparum confirmed |
| Band-form trophozoite | P. malariae | Stretches across RBC diameter |
| Schüffner's dots + enlarged RBC | P. vivax | Fine pink stippling in enlarged cell |
| Appliqué/accolé form | P. falciparum | Ring at RBC margin; can be confused with platelets |
| Blood collection timing | At onset of fever / during paroxysm | Parasitaemia highest during febrile peak |
| Time limit after venipuncture | Prepare smear within 1 hour | Anticoagulant distorts morphology after 1 hour |
Self-Check Questions
- A medical student prepares a combined thick-thin smear on a single slide and applies methanol to fix the thin film. The following day, the thick smear cannot be read. What went wrong?
- A thick smear shows 120 parasites per 200 WBCs. Calculate the parasites per μL (assume 8,000 WBCs/μL). Is this severe malaria?
- You see a ring-stage parasite at the margin of an intact RBC (appliqué form) on the thin smear. The RBC is not enlarged and has no Schüffner's dots. Which species is most likely?
- A patient's thick smear is negative after examining 100 fields, but clinical suspicion for malaria remains high. What should you do next?
- The thin smear shows a trophozoite that forms a band across the diameter of the RBC. Which species does this suggest?
- Why is species identification clinically important — what treatment decision does it affect?
Answers
- Methanol vapour fixed the thick film, preventing RBC lysis and making the background opaque. Should never fix the thick smear area.
- (120 ÷ 200) × 8,000 = 4,800 parasites/μL. Not yet at the >5% severe threshold by this method — quantify by RBC method on thin smear to confirm.
- P. falciparum (appliqué/accolé form; no RBC enlargement; no Schüffner's dots).
- Scan the entire thick film (not just 100 fields); prepare a new smear from a fresh blood sample; consider RDT if not already done; reassess timing of blood collection relative to fever.
- P. malariae (band-form trophozoite).
- P. vivax and P. ovale require primaquine for radical cure (to eliminate hypnozoites); P. falciparum treatment uses artemisinin-based combination therapy; P. malariae requires longer treatment duration. Species ID changes drug choice.)
References
- World Health Organization. (2016). Malaria microscopy quality assurance manual (Version 2). WHO. https://www.who.int/publications/i/item/9789241549394
- World Health Organization. (2010). Basic malaria microscopy. Part I. Learner's guide (2nd ed.). WHO.
- Garcia, L. S. (2016). Diagnostic Medical Parasitology (6th ed.). ASM Press.
- Forbes, B. A., Sahm, D. F., & Weissfeld, A. S. (2007). Bailey & Scott's Diagnostic Microbiology (12th ed.). Mosby Elsevier.
- Wongsrichanalai, C., Barcus, M. J., Muth, S., et al. (2007). A review of malaria diagnostic tools: microscopy and rapid diagnostic tests. American Journal of Tropical Medicine and Hygiene, 77(6 Suppl), 119–127. https://doi.org/10.4269/ajtmh.2007.77.119
- DPDx — Laboratory Identification of Parasites of Public Health Concern. CDC. https://www.cdc.gov/dpdx/malaria/
Frequently Asked Questions
What is the difference between a thick and thin blood smear for malaria?
Why should methanol never be applied to the thick blood smear?
How many fields must be examined before a thick smear is reported as negative for malaria?
How is parasitaemia calculated from a blood smear?
What Giemsa stain concentration is used for rapid malaria diagnosis?
How do you identify P. falciparum on a thin blood smear?

Tankeshwar Acharya, MSc (Medical Microbiology)
Tankeshwar Acharya is an Assistant Professor in the Department of Microbiology at Patan Academy of Health Sciences (PAHS), Nepal, where he has been teaching and practicing clinical microbiology for over 14 years. He is the founder of Microbe Online, one of the leading free microbiology education resources on the web, covering bacteriology, mycology, parasitology, immunology, and clinical laboratory diagnostics written from direct experience in both the classroom and the diagnostic laboratory.