
Slide Culture for Fungi: Principle, Procedure, Results
A step-by-step guide to the fungal slide culture technique: how to set it up, why it preserves conidial arrangement, the dimorphic-pathogen safety rule, and how to read the mount.
Why It Matters?
You have a filamentous mold growing on a Sabouraud plate, and you need to identify it. The fast way is to tease a bit of the growth onto a slide with a needle, but the moment you touch it, the delicate conidiophores collapse and the conidia scatter, so under the microscope you are looking at a pile of loose spores with no idea how they were arranged on the fungus. Arrangement is exactly what tells you the genus.
Slide culture solves this by letting the fungus grow directly against a coverslip, so its spore-bearing structures form and stay in place, undisturbed, until you lift the coverslip and look. It is the reference method for preserving conidial ontogeny. It also carries one firm safety rule that you learn before you ever set one up: you do not make an open slide culture of a mold you suspect is a dimorphic pathogen, because disturbing it releases infectious spores. This guide walks through the setup, the handling points where beginners lose the structures they are trying to see, and how to read the result.
Slide-culture is a rapid method of preparing fungal colonies for examination and identification with little disturbance as possible. Fungal isolates are grown directly on the slide on a thin film of agar. By doing this, there is no need to remove a portion of the fungus from a culture plate and transfer it to the slide.
Identification of fungi depends largely on their macroscopic features (colony characteristics, growth rate, color, texture, diffusible pigment, exudates, aerial and submerged hyphae) and microscopic features (arrangement of spores and sporing bodies). Arrangements of conidiophores and the way in which spores are produced (conidial ontogeny) help in the accurate identification of filamentous fungi.
This can be achieved by tease mount (a technique in which a part of growth is teased with needles, a drop of LPCB is added, covered with a coverslip and observed under the microscope). Although the most common technique used in mycology, identification is often difficult by tease mount method because of the dislodgement of conidia and spores from the conidiogenous cell.
To overcome this, slide cultures are put up which is considered best for preserving and observing the actual structure of a fungus. The method was first described by Riddell in 1950, and several modifications are in use today.
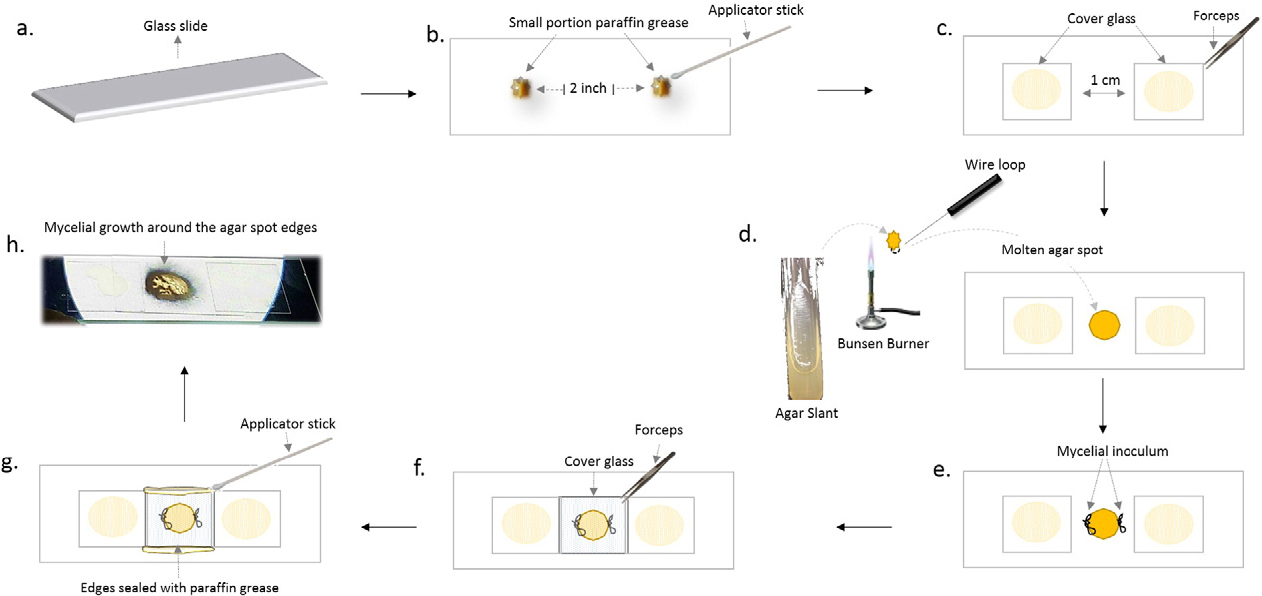 Figure: Slide culture for fungi (Source)
Principle
Fungi are inoculated in small blocks of nutrition deficient agar medium (like cornmeal agar or potato dextrose agar), covered with a coverslip and incubated. After incubation, the coverslip is removed from the agar block and placed on another slide to which a dye, such as lactophenol cotton blue, may be added and observed for microscopic structures.
Fungi when grown in nutrition deficient medium develop spores rapidly and adhere to the surface of the coverslip.
Identification is made by microscopically examining the undisturbed sporulating structures as they were arranged during growth on the agar block under the coverslip.
Procedure
There are many variations on this method; however, the basic principle and procedure remain the same. Differences are based only on the set up of the procedure. Some use agar plates as a base whereas others may use wet tissue or molten agar.
Prepare a setup by either one of the following methods
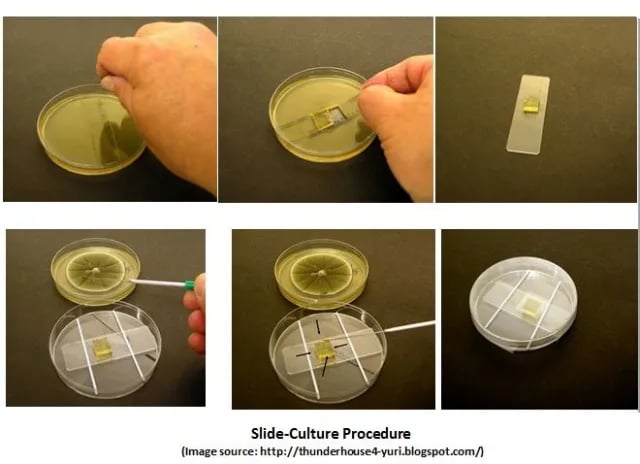 Figure: Slide-Culture Procedure
- Aseptically, with a pair of forceps, place a sheet of sterile filter paper in a Petri dish. Place a sterile U-shaped glass rod on the filter paper (rod can be sterilized by flaming if held by forceps). Pour enough sterile water (about 4 ml) on filter paper to completely moisten it and place a sterile slide on the U-shaped rod.
OR,
- Alternatively, place several layers of paper towel into a sterile culture dish, add two applicator sticks or sterile glass rod, and position a sterile microscope slide on top.
OR,
- Cut an agar block of desired dimensions (using sterile scalpel) from a solid medium and just flip the block up onto the surface of the same agar plate. Proceed to step 4 directly in such cases.
- Cut a small block (range: 5×5 mm-1x1cm) of a suitable agar medium that has been previously poured into a culture dish to a depth of approximately 2 mm by using sterile scalpel blade or with a sterile test tube. Note:The block should be smaller than the coverslip so that it fits under.
- Add the agar block to the surface of the sterile microscope slide.
- With a right-angle wire, inoculate the four quadrants of the agar block with the organism and apply a sterile coverslip onto the surface of it.
- Replace the lid of the culture and allow it to incubate at 30°C for 4-7 days.
- After the incubation period, remove the coverslip (working inside of a biological safety cabinet) and place it on a microscope slide containing a drop of lactophenol cotton blue (LPCB) or aniline blue.
- Observe microscopically for the characteristic shape and arrangement of spores.
The remaining agar block may be incubated further and used later (if the slide culture is unsatisfactory for the microscopic identification. The agar block is then removed and discarded, and a drop of lactophenol cotton blue (LPCB) or aniline blue is placed on the area of growth and a coverslip is positioned into place. Many laboratorians like to make two cultures on the same slide so that if characteristic microscopic features are not observed on examination of the first culture, the second will be available after an additional incubation period.
Although this method is ideal for making a definitive identification of an organism, it is the least practical of the available methods. It should be reserved for those instances in which an identification cannot be made based on adhesive tape preparation or wet mount.
Results and Interpretation
Under the microscope, look at how the spores are arranged on and around the spore-bearing structures, not just the spores themselves. The value of slide culture is that the conidiophores, phialides, vesicles, and the pattern in which conidia are borne stay in their natural arrangement.
Match what you see against the identifying features of common molds: for example, the radiating chains of conidia from a swollen vesicle in Aspergillus, the brush-like phialides of Penicillium, or the septate versus aseptate hyphae and sporangium of the zygomycetes. Because slide culture preserves this arrangement, it gives a more confident identification than a tease mount, where these structures are usually dislodged.
Caution
Do not make open slide cultures of slow-growing molds suspected to be dimorphic pathogens, such as Histoplasma capsulatum, Blastomyces dermatitidis, Coccidioides immitis, Paracoccidioides brasiliensis, or Sporothrix schenckii. In their mold form these organisms produce infectious spores (conidia) that become airborne when the culture is disturbed, and slide culture is a leading cause of laboratory-acquired systemic mycoses. Suspected dimorphic pathogens must be handled only in sealed preparations inside a biological safety cabinet, and identified by other means.
For any slide culture, observe it only after the coverslip has been lifted from the agar block and mounted on a clean slide, never while the coverslip is still sitting on the growing agar block. Examining a live, open culture directly risks releasing spores and causing a laboratory-acquired infection.
Advantages of slide culture
- It is a cost-effective, rapid method for the identification of fungal isolates based on their morphological and/ microscopic characteristics.
- As fungi grow directly on the slide on a thin film of agar, there is no need to remove a portion of the fungus from a culture plate and transfer it to the slide. This reduces the chance of damage to fragile reproductive structures or spore-bearing structures of fungi.
Disadvantages of slide culture
As the agar medium used contains a limited nutrient source, fungal pathogens will survive for a short time period. Therefore, this method is not suited to fungi which take more than a few days to reach maturity, for example, members of the Xylariaceae and many fungi isolated as endophytes.
How to Remember
- Why slide culture at all: arrangement, not just spores. A tease mount knocks the conidia loose, so you see the pieces but not how they were assembled. Slide culture grows the fungus against a coverslip and freezes the arrangement in place. If you only remember one thing: slide culture preserves conidial ontogeny (how and where the spores are borne).
- Starve them to sporulate. The agar block is deliberately nutrient-poor (cornmeal or PDA, not rich Sabouraud). Nutrient stress pushes the fungus to reproduce, so it sporulates faster and more fully. "Hungry fungi make spores" captures why the medium is thin on purpose.
- The one safety line: no open slide cultures of dimorphic pathogens. Histoplasma, Blastomyces, Coccidioides, Paracoccidioides, Sporothrix. In mold form these throw infectious spores into the air when disturbed. Slide culture disturbs them by design, so it is the wrong method and a real cause of lab-acquired infection.
- Lift, then look. Never read the culture with the coverslip still on the living block. Remove the coverslip, mount it on a clean slide with LPCB, then observe. The order protects both the structures and you.
- Two cultures, one slide. Setting up two blocks on the same slide gives a backup: if the first coverslip is read too early or the structures are not clear, the second is still incubating and ready.
Key Exam Facts in One Table
| Concept | Key exam fact and why it holds |
|---|---|
| Purpose | Grow a fungus undisturbed against a coverslip so spore-bearing structures keep their natural arrangement (conidial ontogeny), for accurate identification. |
| Developed by | R. W. Riddell, 1950; several modifications now in use. |
| Medium used | Nutrient-poor agar (cornmeal agar or potato dextrose agar). The low nutrient level pushes the fungus to sporulate. |
| Setup essentials | Moist chamber (filter paper/paper towel + water), a support (U-shaped rod or applicator sticks), sterile slide, small agar block smaller than the coverslip, inoculate the four edges, apply coverslip. |
| Incubation | About 30°C for 4–7 days. |
| Stain for reading | Lactophenol cotton blue (LPCB) or aniline blue, applied to the lifted coverslip on a clean slide. |
| Key advantage | Preserves fragile reproductive structures that a tease mount destroys → more confident identification. |
| Key limitation | Nutrient-poor block supports growth only briefly; unsuitable for slow-maturing fungi. Also the least practical routine method, reserved for when tape/wet mounts fail. |
| Critical safety rule | Never make open slide cultures of suspected dimorphic pathogens (Histoplasma, Blastomyces, Coccidioides, Paracoccidioides, Sporothrix); risk of lab-acquired systemic mycosis. |
| Safe observation | Read only after lifting the coverslip onto a clean slide, never with the coverslip on the live agar block. |
Where Students Get Confused
- "Richer medium = better growth = better result." Backwards here. Slide culture uses nutrient-poor agar on purpose. Rich medium gives lush hyphae but poor sporulation, and it is the spores and their arrangement you need. Starving the fungus is the point.
- "Bigger agar block is safer, more to grow on." The block must be smaller than the coverslip so the coverslip sits flat over it and the fungus grows against the glass. An oversized block lifts the coverslip and ruins the mount.
- "Just look at it under the scope while it is growing." No. Reading the culture with the coverslip still on the living block is the dangerous mistake, it can aerosolize spores. Always lift the coverslip onto a clean slide first.
- "Slide culture is the routine ID method." It is the reference method, not the routine one. It is the least practical of the available methods and is reserved for when a tease mount or tape mount cannot give the answer.
- "It works for any fungus." Not for slow-maturing molds (the block runs out of nutrients), and it must not be used at all for suspected dimorphic pathogens.
References and Further Reading
- Larone, D. H. (2011). Medically Important Fungi: A Guide to Identification (5th ed.). ASM Press.
- Procop, G. W., Church, D. L., Hall, G. S., Janda, W. M., Koneman, E. W., Schreckenberger, P. C., & Woods, G. L. (2017). Koneman's Color Atlas and Textbook of Diagnostic Microbiology (7th ed.). Wolters Kluwer.
- Tille, P. M. (2022). Bailey & Scott's Diagnostic Microbiology (15th ed.). Elsevier.
- Riddell, R. W. (1950). Permanent stained mycological preparations obtained by slide culture. Mycologia, 42(2), 265–270.
- Prakash, P. Y., & Bhargava, K. (2016). A modified microchamber agar spot slide culture technique for microscopic examination of filamentous fungi.
Frequently Asked Questions
Why is slide culture preferred over a tease mount for identifying fungi?
Why is a nutrient-poor medium used for slide culture?
Which fungi should never be examined by slide culture?
At what temperature and for how long is a fungal slide culture incubated?
How is the slide culture stained and observed?
When should slide culture be used instead of simpler methods?

Tankeshwar Acharya, MSc (Medical Microbiology)
Tankeshwar Acharya is an Assistant Professor in the Department of Microbiology at Patan Academy of Health Sciences (PAHS), Nepal, where he has been teaching and practicing clinical microbiology for over 14 years. He is the founder of Microbe Online, one of the leading free microbiology education resources on the web, covering bacteriology, mycology, parasitology, immunology, and clinical laboratory diagnostics written from direct experience in both the classroom and the diagnostic laboratory.