
Preparation of Culture Media: Step-by-Step Guide, Best Practices, and Troubleshooting
A complete guide to in-house culture media preparation (weighing, dissolving, autoclaving, pH verification, dispensing, drying, and storage) with a troubleshooting table for common problems including clumping, wrong pH, soft agar, and poor growth.

On this page
A district hospital laboratory in rural Nepal receives a batch of Mueller-Hinton agar plates prepared in-house by a newly trained technician. The plates pass visual inspection; they appear clear and uniformly poured. Two days later, the laboratory reports that a urinary isolate of Escherichia coli is resistant to ciprofloxacin. The clinician switches to a more expensive second-line agent. A repeat culture-sensitivity later shows the organism was actually susceptible.
The error: the Mueller-Hinton agar was poured to 6 mm depth instead of the standard 4 ± 0.5 mm. Thicker agar forces the antibiotic to diffuse through more medium before reaching any given radial distance from the disc. The antibiotic concentration at the colony periphery is lower than it would be on a correctly poured plate, so the inhibition zone is smaller than it should be.
A zone that would correctly read as susceptible on a 4 mm plate falls below the susceptibility breakpoint on a 6 mm plate, producing a false resistant result. A technically subtle preparation error produced a clinically and economically consequential misreport.
Culture media preparation is not a background task. The quality of every susceptibility report, every isolation attempt, and every identification result depends directly on whether the medium was prepared correctly. This article compiles best practices specifically for in-house media preparation.
Manual preparation of culture media is labor intensive, so many companies have developed automated culture media preparation systems. If your lab can afford to purchase them, automated culture media preparation systems can save you manual labor and time.
Read more: Automated Culture Media Preparation and Dispenser System.
The Preparation Sequence
This summary table provides a one-page reference for the complete culture media preparation workflow.
| Step | Action | Critical point |
|---|---|---|
| 1. Select | Choose media from reputable manufacturer; verify product name, composition, shelf life | Match media to laboratory needs; get clinical microbiologist input |
| 2. Store | Keep dehydrated powder cool, dry, dark; seal tightly after opening; use within 6 months of opening | Dehydrated media are hygroscopic so moisture causes irreversible clumping |
| 3. Calculate and weigh | Weigh accurately in low-humidity environment; use calibrated balance; record in logbook | Do not return excess powder to the bottle; dust mask and gloves required |
| 4. Dissolve | Add powder to half the required water; stir; add remaining water down the sides; heat to boil | Media should be boiled fully until clear as incompletely dissolved media will not sterilize evenly |
| 5. Check, autoclave or not? | Most media: autoclave at 121°C for 15 min. Some media must NOT be autoclaved | Autoclaving TCBS, XLD, DCA, SS, or HE agar destroys selective agents. A serious error. |
| 6. Autoclave | ≤2 liters per batch; loose lids; load with space for steam; start timer at 121°C | Use chemical and biological indicators; cool down before opening |
| 7. Add supplements | Add blood, antibiotics, growth factors at 45–50°C, aseptically | Never add heat-labile supplements to agar above 50°C |
| 8. Verify pH | Check at 25°C after cooling, before dispensing | Verify after sterilization, not before; acceptable range in manufacturer's insert |
| 9. Dispense | Pour on a level surface; avoid bubbles. General plates 20 to 25 mL; Mueller-Hinton for AST needs about 25 mL in a 90 mm plate for 4 mm depth | Mueller-Hinton: must be 4 ± 0.5 mm depth (≈25 mL in 90 mm plate) |
| 10. Dry | Dry with lids ajar 20–30 min at 35°C, or overnight at room temperature | Remove condensation. Wet plate surface causes spreading growth |
| 11. Quality control | Quarantine until QC passed; test with ATCC control strains | Never release media for diagnostic use before QC |
| 12. Store prepared plates | Wrap in sealed bags, upside down, at 2–8°C, in the dark | Labeled with medium name, batch number, preparation date |
Selection of Media Types and Manufacturer
When selecting culture media, look for products from reputable manufacturers supported by your national reference laboratory. Carefully check the product’s name, compositions, instructions for use, and shelf life. Look for humidity-proof packaging (screw cap, peel-off seal).
All bacteriology laboratories may need a minimal supply of basic nutrient media (such as nutrient agar or tryptic soy agar), enriched media (such as blood agar and chocolate agar), and selective media for Gram-positive (Columbia CNA agar), and Gram-negative bacteria (MacConkey agar).
There is a plethora of media with similar applications. Depending on the setting, you may need to keep stock of a few media for epidemic preparedness (e.g., TCBS in cholera risk settings). Get help from a clinical microbiologist to select the appropriate culture media needed for your laboratory.
Procurement, Storage, and Stock Management
Ensure your suppliers (both primary and backup) are reliable and provide after-sales support. Upon receipt of goods, check and record;
- product name and lot number
- quantity received
- expiry date and remaining shelf life
- package integrity
- order processing time
- correctness of order delivery
At all times, follow the manufacturer’s instructions about storage conditions. For example, growth supplements such as egg yolk or antibiotic solutions should be stored at 2-8°C, whereas the base medium may be stored at room temperature, not exceeding 30°C.
Dehydrated media are stored in a cool, dry place, protected from light and dust. Monitor the storage area’s temperature and humidity. Do not store dehydrated media in the same room used for steam sterilizing, boiling materials, cleaning glassware, etc.
Organize the stock according to a first-in, first-out system, rank media in a logical order and separate opened from closed containers.
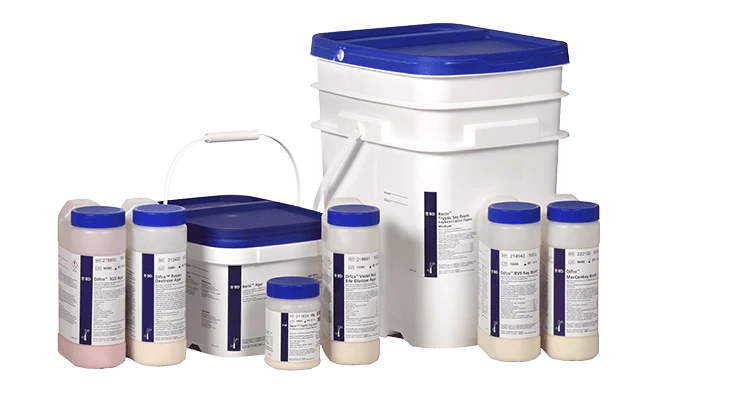 Figure: Dehydrated culture media
The shelf life of dehydrated powder is usually several years. However, dehydrated media are hygroscopic (i.e., it absorbs water) and quickly deteriorate when exposed to moisture. When exposed to moisture, a hard mass is formed, which alters the chemical and microbiological properties of the medium. This can be a serious problem for tropical countries with humid climates.
Therefore, record the opening date on the container and use the product for a maximum of 6 months after opening unless otherwise specified by the manufacturer. After this period, visual and performance checks are required. When not in use, keep containers tightly closed and seal the caps with adhesive tape.
Discard products when expired, when the powder is clumped, discolored, or not free flowing, or in case of quality issues; record product details and reasons for discarding.
Preparation of Culture Media
Materials/Equipment Requirement
- Pyrex flask (conical flask) at least double the size of the batch
- Magnetic Stir Bar
- Aluminum Foil
- Weighing machine
- Dehydrated culture media
- Spatula
- Graduated cylinder
- Distilled or deionized water
- Hot plate stirrer
- Autoclave
- Sterile Petri plates, and
- Infrared no-touch thermometer
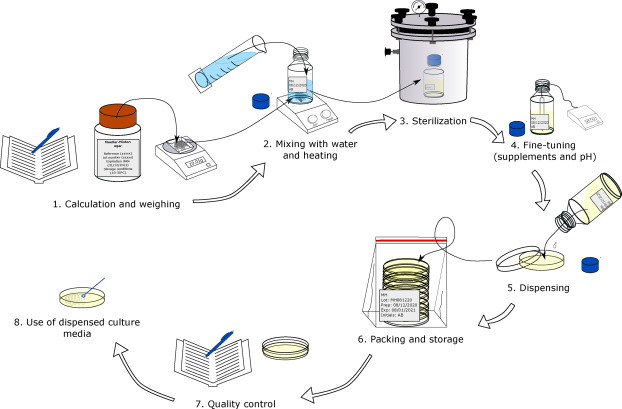 Figure: Preparation of culture media
Calculation and Weighing
The dehydrated media should be calculated and weighed in a damp-free environment (low humidity), preferably under a laboratory fume hood. Ensure table, balance, and materials are clean, dust-free, and powder-free.
Balance
Top loading (precision) balance is suitable for weighing media. Position the balance on a level, stable, vibration-free table. Calibrate the balance at regular intervals (e.g., annually) and verify control weights before use.
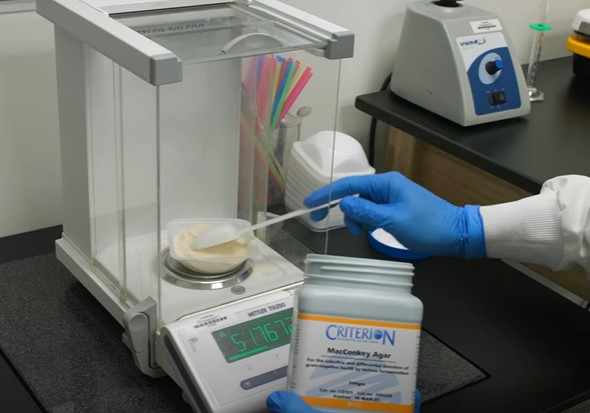 Figure: Weighing of Culture Media
Materials and PPE
To prevent the risk of inhaling fine particles of dehydrated media, wear a dust mask while handling dehydrated media. Wear gloves to avoid skin contact. Wear safety goggles (e.g., for sodium deoxycholate) while using media with components that can cause skin and eye irritation (read product instructions). Wash hands before and after working with dehydrated culture media.
Calculate
Follow the manufacturer’s instructions. Prepare a table with pre-defined weights and volumes for a fixed number of plates. To achieve a 4 mm depth in a 90 mm (9 cm) Petri plate, pour approximately 25 mL. The general dispensing range for standard plates is 20 to 25 mL. Record product name, lot number, preparation date, weight and volume of water, and operator identification in a logbook.
Weighing
To facilitate weighing, use materials with pre-defined volume. Open the container and take the required amount of powder. Close the container immediately to protect it from humidity. Do not put the excess powder back into the bottle.
Mixing with Water and Heating
Boiling is often required to dissolve media powder, but specific manufacturers’ instructions printed in media package inserts should be followed exactly. Use fresh water prepared by distillation, deionization, or reverse osmosis. The presence of copper ions, high conductivity, and high pH may significantly alter the quality of in-house prepared media. Do not use tap water as it affects selectivity and pH.
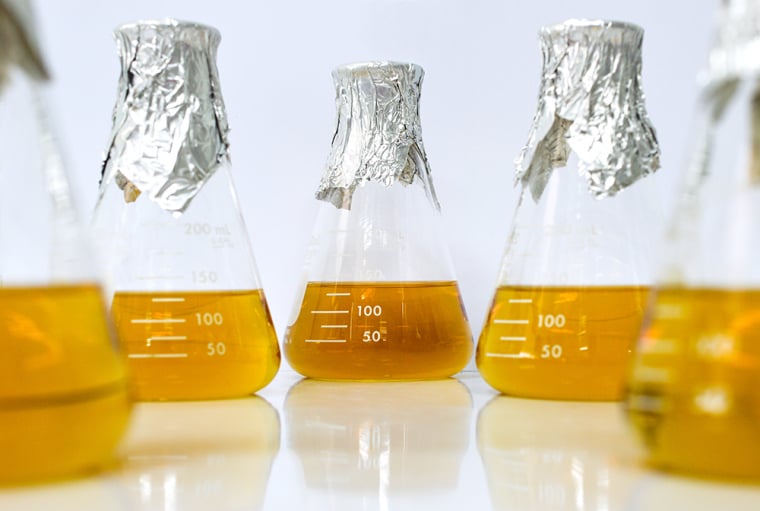 Figure: Conical flasks containing dissolved culture media
The quality of glassware used for pouring media is also an important factor. Use Erlenmeyers, bottles, and graduated cylinders made of borosilicate glass to measure water and mix with media powder. If using reusable glassware, only borosilicate glassware should be used because soda glass can leach alkali into the media and change the pH of the medium, which may affect growth.
Procedure for dissolving the powder in water
- Pour half of the required water into the flask, and add the pre-weighed powder. Pre-heating the water to 50-60°C may facilitate dissolution.
- Stir or rotate for a few minutes (do not shake!)
- Pour the rest of the water down the sides to dissolve any excess powder sticking to the flask walls (dry powder may not be sterilized in the autoclave)
- Heating is required for dissolving agar-containing media. Do not close the flasks tightly.
- Heat up to boiling, with frequent stirring, until the solution becomes clear.
- Avoid boiling, overheating and foaming, scorching and burning, clumping, and inconsistent mixing.
Sterilization
Most media require sterilization so that only bacteria from the patient specimen grow, not contaminants from water or powdered media. A small group of highly selective media are damaged by autoclaving and are prepared by boiling only. These are listed in the "Media that must never be autoclaved" section below.
Liquid media are distributed to individual tubes or bottles before sterilization. Autoclave a medium only when the ingredients are completely dissolved. Do not tighten the lids or caps completely. Agar media are sterilized in large flasks or bottles capped with either plastic screw caps or plugs before being placed in an autoclave.
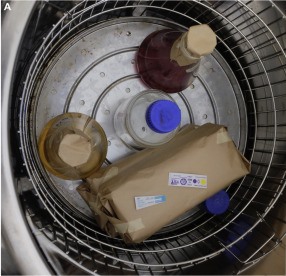 Figure: Items are positioned in the autoclave with enough space for the steam to pass through. Autoclave indicator tape and chemical indicators are used.
The timing of autoclave sterilization should start from the moment the temperature reaches 121°C and usually requires a minimum of 15 minutes.
Volume matters: Autoclave a maximum of 2 liters of media per batch. Large volumes (>2 liters) in a single flask heat unevenly; the center may not reach 121°C while the outside overheats, producing incomplete sterilization and/or medium degradation simultaneously. For large batches, divide into multiple flasks of ≤2 liters each.
Chemical indicators (such as autoclave tape and time-steam-temperature strips) should be used with every load, and biological indicators (spores of Geobacillus stearothermophilus) on a regular schedule, to monitor autoclave performance. Note that liquid media are run on a fluid or gravity-displacement cycle, not a porous-load vacuum cycle, so the Bowie-Dick test (a steam-penetration check for pre-vacuum autoclaves) does not apply to media loads.
Once the sterilization cycle is completed, molten agar is allowed to cool to approximately 50°C before being distributed to individual Petri plates (about 25 mL per 90 mm plate, or 20 to 25 mL for standard non-AST plates).
Avoid
- Over-sterilization causes precipitation, pH change, component destruction
- Under-sterilization results in contaminated medium
Ensure
- The wrapping allows for steam penetration
- There is enough space between the items to allow steam circulation
- To identify sterilized items use indicator tape to label the flask (medium name/code, preparation date, initials).
- Use chemical indicators with each cycle (e.g., time-steam-temperature strips) and biological indicators on an interval basis to verify autoclave cycles.
Note
- Use a ‘cool down program’ or wait until the pressure drops sufficiently before opening (70-80°C) to avoid fast pressure drop (liquid can boil over, and caps can be blown off).
- Do not wait too long before unloading the autoclave; overheating may destroy media ingredients.
Critical: Media That Must NEVER Be Autoclaved
A small but important group of selective media are destroyed by autoclaving. Their selective agents, differential indicators, and pH balance are thermolabile: autoclaving renders them either non-selective, non-differential, or both. These media are prepared by boiling only (one minute with constant stirring) and poured directly into plates.
| Medium | Why autoclaving destroys it |
|---|---|
| TCBS agar | Bile salts, thiosulfate-citrate combination, and bromthymol blue are degraded; medium loses alkaline pH and selectivity for Vibrio |
| XLD agar | Xylose, lysine, and phenol red are heat-degraded; the three-step Salmonella/Shigella differentiation mechanism is lost |
| DCA agar | Deoxycholate and citrate altered; agar softens and cannot be streaked |
| SS agar | Selective agents including brilliant green are partially destroyed |
| HE agar | Bromthymol blue and acid fuchsin degraded; differential color reactions lost |
The test: If you cannot streak isolated colonies on the plate after incubation (if the agar is too soft, too dark, or produces no growth) autoclaving damage is the most likely cause. Prepare a fresh batch and use boiling only.
Media that CAN be autoclaved (standard 121°C, 15 min): Blood agar base/TSA, MacConkey agar, Mueller-Hinton, LJ medium base (the base is autoclaved, but the final medium is set by inspissation, a gentle coagulation at 80 to 85°C, not by autoclaving), nutrient agar, CLED agar, chocolate agar base, mannitol salt agar, and most standard bacteriological and mycological media. Always verify in the manufacturer's package insert.
Fine-tuning (supplements and pH)
If other ingredients are to be added (e.g., supplements such as sheep blood or specific vitamins, nutrients, growth promoters, or antibiotics), they should be incorporated when the molten agar has cooled, just before distribution to plates.
The quality of the blood plays an important role in the performance of the blood-containing media, e.g., hemolytic reactions are well distinguished in sheep blood-containing media. The blood’s concentration, homogeneity, viscosity, and color should be checked before it is used for media preparation. The certificate of analysis and sterility conditions should be considered for other additives.
Delicate media components that cannot withstand steam sterilization by autoclaving (e.g., serum, certain carbohydrate solutions, certain antibiotics, and other heat-labile substances) should be sterilized separately by membrane filtration. Passage through a 0.22 µm membrane filter (the sterilizing grade) removes bacteria and fungi, though not viruses or mycoplasma.
Dispensing of Prepared Culture Media
Cool down the culture media in a water bath (45-50°C) or hot plate stirrer before dispensing to minimize condensation. You can check the temperature with an infrared no-touch thermometer. Dispensing at too high temperature leads to excessive evaporation. If media stay too long in a water bath, it may cause precipitation (reheat, but do not overheat). Do not use cold water to cool down agar media, as it may lead to flakes or cloud formation.
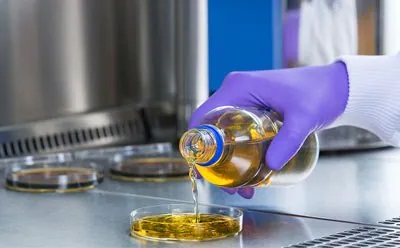 Figure: Dispensing culture media
If using reusable glass Petri plates, sterilize them at 160°C for 2 hours in a hot air oven. Allow the oven to cool to 50°C before opening (to avoid cracking glassware). Dispense the media aseptically in a draft-free room (with closed windows), and avoid fans or climate control. Work close to the flame or in a biological safety cabinet.
Procedure for dispensing agar media in plates
- Flame sterilize the neck of the flask before and between pouring
- Mix the culture media gently by rotating the flask before dispensing
- Dispense on a level surface
- For antimicrobial susceptibility testing, agar depth should be 4 ± 0.5 mm: Circular Petri plate of 90 mm: about 25 mL
- Use sterile, graduated pipettes or media distribution syringe/pump
- Avoid forming air bubbles (flame surface or use a heated loop to remove them).
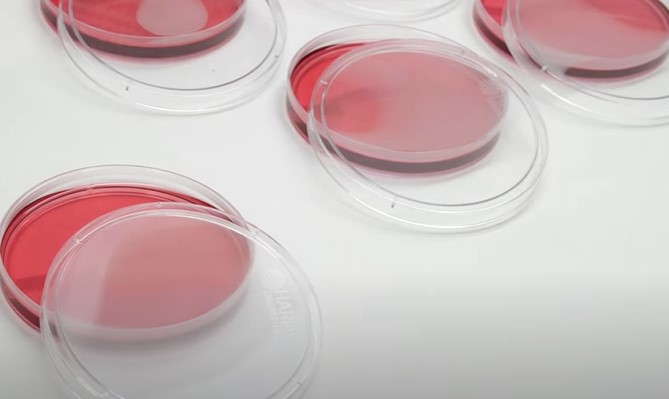 Figure: Dispensing and Drying of Culture Media
Dispensing of agar or liquid media in tubes
- Use tubes with lids that allow ventilation (e.g., screw caps), do not tighten completely.
- Put tubes in an autoclavable rack.
- Mix gently by rotating the flask before dispensing
- Dispense the correct volume per tube. Use sterile, graduated pipettes or a media distribution syringe/pump
- Close screw caps tightly after autoclaving
Drying of plates/tubes
- Post-preparation drying, to set the agar and remove bulk condensation: several hours to overnight at room temperature. This is done once, after pouring.
- Selective media: about 30 minutes with the lid ajar. If contamination risk is high, keep lids closed.
- Dry before packing to prevent condensation on the lids. Avoid over-drying (cracks).
- Drying depends on the type of media:
For agar slants, let dry in a sloped position to give a butt of 2.5-3 cm deep and a slope of 2-2.5 cm long. Use a standardized and validated rack. For agar, semi-solid tubes, and liquid media: let dry in a rack (vertical position).
Packing and Storage
Label individual plates with name (abbreviated/code), preparation date, and lot number. Wrap the plates in sealed, labeled plastic bags, a maximum of ten plates per bag, to avoid moisture. Store them upside down, at 2-8°C, in the dark following manufacturer’s instructions.
Shelf life
Agar media in Petri plates.
- Blood agar: 7 days; with unstable additives: 2-5 days
- Most selective media: 5-7 days
- Nutrient agar without blood: 2-4 weeks
In tubes
- Simple, non-selective broths and agars: 6 months
- Selective media: 3 weeks (2-8 weeks)
- Selenite broth: 2-3 months
Quality Control
Finally, all media, whether purchased or prepared, must be subjected to stringent quality control before being used in the diagnostic setting. Quality control (QC) should be based on a pragmatic, risk-based approach. Newly prepared and dispensed media should be quarantined until they pass QC. Read more about quality control of culture media.
Using Culture media
Bring the culture media to room temperature before use. Ensure there are no visible drops of water on the agar surface or inside the lid. If seen, do not shake off condensation water from the lid.
Instead, dry plates for 20-30 minutes at 35-37°C with agar plates upside down and agar base resting at an angle on the lid (if necessary, dry plates at 20-25°C overnight).
Note: This is a separate, shorter drying step done immediately before plating, not to be confused with the post-preparation drying above.
Do not over-dry plates (cracks in surface, surface wrinkled).
Visual sterility check before use is a mandatory step. Check the plates for contamination or growth of colonies.
Disposal of used culture media
For disposal of used culture media, follow in-country or WHO guidelines, which recommend inactivation and subsequent incineration before disposal. Inactivation (so-called ‘destruction’ or Level III inactivation) should be done in the laboratory, preferably by autoclaving.
Troubleshooting: Common Preparation Problems
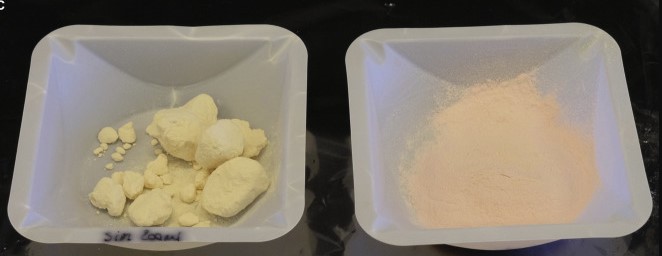 Figure: Clumped and free-flowing media
| Problem observed | Most likely causes | Action |
|---|---|---|
| Dehydrated powder clumped | Humidity too high during storage; container left open; beyond shelf life | Discard. Clumped media has altered chemical properties; cannot be weighed accurately |
| Wrong pH | pH meter not calibrated; pH checked while medium still hot (must be at 25°C); poor-quality water; contaminated container | Recalibrate pH meter; recheck water quality; discard and remake if pH outside acceptable range |
| Incomplete dissolution | Inadequate water quality; insufficient heating; flask too small; dehydrated media stored incorrectly | Boil again with stirring; if persistent, check water source and batch age |
| Caramelization | Overheating during dissolution; excessive autoclaving time or temperature; medium held at 50°C too long; repeated re-melting | Use fresh batch; reduce autoclave time; do not re-melt agar more than once |
| Soft agar / incomplete gelling | Incorrect powder: water ratio (weighing error or over-dilution); agar not fully dissolved; overheating at low pH; repeated re-melting | Recalculate; prepare fresh batch; check balance calibration |
| Turbidity / precipitation | Poor-quality water; overheating; wrong pH; incomplete dissolution; evaporative water loss | Check water conductivity; verify pH; avoid excessive heat |
| Poor growth or loss of differential properties | Overheating (most common); incorrect QC organisms; wrong pH; inhibitory substances in water or container | Use ATCC reference strains for QC; check water quality; verify autoclave temperature; never re-melt selective media |
| Condensation on plate surface | Dispensed at too high a temperature; cooled too quickly; stored without adequate drying | Dry plates before sealing; check dispensing temperature (45–50°C); pre-warm plates before use |
| Unequal filling / thin plates | Inconsistent pipetting volume; dispensed on uneven surface | Use a level surface confirmed with a spirit level; calibrate dispensing volume |
| Surface bubbles on plates | Air introduced during mixing or pouring; poured too fast | Flame the surface briefly with a Bunsen burner after pouring; avoid vigorous mixing before dispensing |
How to Remember
The preparation sequence as a chain: break any link and the whole chain fails:
Select → Store → Weigh → Dissolve → Autoclave (or not) → Cool → Add supplements → Check pH → Dispense → Dry → QC → Store
Every step has a single most critical point:
- Weigh: accuracy; never return excess to the bottle
- Dissolve: boil fully; no dry powder sticking to flask walls
- Autoclave decision: check the DO NOT AUTOCLAVE list before every new media type
- Cool: 45–50°C before supplements and dispensing; not hot, not cold
- pH: check after sterilization, at 25°C, before dispensing
- Dispense: level surface, correct volume (Mueller-Hinton: 25 mL for 4 mm depth)
- Dry: no condensation before sealing and storing
The three most consequential errors in clinical practice:
- Wrong agar depth for Mueller-Hinton: too thick gives false resistance (antibiotic diffuses less far through deeper agar → smaller zone → organism appears resistant when it is susceptible); too thin gives false susceptibility (antibiotic diffuses more easily → larger zone → organism appears susceptible when it is resistant). This directly causes incorrect antibiotic reports.
- Autoclaving DO NOT AUTOCLAVE media: destroys selectivity; organisms that should not grow will grow; pathogens may be missed. Always check before sterilizing any new medium type.
- Not cooling before adding supplements: blood added to agar that is too hot (above about 50°C) begins to lyse the red cells, darkening and degrading the blood agar. Deliberately heating blood in the base to around 80°C is exactly how chocolate agar is made, so an over-hot blood agar is really a spoiled batch drifting toward chocolate. Antibiotics and other heat-labile supplements added above 50°C denature and lose activity.
why in-house preparation matters: In high-income countries, most laboratories use ready-to-use commercial plates. In Nepal and similar settings, in-house preparation from dehydrated media is the standard because of cost and supply chain reliability. Every error in preparation has a direct patient consequence in this context because there is no commercial plate as a backup. Mastering culture media preparation is not optional, it is the foundation of diagnostic reliability.
References and further readings
- Tille, P. M. (2022). Bailey & Scott's Diagnostic Microbiology (15th ed.). Elsevier.
- Orekan, J., Barbé, B., Oeng, S., Ronat, J. B., Letchford, J., Jacobs, J., Affolabi, D., & Hardy, L. (2021). Culture media for clinical bacteriology in low- and middle-income countries: challenges, best practices for preparation and recommendations for improved access. Clinical Microbiology and Infection, 27(10), 1400–1408. https://doi.org/10.1016/j.cmi.2021.05.016
- Clinical and Laboratory Standards Institute (CLSI). (2023). M22: Quality Control for Commercially Prepared Microbiological Culture Media (5th ed.). CLSI.
- World Health Organization. (2003). Manual for the Laboratory Identification and Antimicrobial Susceptibility Testing of Bacterial Pathogens of Public Health Importance in the Developing World. Geneva: WHO.
Frequently Asked Questions
Why does incorrect Mueller-Hinton agar depth cause false antibiotic susceptibility results?
Why must certain selective media like TCBS, XLD, and DCA agar never be autoclaved?
TCBS, XLD, DCA, SS agar, and HE agar contain heat-labile selective and differential components that are chemically destroyed by autoclaving at 121°C.
In TCBS agar, the alkaline pH (approximately 8.6), the bile salts, and the thiosulfate-citrate combination (all critical for selective inhibition of non-Vibrio organisms and differentiation by sucrose fermentation) are disrupted by autoclaving.
In XLD agar, the selective mechanism depends on a specific combination of xylose, lysine, deoxycholate, and sodium thiosulfate operating at precise concentrations; heat causes chemical reactions between these components that destroy the differential capacity.
The practical consequence of autoclaving these media is subtle and dangerous: the agar may appear grossly normal (correct color, correct consistency) but will lack selectivity, allowing organisms that should be inhibited to grow freely.
This produces false-negative cultures: the plate appears to show no Salmonella or Vibrio when in fact the organism is present but the selective pressure that would have suppressed competing flora has been eliminated. These media must be prepared by boiling only (one minute with constant stirring).
How should a microbiologist investigate when a freshly prepared batch of culture media gives unexpected results during quality control testing?
A systematic approach works through the most common causes in order of likelihood.
First, verify the autoclave function: check that the autoclave indicator tape changed color correctly and review the temperature and pressure log for the sterilization cycle: incomplete sterilization or overheating are both possible.
Second, check the water quality: most failures in media preparation in resource-limited settings are due to water with excessive mineral content, incorrect pH, or contaminating substances.
Third, review the preparation record: were the correct amounts weighed (check against the logbook), was the medium heated to complete dissolution before autoclaving, was the correct incubation temperature and duration used for QC testing.
Fourth, test a fresh batch of the same medium prepared in parallel: if the new batch performs correctly, the problem is in the previous preparation process; if both batches fail, the problem may be in the water supply or the dehydrated medium itself (contamination or deterioration).
Finally, check the shelf life and storage conditions of the dehydrated medium. Improperly stored or expired dehydrated media frequently cause batch failures that appear unexpectedly.
What is the correct agar depth for Mueller-Hinton agar and why does it matter?
Mueller-Hinton agar must be poured to 4 mm ± 0.5 mm depth (approximately 20-25 mL per 90 mm Petri dish). Agar that is too thick (greater than 4.5 mm) forces antibiotic discs to diffuse through more medium before reaching any given radial distance, producing smaller inhibition zones and false resistance results.
Agar that is too thin (less than 3.5 mm) produces larger zones and false susceptibility results. This depth requirement is specified by CLSI and is one of the most important quality parameters in AST plate preparation.
What type of water should be used for preparing culture media and why?
Distilled, deionized, or reverse osmosis water should be used for culture media preparation. Tap water contains dissolved minerals (calcium, magnesium, chlorine, fluoride) that can alter the pH of the medium, interfere with selective agents, inhibit organism growth, or affect biochemical reactions.
For Mueller-Hinton agar specifically, excess calcium and magnesium ions directly affect aminoglycoside and tetracycline zone sizes. The water quality used in media preparation is therefore a quality control parameter, not merely a procedural preference.
What should be done if condensation water is seen on the agar surface or inside the lid after preparation?
Condensation on the agar surface or lid should never be shaken off. This spreads moisture across the agar surface, which causes spreading of colonies and compromises selective properties.
Instead, dry plates at 35-37°C for 20-30 minutes with plates inverted (agar side up) so condensation drains away from the surface. Do not over-dry, cracking of the agar surface indicates excessive drying and the plates should be discarded.
A simple visual check before plating: the surface should appear uniformly matte (not shiny with moisture) and crack-free.

Tankeshwar Acharya, MSc (Medical Microbiology)
Tankeshwar Acharya is an Assistant Professor in the Department of Microbiology at Patan Academy of Health Sciences (PAHS), Nepal, where he has been teaching and practicing clinical microbiology for over 14 years. He is the founder of Microbe Online, one of the leading free microbiology education resources on the web, covering bacteriology, mycology, parasitology, immunology, and clinical laboratory diagnostics written from direct experience in both the classroom and the diagnostic laboratory.
Comments
No comments yet. Be the first to share your thoughts.
Leave a comment
All comments are reviewed before they appear.