
Designing PCR Primers: 6 Useful Tips
PCR primer design determines whether amplification succeeds or fails. Learn the six key parameters — length, Tm, GC content, GC clamp, specificity, and secondary structure — with the Wallace-Itakura formula.
A reference laboratory in Kathmandu is validating a new in-house PCR assay for Mycobacterium tuberculosis detection in sputum. The primers were designed in-house by adapting a published protocol. In the first validation run, the assay produces bands in three of five negative control samples. The positive controls amplify correctly. The assay is flagged as unreliable and withdrawn.
Investigation reveals the problem: the reverse primer contains a four-base repeat at its 3′ end that promotes mispriming — the primer is annealing to non-target sequences in the template and producing spurious amplicons. The primer also has a Tm 8°C higher than the forward primer, so at the chosen annealing temperature, one primer is binding efficiently while the other is barely attached. Two design errors, both detectable at the design stage using freely available online tools, produced an assay that could not be trusted.
Good primer design is not a supplementary concern in PCR — it is the assay. A PCR reaction with correctly designed primers will work reliably across a range of conditions and samples. A reaction with poorly designed primers will produce non-specific products, inconsistent results, or complete amplification failure — regardless of how well everything else is optimised.
Designing a good pair of PCR primers is probably the single most important factor for successful PCR reactions. A primer is a short, synthetic, single-stranded DNA sequence that is complementary to the template region of DNA. PCR reactions require two complementary oligonucleotides primers; forward primer and reverse primer. Forward primer anneals to the region upstream of the DNA segment to be amplified and the reverse primer anneals to the region downstream of the DNA to be amplified.
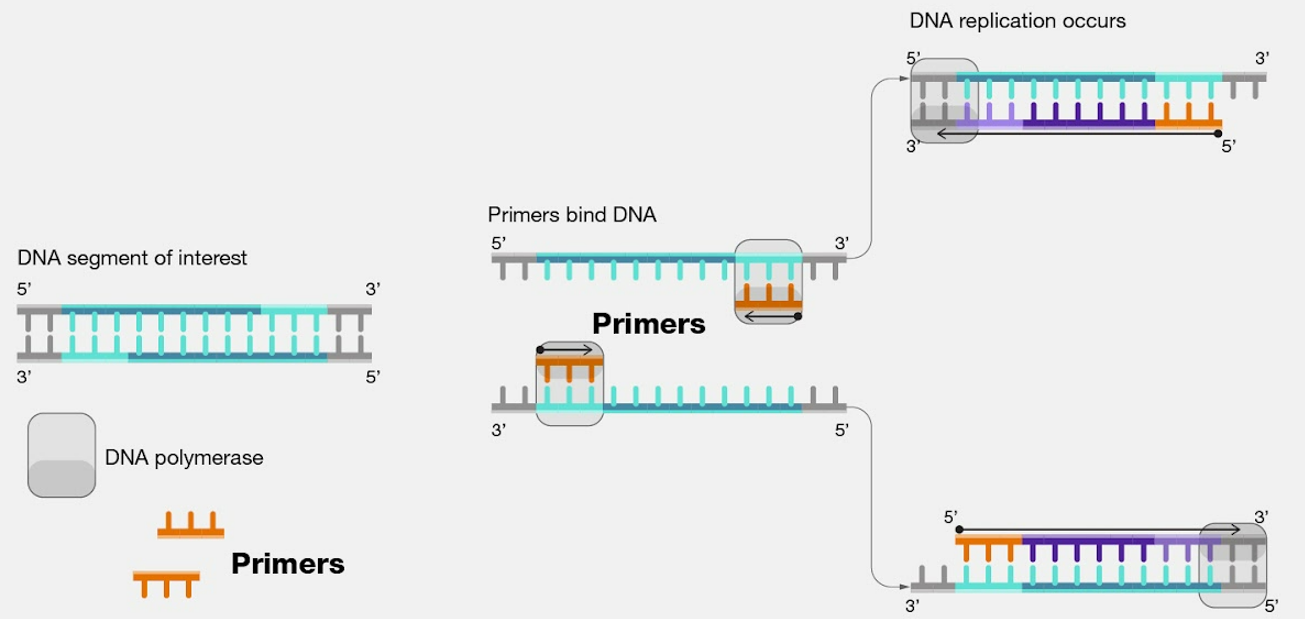 Primers are the key to the success or failure of a PCR experiment. If the primers are designed correctly, the experiment results in the amplification of the target region of the template molecule but if the primers are incorrectly designed, the experiment will fail possibly because no amplification occurs or the wrong fragments get amplified. Designing a working primer can be a bit tricky, with so many ways to design them and a number of small details that must be taken into consideration.
The process of designing specific primers typically involves two stages.
- The primer’s flanking regions of interest are generated using bioinformatics tools.
- The primer’s pairs are searched against a nucleotide sequence using tools such as the basic local alignment search tool (BLAST) to examine the potential target.
Why Primer Design Determines PCR Success or Failure
Every component of a PCR reaction — the polymerase, the buffer, the thermocycler — performs its function correctly given the right conditions. None of them can compensate for a poorly designed primer. The primer is the only component that defines what gets amplified. If the primer binds the wrong sequence, the wrong product is amplified — and the result is not just useless but potentially misleading in a clinical context.
Three failure modes account for most primer-related PCR problems:
Non-specific amplification: The primer anneals to sequences other than the intended target. The result is multiple bands on gel, or a real-time PCR curve that rises but does not correspond to the target organism. In a diagnostic assay, this is a false positive.
No amplification: The primer cannot bind the template — because Tm is too high for the annealing temperature chosen, because the primer has formed a hairpin with itself, or because the primer sequence contains too many repeats. The result is a flat real-time PCR curve or no band on gel. In a diagnostic assay, this is a false negative.
Primer dimer formation: The forward and reverse primers bind to each other instead of the template, consuming reagents and producing a short artifactual band. In SYBR Green real-time PCR, primer dimers generate fluorescent signal indistinguishable from target amplification.
All three failure modes are predictable and preventable at the design stage — which is why the six parameters below matter.
PCR Primer Design Consideration
There are several properties you’ll need to consider while designing successful PCR primers. Some of them are;
- Primer specificity
- The length of the primer
- Annealing and melting temperatures of the primers
- The GC content of the primer,
- GC Clamp and the
- Secondary structure of the primer
Primer Specificity
Design primer that is complementary to the template region of the DNA. It must be ensured that the likelihood of annealing to sequences other than the gene of interest is very low. Primer specificity is usually dependent on the length and annealing temperature. A sequence homology search (eg, primer blast) with known template sequences in the public genome database like NCBI helps determine its specificity.
Primer Length
PCR primers of 18-24 base pairs are optimal to get the best yields. The length is long enough for adequate specificity. Also, it is short enough for primers to bind easily to the template at the annealing temperature.
If your primers are too short, they could produce more non-specific DNA amplification products. But on the other hand, if they’re too long they can result in slower hybridization rates.
Annealing and Melting Temperatures
The annealing temperature is the temperature at which the primer hybridizes with the template DNA. Annealing temperature affects the specificity of the reaction. If the annealing temperature is too high, the primers and the template remain separate but if the annealing temperature is too low, primers may bind nonspecifically to the template.
The ideal annealing temperature must be low enough to enable hybridization between the primer and the template DNA but high enough to prevent mismatch hybrids from forming. The annealing temperatures of both primers should be close to each other. Annealing temperature should be five degrees below the melting temperature so that most of the primers bind to the template. Lowering the temperature any further, however, could result in more non-specific binding.
The melting temperature (Tm) is a temperature where half of the primers will dissociate from the DNA. The two primers (forward primer and reverse primer) should ideally have similar melting temperatures. Primers with Tm in the range of 52-58°C generally produce the best results. Primers with melting temperatures above 65°C have a tendency for secondary annealing.
If the Tm of your primer is very low, including a sequence with more GC content, or extending the length of the primer a little may help.
The GC content of the sequence gives a fair indication of the primer Tm. There are many tools that can help to calculate Tm online but there’s an easy way you can quickly do the rough math. Simply add four degrees celsius for every G or C, and two degrees celsius for every A or T in your primer sequence. This calculation is based on Wallace-Itakura formula for calculating oligonucleotide melting temperatures;
Tm= 2 (A+T) + 4 (G+C)
GC content of the primer
Higher GC content (the number of G’s and C’s in the primer as a percentage of the total bases) ensures a more stable binding between the primers and the template DNA because G-C base pairs are stronger than A-T base pairs. The ideal GC content of a primer is 40-60%. For example, if a primer contains twenty base pairs total, and has six Gs and four Cs, it would have a 50 percent GC content.
GC base pairs are useful because they have three hydrogen bonds, one more than the AT pairs. Therefore, GC pairs help promote stronger and more specific binding to the template DNA.
GC Clamp
You’ll also want to include a GC clamp at the 3′ end of the primers. Including two to three Gs and Cs to the 3′ ends of the primer helps promote specific binding between the primer and the template.

Secondary Structure
Depending on the sequence of the primer there’s a chance it could form hairpins or dimerize with itself or the other primer. This means it could base pair with itself or base pair with the other primer instead of the template.

Primer dimer (PD) consists of two primer molecules that have hybridized with each other instead of the template because of strings of complementary bases in the primers. To prevent primer dimerization, you should avoid the presence of identical nucleotides between forward and reverse primers (i.e. inter-primer homology).
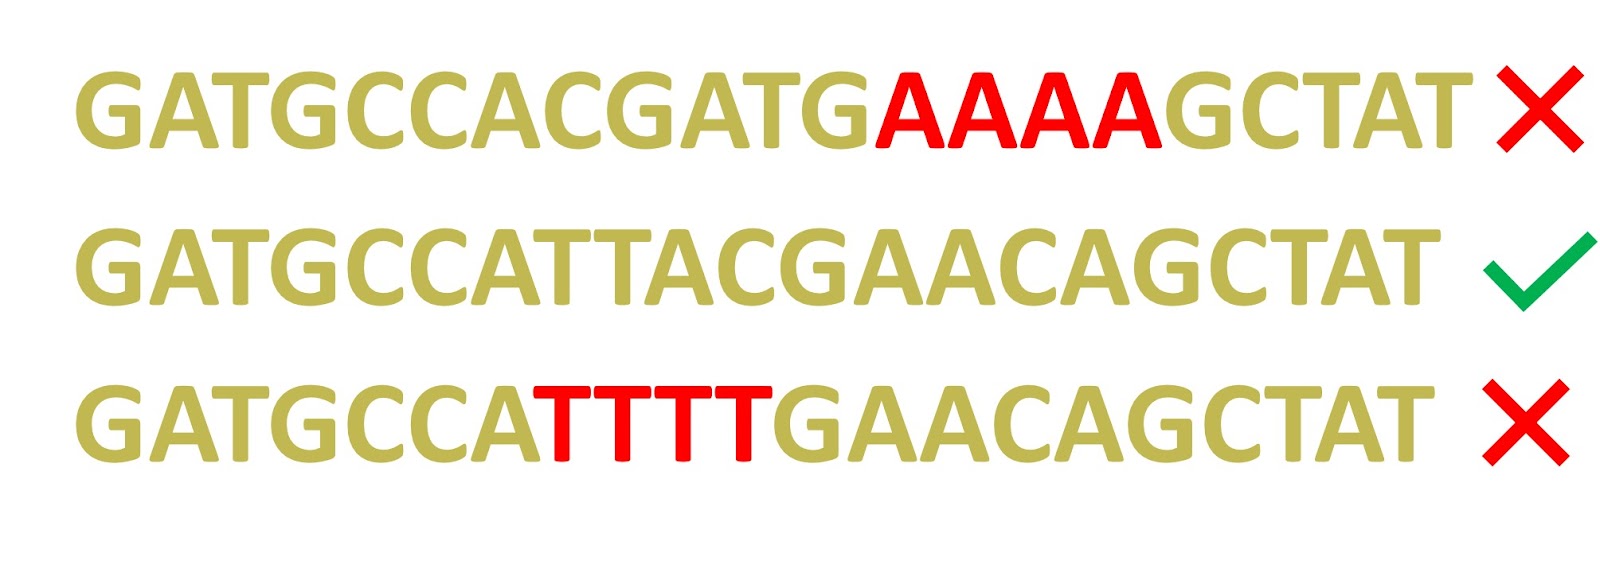 Also, be aware of the presence of repeats in your nucleotide sequence. Too many repeats could cause mispriming, and the primer can anneal to unintended locations. To prevent dimerization and mispriming, avoid running 4 or more of one base, or dinucleotide repeats (for example, ACCCC or ATATATAT). Similarly, avoid intra-primer homology i.e., the presence of more than 3 bases that complement within the primer.
Various online tools can be used that warn potential hairpins, self-dimers, or cross-dimers formation in a particular nucleotide sequence. For example, MFEprimer-3.0 is a tool that can be used to check the quality of PCR primers. It is used for checking the presence of non-specific amplicons, dimers, hairpins, etc in the candidate primers.
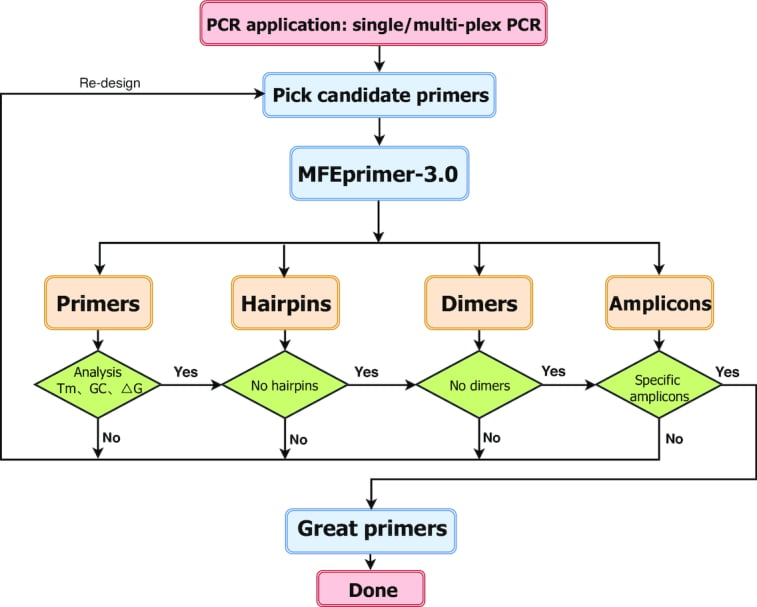 If your primes do not give you the PCR product you’re looking for, you could try changing the condition of your PCR reaction like the annealing temperature. If still not having any luck, it might be time to go back to the drawing board and redesign your primers.
What Goes Wrong: Primer Design Failures and Their Causes
| Problem | Cause | Prevention |
|---|---|---|
| Non-specific amplification (multiple bands) | Primer too short; annealing temperature too low; primer anneals to homologous sequences elsewhere in genome | Use 18–24 bp primers; set annealing temperature at Tm − 5°C; verify specificity with Primer BLAST against full genome |
| No amplification | Primer Tm too high for chosen annealing temperature; hairpin formation blocks 3′ end; primer binds to itself | Check Tm with Wallace-Itakura formula; run secondary structure check (MFEprimer); lower Tm by reducing GC content or shortening primer |
| Primer dimer | Forward and reverse primers are complementary to each other; 3′ ends hybridise | Check inter-primer homology; avoid >3 complementary bases between primers; do not use >3 G/C at 3′ end |
| Weak or inconsistent amplification | Tm mismatch between forward and reverse primers; one primer binds efficiently, other does not | Design both primers to within 1–2°C Tm of each other; recalculate using same formula for both |
| Wrong product size | Primer anneals to a repeated or homologous region at a different location in the genome | BLAST both primers against the full template genome before synthesis; confirm unique binding site |
| Amplification fails on clinical samples but works on pure DNA | Inhibitors in clinical specimen interfere with primer binding at suboptimal concentrations | Increase primer concentration slightly; use inhibitor-resistant polymerase; include internal amplification control |
Designing Primer
If you know the gene sequence of your gene of interest and want to amplify the whole gene, then designing a primer can be pretty straightforward.
- Forward primer: First 20 nucleotide sequences of your gene of interest can be the primer sequence for your forward primer.
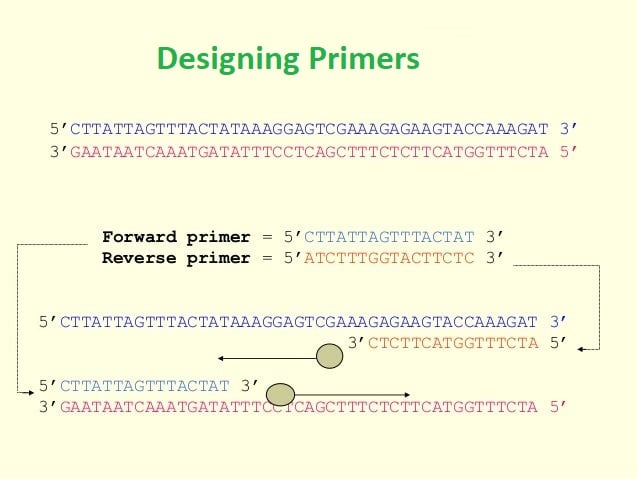 - Reverse primer: Select the last 20 nucleotide sequences of your gene of interest. Past that sequence code in the text box in this link. Press reverse complement The gene sequence that you get is your reverse primer.
The manual selection of optimal PCR primer sets can be quite tedious so currently, suitable PCR primers are chosen using software programs or online tools such as primer BLAST, eurofins primer design tool, etc. Prior set selection algorithms of primer designing software help to select the best primer candidate by calculating and analyzing different sequences as per parameters (such as melting point, GC content, primer length, etc) specified by the users.
Primer designing using NCBI primer BLAST
You can also design the PCR primers using NCBI primer BLAST tools. Check this link for the detailed methodology
How to design PCR primers and check them for specificity using Primer BLAST
Uses of Primers
Apart from amplifying the target gene of interest in PCR methods, primers are also used in DNA sequencing and other experimental processes such as genotyping (to detect sequence variations in alleles in specific cells or organisms), cloning DNA fragments of interest, and mutagenesis (introduction of desired mutations into the gene of interest to study gene expression and other attributes).
"For an overview of PCR types and clinical applications, see Polymerase Chain Reaction: Steps, Types, and Applications
How to Remember
The six parameters — SLAT GC: A mnemonic for the six primer design considerations:
- Specificity
- Length (18–24 bp)
- Annealing and melting temperature (Tm 52–58°C; annealing = Tm − 5°C)
- Three Gs/Cs at 3′ end (GC clamp — but not more than three)
- GC content (40–60%)
- Cross-complementarity check (secondary structure — no hairpins, no dimers)
The Wallace-Itakura formula — count the bases: Tm = 2(A+T) + 4(G+C)
G and C contribute 4°C each because they form three hydrogen bonds. A and T contribute 2°C each because they form only two. Count every base in the primer, apply the formula, and the result is the approximate Tm. Annealing temperature is that number minus 5°C.
Too short = non-specific; too long = slow binding. A primer shorter than 18 bp has insufficient specificity — it will find too many binding sites in a complex genome. A primer longer than 24 bp binds so strongly that the annealing temperature must be raised, slowing hybridisation and reducing efficiency. The 18–24 bp range is the sweet spot between specificity and kinetics.
GC clamp = anchor at the 3′ end. The 3′ end of the primer is where extension begins. A GC clamp (2–3 G/C residues at the 3′ end) anchors the primer firmly to the template at the critical initiation point. But more than 3 G/C residues at the 3′ end promotes primer dimer formation — the same strong binding that anchors the primer to the template also causes it to bind to the other primer's 3′ end. Two to three is the rule: enough to anchor, not enough to dimerize.
Forward primer = first 20 bases of the gene; reverse primer = reverse complement of the last 20 bases. This is the practical starting point for primer design when the gene sequence is known. The forward primer matches the 5′ start of the sense strand. The reverse primer is the reverse complement of the 3′ end of the sense strand — meaning you take the last 20 bases, reverse the sequence, and swap each base for its complement (A↔T, G↔C).
Key exam facts in one table
| Topic | Key fact |
|---|---|
| Optimal primer length | 18–24 base pairs |
| Too short (<18 bp) | Non-specific amplification — primer finds too many binding sites |
| Too long (>24 bp) | Slower hybridisation rate; reduced amplification efficiency |
| Optimal Tm range | 52–58°C; primers with Tm >65°C prone to secondary annealing |
| Annealing temperature | Set at Tm − 5°C to allow efficient primer binding without non-specific annealing |
| Both primers Tm | Should be identical or within 1–2°C of each other |
| Wallace-Itakura formula | Tm = 2(A+T) + 4(G+C); G/C = 4°C each (3 H-bonds); A/T = 2°C each (2 H-bonds) |
| Optimal GC content | 40–60% |
| GC clamp | 2–3 G/C residues at 3′ end; promotes specific binding at extension initiation point |
| GC clamp limit | No more than 3 G/C at 3′ end — excess causes primer dimer formation |
| Primer dimer | Forward and reverse primers bind each other instead of template; consumes reagents; produces artifactual band |
| Hairpin | Primer folds back on itself due to intra-primer complementarity; blocks 3′ end from template binding |
| Specificity verification tool | NCBI Primer BLAST — searches primer sequences against genome database for off-target binding sites |
| Secondary structure check tool | MFEprimer-3.0 — checks for hairpins, self-dimers, cross-dimers |
| Forward primer selection | First 20 nucleotides of the target gene sequence (sense strand, 5′ end) |
| Reverse primer selection | Reverse complement of the last 20 nucleotides of the target gene sequence |
References and further reading
- Wang, K., Li, H., Xu, Y., et al. (2019). MFEprimer-3.0: Quality control for PCR primers. Nucleic Acids Research, 47(W1), W610–W613. https://doi.org/10.1093/nar/gkz351
- Dieffenbach, C. W., Lowe, T. M., & Dveksler, G. S. (1993). General concepts for PCR primer design. PCR Methods and Applications, 3(3), S30–S37. https://doi.org/10.1101/gr.3.3.S30
- Ye, J., Coulouris, G., Zaretskaya, I., et al. (2012). Primer-BLAST: A tool to design target-specific primers for polymerase chain reaction. BMC Bioinformatics, 13, 134. https://doi.org/10.1186/1471-2105-13-134
- Mahon, C. R., Lehman, D. C., & Manuselis, G. (2018). Textbook of Diagnostic Microbiology (6th ed.). Elsevier.
- Clinical and Laboratory Standards Institute (CLSI). (2016). Clinical Microbiology Procedures Handbook (4th ed.). American Society of Microbiology. https://doi.org/10.1128/9781555818814
Frequently Asked Questions
What is the optimal length for a PCR primer and why?
How is melting temperature (Tm) calculated for a PCR primer?
What is a GC clamp and why is it important in primer design?
What is a primer dimer and how does it affect PCR?
What online tools are used to verify PCR primer quality before synthesis?

Tankeshwar Acharya, MSc (Medical Microbiology)
Tankeshwar Acharya is an Assistant Professor in the Department of Microbiology at Patan Academy of Health Sciences (PAHS), Nepal, where he has been teaching and practicing clinical microbiology for over 14 years. He is the founder of Microbe Online, one of the leading free microbiology education resources on the web, covering bacteriology, mycology, parasitology, immunology, and clinical laboratory diagnostics written from direct experience in both the classroom and the diagnostic laboratory.