

In 2011 and 2012, health departments across the United States traced a cluster of Salmonella Typhimurium infections back to an unexpected source. It was not contaminated food. It was the microbiology teaching laboratories where students were learning to handle the very organism that made them sick. Students, and in some cases the people they lived with, fell ill after working with clinical isolates, carrying the organism out of the lab on hands, pens, and phones. No one had touched an exotic Risk Group 3 pathogen. This was Salmonella, an everyday Risk Group 2 organism that a student meets in any diagnostic lab.
That outbreak is the reason the biosafety rules tighten at BSL2, and it is why a formal set of teaching guidelines exists at all. The jump from BSL1 to BSL2 is not about scarier equipment. It is about the moment the organism on your loop can genuinely make you, or the person you go home to, sick. Everything below follows from that single shift in stakes.
Educators need to be aware of the risks inherent in using microorganisms in the laboratory and must use best practices to minimize the risk to themselves, students, and the community.
The following guidelines are designed to encourage awareness of the risks, uniformity in best teaching practices, and safety of the students. These guidelines are not mandatory but are designed to promote best practices in the teaching laboratory.
The use of organisms that require BSL2 facilities is not recommended for typical school-level settings (primary and secondary education) unless these facilities are available. BSL2 is suitable for organisms that pose a moderate individual risk and low community risk for infection. When good microbiological techniques are used, these organisms rarely cause serious disease, and effective treatment for laboratory-acquired infections is available.
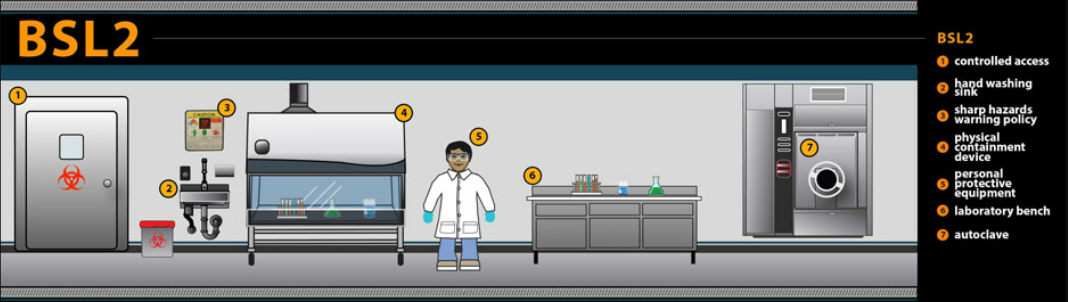 Figure: Biosafety Lab Level-2 (BSL-2)
Best practices must be adopted to minimize the risk of laboratory-acquired infections and to train students in the proper handling of organisms that require BSL2 procedures. Students should always demonstrate proficiency in laboratory techniques using organisms that require BSL1 practices before being allowed to handle organisms that require BSL2 practices.
The practices set forth in these guidelines fall into six major categories: personal protection, laboratory physical space, stock cultures, standard laboratory practices, training, and documents. For ease of use, the requirements and practices are brief.
BSL1, BSL2, BSL3, and BSL4 compared
The four biosafety levels build on one another. Each level keeps everything from the level below and adds new barriers, driven by how the organism is transmitted and how severe an infection would be.
The critical transitions to memorize are BSL1 to BSL2 (the organism can now cause disease) and BSL2 to BSL3 (the organism is now dangerous by inhalation, so every manipulation moves into containment).
| Feature | BSL1 | BSL2 | BSL3 | BSL4 |
|---|---|---|---|---|
| Risk group | RG1: not known to consistently cause disease in healthy adults | RG2: associated with human disease; moderate individual, limited community risk | RG3: serious or lethal disease; may transmit; treatment usually available | RG4: life-threatening; high transmission; often no treatment or vaccine |
| Example agents | E. coli K-12, B. subtilis, S. cerevisiae | S. aureus, Salmonella, hepatitis B, HIV | M. tuberculosis, Coxiella burnetii, Brucella, Francisella tularensis | Ebola, Marburg, Lassa, variola (smallpox) |
| Main route of concern | Not typically infectious | Percutaneous injury, ingestion, mucous-membrane exposure | Inhalation of infectious aerosols | Aerosol; extreme individual and community risk |
| PPE (primary barriers) | Coat recommended, gloves as needed | Coat and gloves required; face protection when splashing | Respiratory protection; solid-front gowns; gloves | Positive-pressure full-body suit, or work in a Class III cabinet line |
| Biosafety cabinet | Not required; open bench | Required for aerosol-generating or large-volume work; routine bench work permitted | Required for all manipulations of the agent | Class III BSC, or Class II inside a suit laboratory |
| Lab access | Standard | Restricted while work is in progress; biohazard sign posted | Controlled entry through self-closing, lockable doors | Strictly controlled; isolated or dedicated building with change and shower rooms |
| Facility (secondary barriers) | Standard lab with a sink | Sink, autoclave available, biohazard signage | Directional inward airflow, double-door entry, sealed surfaces, autoclave in the lab | Sealed room, dedicated exhaust and HEPA filtration, effluent decontamination, airlock entry |
| Medical surveillance / vaccines | Not required | Offered as appropriate (for example, hepatitis B vaccine) | Surveillance recommended; baseline serum often stored | Rigorous surveillance required |
Note the two levels that split Staphylococcus: streak plating S. epidermidis sits at BSL1, while pipetting S. aureus sits at BSL2. Level is a property of the whole task, not just the label on the plate.
Personal Protection Requirements for BSL2 teaching laboratories
- Wear safety goggles or safety glasses for all routine laboratory procedures involving liquid cultures, including pipetting and spread plating. Where a procedure may create a splash, add a face shield or mask over the goggles. Face protection is not required for work performed inside a biological safety cabinet, since the sash provides the barrier.
- Wear closed-toe shoes that cover the top of the foot.
- Wear gloves when handling microorganisms or hazardous chemicals.
- Wear laboratory coats.
Laboratory Physical Space Requirements for BSL2 teaching laboratories
Require all laboratory space to include:
- Nonporous floors, benchtops, chairs, and stools
- A sink for handwashing
- An eyewash station
- A lockable door to the room
Additional requirements:
- Follow proper pest control practices
- Keep the storage area for personal belongings separate from the work area
- Keep a working and validated autoclave in the building, or arrange for licensed waste removal according to local, state, and federal regulations
- Post biohazard signage wherever cultures are used and stored, on the door to the room, and on any containers used to transport cultures
- Recommended: have a biological safety cabinet, which is required when large culture volumes are used or when a procedure will generate aerosols
Stock Culture Requirements for BSL2 teaching laboratories
- Only use cultures from authorized, commercial, or reputable sources (e.g., an academic laboratory or state health department). Maintain documents about stock organisms, sources, and handling of stock cultures.
- Obtain fresh stock cultures of microorganisms annually (e.g., purchased, revived from frozen stock cultures, etc.) to be certain of the source culture, minimize spontaneous mutations, and reduce contamination.
- Keep stock cultures in a secure area.
Standard Laboratory Practices for BSL2 teaching laboratories
- Wash hands on entering the laboratory, after handling any culture, after removing gloves, and before leaving.
- Tie back long hair.
- Do not wear dangling jewelry.
- Disinfect bench before and after the laboratory session with a disinfectant known to kill the organisms handled.
- Use disinfectants according to manufacturer instructions.
- Do not bring food, gum, drinks (including water), or water bottles into the laboratory.
- Do not touch the face, apply cosmetics, adjust contact lenses, or bite nails.
- Do not handle personal items (cosmetics, cell phones, calculators, pens, pencils, etc.) while in the laboratory.
- Do not mouth pipette.
- Label all containers clearly.
- Keep door closed while the laboratory is in session. Laboratory director or instructor approves all personnel entering the laboratory.
- Minimize the use of sharps. Use needles and scalpels according to appropriate guidelines and precautions. Do not recap needles; if recapping is unavoidable, use the one-handed scoop technique. Dispose of sharps directly into a puncture-resistant container.
- Use proper transport vessels (test tube racks) for moving cultures in the laboratory and store vessels containing cultures in a leak-proof container when work with them is complete.
- Use leak-proof containers for storage and transport of infectious materials.
- Use microincinerators or disposable loops rather than Bunsen burners.
- Arrange for proper (safe) decontamination and disposal of contaminated material (e.g., in a properly maintained and validated autoclave) or arrange for licensed waste removal according to local, state, and federal regulations.
- Do not handle broken glass with fingers; use a dustpan and broom.
- Notify instructor of all spills or injuries.
- Document all injuries according to university or college policy.
- Keep note-taking and discussion practices separate from work with hazardous or infectious material.
- Use only institution-provided marking pens and writing instruments.
- Teach, practice, and enforce the proper wearing and use of gloves.
- Advise immune-compromised students (including those who are pregnant or may become pregnant) and students living with or caring for an immune-compromised individual to consult physicians to determine the appropriate level of participation in the laboratory.
Training Practices for BSL2 teaching laboratories
- Be aware that student assistants may be employees of the institution and subject to OSHA, state, and/or institutional regulations.
- Conduct extensive initial training for instructors and student assistants to cover the safety hazards of each laboratory. The institution’s biosafety officer or microbiologist in charge of the laboratories should conduct the training.
- Conduct training for instructors whenever a new procedural change is required.
- Conduct training for student assistants annually.
- Require students and instructors to handle microorganisms safely and responsibly.
- Require students to demonstrate competency at BSL1 before working in a BSL2 laboratory.
- Inform students of safety precautions relevant to each exercise before beginning the exercise.
- Emphasize to students the importance of reporting accidental spills and exposures.
Document Practices for BSL2 teaching laboratories
- Require students to sign safety agreements explaining that they have been informed about safety precautions and the hazardous nature of the organisms they will handle throughout the course.
- Maintain student-signed safety agreements at the institution.
- Prepare, maintain, and post proper signage.
- Document all injuries and spills; follow university policy, if available.
- Make Safety Data Sheets (SDS, formerly called MSDS) available at all times; follow institutional documentation guidelines regarding the number of copies, availability via print or electronic form, etc.
- Post emergency procedures and updated contact information in the laboratory.
- Maintain and make available (e.g., in a syllabus, in a laboratory manual, or online) to all students a list of all cultures (and their sources) used in the course.
- Keep a biosafety manual specific to the laboratory and/or course in the laboratory.
- Keep a copy of the current version of Biosafety in Microbiological and Biomedical Laboratories (BMBL) in the laboratory.
How to Remember
- The BSL1 to BSL2 jump is "the bug can now bite." Almost everything that was recommended at BSL1 becomes required at BSL2: lab coat, gloves, belongings kept separate, a validated autoclave, and keeping note-taking away from the bench. If you learned BSL1 as "optional extras," BSL2 is where those extras become the rules.
- The biohazard trefoil is the visual signature of BSL2. BSL1 has no biohazard sign. The moment you see the trefoil on a door, on a storage area, and on transport containers, you are at BSL2 or above. Sign on the door equals restricted access while work is in progress.
- The cabinet is for aerosols, not for everything. A common misread is that BSL2 means "work inside the cabinet." Routine pipetting and plating happen on the open bench at BSL2. The biological safety cabinet becomes mandatory only for aerosol-generating procedures or large culture volumes.
- Prove it at BSL1 first. You must demonstrate competency with BSL1 organisms before you are allowed to handle BSL2 organisms. The skill ladder is deliberate, because technique is the primary barrier when the organism can actually infect you.
- BSL2 versus BSL3 is the breathing line. BSL2 dangers enter through cuts, swallowing, and splashes to the eyes or mouth. BSL3 dangers enter through the air. That is why, at BSL3, every manipulation moves into containment rather than just the aerosol-generating ones.
Key exam facts in one table
| Rule / Requirement | BSL2 Requirement | Why it matters |
|---|---|---|
| Biosafety cabinet | Required for aerosol-generating procedures and large-volume work; open-bench work otherwise permitted | Aerosols are the main route to a laboratory-acquired infection, so containment scales with the task |
| Work surface | Open bench for routine work; cabinet for aerosols | Standard bench with disinfection is adequate for non-aerosol procedures |
| Lab coat | Required | Prevents transfer of organisms to clothing and to areas outside the lab |
| Gloves | Required when handling microorganisms or hazardous chemicals | RG2 organisms can infect through skin breaks and contaminated hands |
| Face protection | Goggles routinely; add face shield or mask for splash procedures (not needed inside a BSC) | Protects mucous membranes from splash exposure |
| Lab access | Restricted while work is in progress; instructor approves entry | Limits exposure of untrained people to active cultures |
| Biohazard signage | Required on the door, on storage, and on transport containers | Signals the presence of RG2 agents and the need for precautions |
| Training prerequisite | Demonstrated BSL1 competency before BSL2 work | Technique is the primary barrier, so it must be proven first |
| Environmental / unknown isolates | May be subcultured at BSL2 | An unidentified isolate could be RG2, so it belongs here, not at BSL1 |
| Waste decontamination | Validated autoclave on site, or licensed removal | Kills RG2 organisms before disposal |
| Documents | Biosafety manual and a current copy of the BMBL kept in the lab | Ensures procedures and containment guidance are on hand |
| Vaccination / surveillance | Offered as appropriate (for example, hepatitis B vaccine) | Adds a medical barrier for known bloodborne risks |
Where Students Get Confused
- Thinking BSL2 means "work inside the cabinet at all times." Routine pipetting and plating are done on the open bench at BSL2. The biological safety cabinet is required only for aerosol-generating procedures or large culture volumes. Confusing this with BSL3, where all agent manipulation is in containment, is the most common error.
- Carrying the BSL1 "never subculture unknowns" rule into BSL2. At BSL1 you must not subculture unidentified environmental isolates, precisely because they might be RG2. BSL2 is the level where that subculturing is appropriately done. The rule flips, and students often apply the BSL1 version everywhere.
- Treating BSL2 practices as "BSL1 plus a sign." Several BSL1 recommendations become firm requirements at BSL2: lab coat, gloves, belongings kept separate, a validated autoclave, microincinerators or disposable loops instead of Bunsen burners, and keeping note-taking away from the work area. The change from "recommended" to "required" is the exam trap.
- Assuming a student can start at BSL2. Demonstrated BSL1 competency is a prerequisite. The progression is a safety control, not a formality.
- Blurring BSL2 and BSL3. BSL2 risk enters through injury, ingestion, and mucous-membrane splash. BSL3 risk enters through inhaled aerosols. That single difference, the route of transmission, is what drives every added barrier at BSL3.
References
- Byrd JJ, Emmert E, Maxwell R, Townsend H. Guidelines for Biosafety in Teaching Laboratories Version 2.0: A Revised and Updated Manual for 2019. Journal of Microbiology & Biology Education. 2019;20(3):20.3.72. doi:10.1128/jmbe.v20i3.1975
- Emmert EAB; ASM Task Committee on Laboratory Biosafety. Biosafety Guidelines for Handling Microorganisms in the Teaching Laboratory: Development and Rationale. Journal of Microbiology & Biology Education. 2013;14(1):78-83. doi:10.1128/jmbe.v14i1.531
- U.S. Department of Health and Human Services, CDC, NIH. Biosafety in Microbiological and Biomedical Laboratories (BMBL). 6th ed. Atlanta, GA: CDC; 2020.
- World Health Organization. Laboratory Biosafety Manual. 4th ed. Geneva: WHO; 2020.

Comments
No comments yet. Be the first to share your thoughts.
Leave a comment
All comments are reviewed before they appear.