
Nasopharyngeal Swab Collection: Procedure, Depth, and Common Mistakes

On this page
A patient with three days of fever and cough has a nasopharyngeal swab taken for respiratory virus PCR. The swab goes into the nostril, meets resistance after about two centimeters, and is withdrawn. The result comes back negative.
The swab never reached the nasopharynx. It stopped at the anterior nasal cavity, where the turbinates create resistance that feels convincing but arrives far too early. The tissue that harbors respiratory viruses in the highest concentration sits several centimeters further back.
A nasopharyngeal swab that stops short is not a poor sample. It is a different sample entirely, taken from the wrong anatomical site, and it will read as negative regardless of how much virus the patient is shedding.
Infections of the upper respiratory tract usually involve the ears, the mucus membranes lining the nose and throat above the epiglottis, and the sinuses. Upper respiratory tract specimens should be collected within three days of symptom onset and no later than seven days, ideally before antimicrobial chemoprophylaxis or therapy.
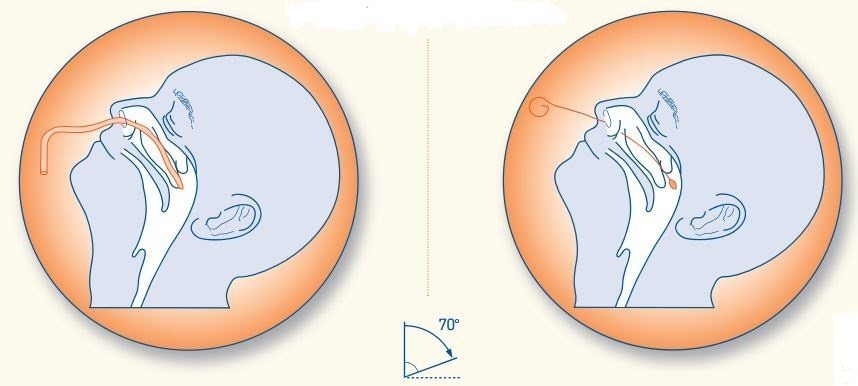 Figure: Procedure for Nasopharyngeal aspirate and Swab
Most infections involving the nose and throat are viral. Three specimen types are routinely submitted for respiratory virus testing: the nasopharyngeal (NP) swab, the oropharyngeal (OP) swab, and the nasopharyngeal wash or aspirate.
They are not equivalent. Nasopharyngeal wash or aspirate gives the highest yield and is the specimen of choice where it can be obtained, particularly in children. The NP swab is the practical standard for most settings and performs nearly as well when taken correctly. The OP swab is the weakest of the three for most respiratory viruses and should be a second choice or a supplement, not a substitute, unless the target organism specifically favors it.
Use a mask, gloves, and eye protection while collecting the specimen.
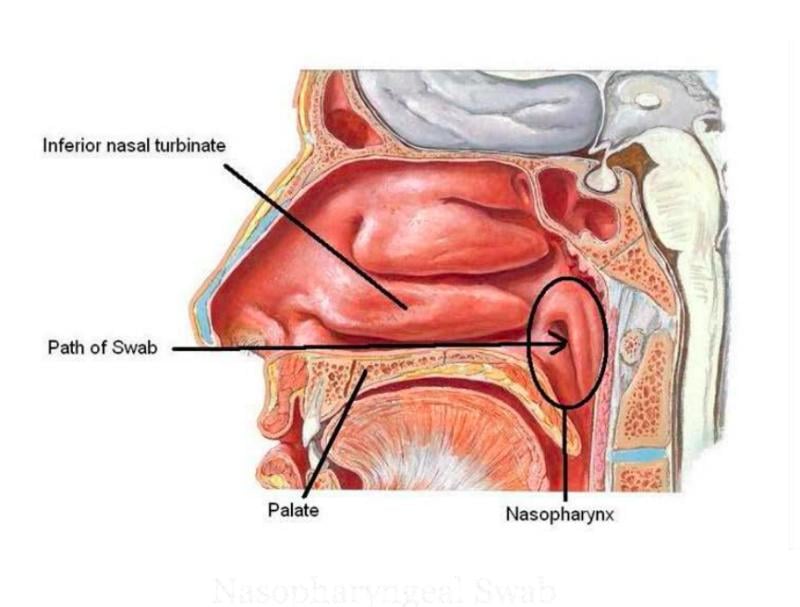 Figure: Nasopharyngeal swab
Which Specimen to Collect
| Specimen | Yield | Use it when |
|---|---|---|
| Nasopharyngeal wash or aspirate | Highest | Children, especially infants; where trained staff and suction are available; when maximum sensitivity matters |
| Nasopharyngeal swab | High, near aspirate when technique is correct | Routine adult and pediatric collection; the practical standard in most settings |
| Oropharyngeal swab | Lower for most respiratory viruses | As a supplement to an NP swab, when NP collection is not tolerated or is contraindicated, or where the target favors the oropharynx (group A Streptococcus, diphtheria) |
| Combined NP plus OP | Slightly higher than NP alone | When guidance specifies it, or when maximizing sensitivity in a suspected case with a prior negative |
Where both an NP and an OP swab are taken for the same viral investigation, both may be placed in a single tube of transport medium. This is deliberate: combining them concentrates the yield into one specimen rather than splitting the request across two.
Contraindications to NP swab collection include recent nasal surgery, significant nasal trauma, marked deviated septum obstructing passage, and coagulopathy or anticoagulation with a bleeding tendency. Use an OP swab or nasal wash in these patients.
Materials
- Sterile Dacron (polyester) or nylon flocked swab on a flexible plastic shaft, minitip for nasopharyngeal use. Nylon flocked swabs give the best yield.
- Viral transport medium or universal transport medium, 1 to 3 mL in a screw-cap tube.
- Personal protection equipment, PPEs (i.e., mask, gloves, eye protection, gowns).
- Requisition form
- Biohazard label
- Biohazard bag
- Shipping container with cold packs
Swabs that must not be used.
Cotton-tipped swabs, calcium alginate swabs, and any swab on a wooden shaft are unacceptable for respiratory virus collection. Calcium alginate inactivates viral particles and inhibits PCR. Wooden shafts release substances that inhibit amplification and can splinter, which is a genuine injury risk in the nasopharynx. Cotton carries PCR inhibitors and its fatty acids are toxic to several fastidious organisms.
For the full comparison of swab materials and which to use for each specimen type, see Types of Swabs in Microbiology.
Viral transport medium is not interchangeable with bacterial transport media such as liquid Amies. For what VTM contains and how specimens in it must be stored, see Viral Transport Media (VTM).
Procedure
Before Sample Collection
- Explain the procedure to the patient. Be sure to advise patients about potential discomfort during sample collection.
- Wash hands.
- Put on appropriate personal protective equipment (at a minimum, gloves and a facemask) to protect yourself in case the patient coughs or sneezes during sample collection. The level of PPEs depends on the infectiousness of the suspected pathogen. For example, in suspected coronavirus (SARS-CoV-2) infections, the examiner should wear an N-95 respirator mask, gown, protective goggles, and gloves.
- If the patient/resident has a lot of mucous in his/her nose, this can interfere with the collection of cells. Ask the patient to blow air into a tissue to clear excess secretions from the nasal passages.
- Seat the patient comfortably. It is best if the patient is placed in a high Fowler’s position in bed with the back of the head supported. It may be necessary to have a second person available to assist with the collection.
Oropharyngeal (OP) Swab Collection
- Insert the swab into the posterior pharynx and tonsillar areas.
- Rub swab over both tonsillar pillars and posterior oropharynx and avoid touching the tongue, teeth, and gums.
A Nasopharyngeal (NP) swab is the optimal upper respiratory tract specimen collection method for viral respiratory infections such as a respiratory syncytial virus (RSV), SARS-CoV-2, influenza virus A & B, and parainfluenza virus. Nasopharyngeal swabs are also collected for the diagnosis of bacterial infections such as Bordetella pertusis (whooping cough), Mycoplasma pneumoniae and to screen carriers of meningococci.
Nasopharyngeal swab collection
- Have the patient recline slightly so the head is tilted back to roughly 70 degrees from horizontal, a modest backward tilt rather than full extension, and support it with your non-dominant hand. If necessary lean the patient’s head against the wall to minimize jerky movements. Instruct the patient to close eyes to lessen the mild discomfort of the procedure.
- Stand slightly offset from the patient to avoid respiratory contamination in case of sudden cough or sneeze.
- Hold the swab like a pen between the thumb, index, and middle fingers.
- Start by inserting the swab horizontally into the left or right nostril. Carefully advance the swab while maintaining a course close to both the septum and floor of the nose, parallel to the palate, until the resistance (resistance is felt when the swab reaches the posterior nasopharynx) is felt. Ideally, you should collect two nasopharyngeal swabs.
Leave the swab in place for several seconds to absorb secretions while gently wiping the wall by twisting the swab shaft for 10-15 seconds. - Slowly and gently remove the swab.
- Immediately insert the swab into a sterile viral transport media tube, snap/cut off the applicator stick, replace the cap, and seal the tube tightly.
How deep should the swab go?
This is where nasopharyngeal swabs most often fail. The swab must reach the nasopharynx, not stop in the nasal cavity.
The landmark: the depth from nostril to nasopharynx equals the distance from the nostril to the outer opening of the ear on the same side. Measure it against the patient's face before you start if you are not yet confident.
In adults this is approximately 5 to 6 cm, or about 2 inches. In children it is proportionally less, and in infants considerably less.
Direction matters as much as depth. Advance the swab along the floor of the nose, parallel to the palate, not upward. Angling upward drives the swab into the turbinates, which is painful, causes bleeding, and does not reach the nasopharynx.
The false resistance problem. Resistance felt within the first 2 to 3 cm is usually the turbinate, not the posterior nasopharyngeal wall. If the swab stops early, withdraw slightly, adjust the angle downward toward the floor of the nose, and advance again. The true endpoint feels like a soft stop at the expected depth. A swab that stops at 2 cm has sampled the wrong site and will read as negative regardless of viral load.
Place NP and OP swabs immediately into the transport medium tube. Where both are taken for the same investigation, both may go into the same tube. Snap or cut the applicator shaft at the breakpoint so the cap seals, holding the tube away from your face, then close it tightly.
Collecting for SARS-CoV-2 and Other High-Transmission Respiratory Pathogens
The collection procedure itself is unchanged for SARS-CoV-2. What changes with a highly transmissible respiratory pathogen is the protection around it.
- Respiratory protection. An N95 or equivalent respirator rather than a surgical mask, with eye protection, gown, and gloves. Fit-check the respirator before entering the room.
- Positioning. Stand slightly to the side of the patient rather than directly in front, so a cough or sneeze is not directed at your face. This applies to all respiratory collection but matters most here.
- Ventilation. Collect in a well-ventilated space or a designated sampling area rather than an enclosed room where possible.
- Handling. Treat the sealed tube as contaminated on the outside. Disinfect the exterior before it enters the transport bag.
The same precautions apply to suspected influenza in an outbreak setting, suspected measles, and any pathogen where aerosol transmission is a concern. The principle is that PPE scales with the transmissibility of the suspected organism, not that any one pathogen has its own procedure.
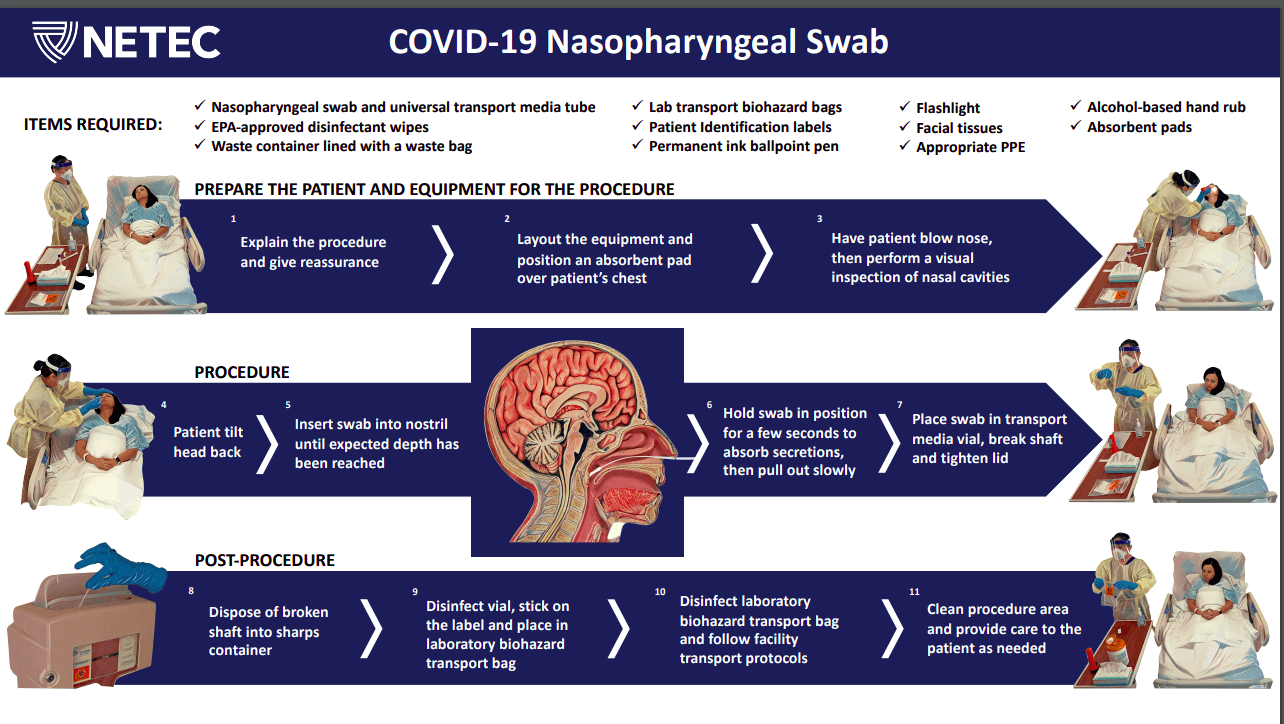 Figure: COVID-19 Nasopharyngeal swab collection procedure
Nasopharyngeal wash/aspirate Collection
- Have the patient sit with the head tilted slightly backward.
- Instill 1 ml-1.5 ml of nonbacteriostatic saline (pH 7.0) into one nostril.
- Flush a plastic catheter or tubing with 2 ml-3 ml of saline.
- Insert the tubing into the nostril parallel to the palate (not upwards).
- Aspirate nasopharyngeal secretions. If permitted, repeat this procedure for the other nostril.
- Collect nasopharyngeal aspirate in sterile vials
Common Collection Errors
| Error | Consequence | How to avoid it |
|---|---|---|
| Swab stops in the nasal cavity | False negative; the wrong anatomical site is sampled | Use the nostril-to-ear landmark; expect 5 to 6 cm in adults |
| Angling the swab upward | Pain, epistaxis, and failure to reach the nasopharynx | Advance along the floor of the nose, parallel to the palate |
| Withdrawing immediately on contact | Insufficient secretions absorbed | Leave in place several seconds, rotate gently for 10 to 15 seconds |
| Using a cotton or calcium alginate swab | PCR inhibition or viral inactivation; false negative | Dacron or nylon flocked on a flexible plastic shaft only |
| Using a wooden-shafted swab | PCR inhibition and splinter injury risk | Plastic shafts only |
| OP swab touching tongue, teeth, or gums | Contamination with oral flora, dilution of the target | Swab tonsillar pillars and posterior pharynx only |
| Specimen left at room temperature | Progressive loss of viral viability and detectability | Refrigerate at 2 to 8°C immediately; transport on cold packs |
| Freezing at -20°C | Freeze-thaw damage; worse than refrigeration | Refrigerate, or freeze at -70°C or below if delay exceeds 72 hours |
| Collecting after day 7 of symptoms | Viral shedding has often fallen below detection | Collect within 3 days of onset, no later than 7 |
| Collecting after antimicrobials started | Reduced yield for bacterial targets | Collect before therapy or prophylaxis where possible |
Labeling
Label each specimen container with:
- Name of the patient
- Hospital or lab identification number
- Type of specimen collected
- Date of collection
Transport and Storage
Send specimens to the laboratory immediately, since detection sensitivity falls with time. Hold and ship at 2 to 8°C on cold packs or wet ice if processing will occur within 48 to 72 hours.
If processing will be delayed beyond that, freeze at -70°C or below and ship on dry ice. Never freeze respiratory specimens at -20°C. That range causes ice crystal formation and freeze-thaw damage, leaving the specimen in worse condition than if it had stayed refrigerated. If -70°C is unavailable, refrigerate and expedite transport instead.
Freezing carries a cost even when done correctly. Respiratory syncytial virus in particular loses substantial viability through a freeze-thaw cycle, which can produce false-negative results. Fresh, refrigerated, and promptly processed remains the best specimen.
Sample packaging and transport
- Label the specimen on viral transport media using a bar code or permanent marker.
- Place the specimen in a laboratory transport biohazard bag.
- Fill out the requisition form.
- Place the sample on cold packs or at 2 to 8°C and transport promptly. If processing will be delayed beyond 48 to 72 hours, freeze at -70°C or below and ship on dry ice.
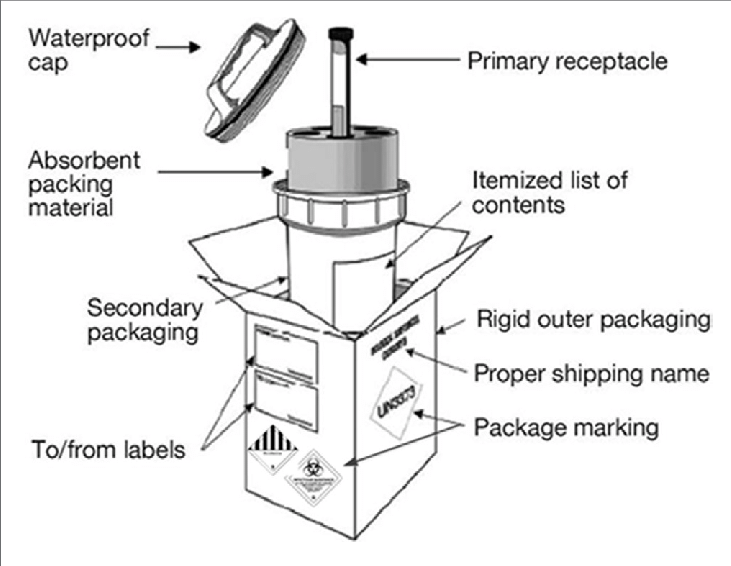 Figure: Basic triple packaging system
If there is a requirement for transportation or shipping of samples, samples should be packed in a basic triple packaging system with a primary watertight container wrapped with absorbent material, a secondary waterproof container, and an outer shipping package.
How to Remember
Nostril to ear. The one measurement worth carrying. The depth from nostril to nasopharynx equals the distance from the nostril to the outer opening of the ear on that side. Roughly 5 to 6 cm in an adult. If the swab stopped at 2 cm, it sampled the wrong place.
Along the floor, not up the nose. The nasopharynx sits behind the nose, not above it. Advance parallel to the palate. Angling upward finds the turbinates, which hurt, bleed, and are not where the virus is.
Early resistance is a liar. Resistance in the first 2 to 3 cm is turbinate, not the back wall. Withdraw slightly, angle downward, advance again. The real endpoint is a soft stop at the expected depth.
Wood and cotton belong in the stationery cupboard. Both inhibit PCR. Calcium alginate inactivates viruses. Dacron or nylon flocked on plastic, nothing else.
Cold, colder, or wrong. 2 to 8°C for up to 48 to 72 hours. Minus 70°C beyond that. Minus 20°C is wrong at any duration and worse than the fridge.
Key exam facts
| Question a student actually gets asked | The answer, with the reasoning that makes it stick |
|---|---|
| Which upper respiratory specimen has the highest yield? | Nasopharyngeal wash or aspirate, particularly in children. The NP swab is the practical standard and performs nearly as well when technique is correct. |
| How deep should an NP swab go in an adult? | About 5 to 6 cm (2 inches), equal to the distance from the nostril to the outer opening of the ear. |
| In which direction is the swab advanced? | Along the floor of the nose, parallel to the palate. Never upward, which drives it into the turbinates. |
| How long should the swab remain in place? | Several seconds to absorb secretions, rotating gently against the wall for 10 to 15 seconds. |
| Which swabs are unacceptable? | Cotton-tipped, calcium alginate, and any wooden-shafted swab. All inhibit PCR; alginate also inactivates viruses; wood can splinter. |
| Which swabs should be used? | Dacron (polyester) or nylon flocked on a flexible plastic shaft, minitip for nasopharyngeal use. |
| When should the specimen be collected? | Within 3 days of symptom onset, no later than 7, and before antimicrobial therapy or prophylaxis where possible. |
| Can NP and OP swabs share one tube? | Yes, when both are taken for the same viral investigation. Combining concentrates the yield into a single specimen. |
| Correct short-term storage? | 2 to 8°C, processed within 48 to 72 hours, shipped on cold packs. |
| Correct long-term storage? | -70°C or below, shipped on dry ice. Never -20°C. |
| Which virus is notably damaged by freeze-thaw? | Respiratory syncytial virus, which can produce false negatives after freezing and thawing. |
| Bacterial targets for an NP swab? | Bordetella pertussis, Mycoplasma pneumoniae, and meningococcal carriage screening. |
| What is the triple packaging system? | A watertight primary container wrapped in absorbent material, a waterproof secondary container, and an outer shipping package. |
Where students get confused
"I felt resistance, so I reached the nasopharynx." Resistance in the first 2 to 3 cm is almost always turbinate. The true posterior wall sits at 5 to 6 cm in an adult. Early resistance is the commonest reason a technically confident swab returns a false negative.
"The nasopharynx is up the nose." It is behind the nose, at the level of the floor of the nasal cavity. Angling the swab upward is painful, causes bleeding, and samples the wrong site. Parallel to the palate, every time.
"A throat swab is easier and just as good." For most respiratory viruses the oropharyngeal swab yields less than a nasopharyngeal swab. It is a reasonable supplement or a fallback when NP collection is contraindicated, but it is not an equivalent substitute.
"Any sterile swab will do." Sterility is not the issue. Cotton and wood inhibit PCR, and calcium alginate inactivates viruses. A perfectly sterile cotton swab on a wooden shaft will still give you a false negative.
"Freezing preserves the specimen." Only at -70°C or below. A -20°C freezer damages the specimen through ice crystal formation and freeze-thaw cycling, leaving it worse off than refrigeration. And even correct freezing costs yield: RSV is notably vulnerable.
"Collect whenever the patient presents." Viral shedding falls over the course of illness. A specimen taken on day 10 may be negative in a genuinely infected patient. Collect within 3 days of onset where possible and no later than 7.
"Two swabs means two tubes." For the same viral investigation, an NP and an OP swab can go into a single tube. Splitting them across two tubes halves the material available for each test rather than doubling the information.
References
- Centers for Disease Control and Prevention. Interim guidelines for collecting and handling of clinical specimens for COVID-19 testing. https://www.cdc.gov/covid/hcp/clinical-care/index.html
- World Health Organization. Manual for the Laboratory Diagnosis and Virological Surveillance of Influenza. Geneva: WHO; 2011. https://www.who.int/publications/i/item/manual-for-the-laboratory-diagnosis-and-virological-surveillance-of-influenza
- Procop GW, Church DL, Hall GS, et al. Koneman's Color Atlas and Textbook of Diagnostic Microbiology. 7th ed. Philadelphia: Wolters Kluwer; 2017.
- Tille PM, editor. Bailey & Scott's Diagnostic Microbiology. 15th ed. St. Louis: Elsevier; 2022.
- Leber AL, editor. Clinical Microbiology Procedures Handbook. 4th ed. Washington, DC: ASM Press; 2016.
- World Health Organization. Guidance on Regulations for the Transport of Infectious Substances. Geneva: WHO.

Tankeshwar Acharya, MSc (Medical Microbiology)
Tankeshwar Acharya is an Assistant Professor in the Department of Microbiology at Patan Academy of Health Sciences (PAHS), Nepal, where he has been teaching and practicing clinical microbiology for over 14 years. He is the founder of Microbe Online, one of the leading free microbiology education resources on the web, covering bacteriology, mycology, parasitology, immunology, and clinical laboratory diagnostics written from direct experience in both the classroom and the diagnostic laboratory.
Comments
No comments yet. Be the first to share your thoughts.
Leave a comment
All comments are reviewed before they appear.