

An ELISA technician in a hospital laboratory is running a batch of 80 hepatitis B surface antigen tests. Using a single-channel micropipette, she pipettes 100 µL of patient serum into each well of the microtiter plate: 80 individual pipetting steps, each requiring tip change, aspiration, dispensing, and ejection.
By the 60th sample, her pipetting angle has drifted slightly. Fatigue has made her plunger depression less consistent. The last 20 samples receive marginally different volumes. When the plate is read, the optical density values in the final rows show higher background noise than the first rows. Three borderline results in those rows cannot be confidently called positive or negative and must be repeated.
A multichannel pipette would have delivered all 80 samples in 10 pipetting steps: consistent volume, consistent angle, consistent pressure across every channel. The clinical difference between a single-channel and multichannel pipette in high-throughput work is not convenience. It is reproducibility.
Many laboratory procedures require transferring the same liquid into many wells or tubes at once. Whenever the same volume has to reach a whole row or plate of wells, a multichannel pipette is the right tool, and the rest of this article is about using one well.
Multichannel pipettes are the pipettes having various channels or shafts (8 to 384 channels available) for pipetting samples into many wells at the same time. These significantly increase productivity and output with minimal production cost and testing time in the laboratory.
The multichannel pipette is similar to the single channel micropipette or regular pipette used in the laboratory in its function, parts, and utility. But a multichannel pipette is better than a single-channel pipette in laboratories repeatedly handling the same liquids (reagents/samples).
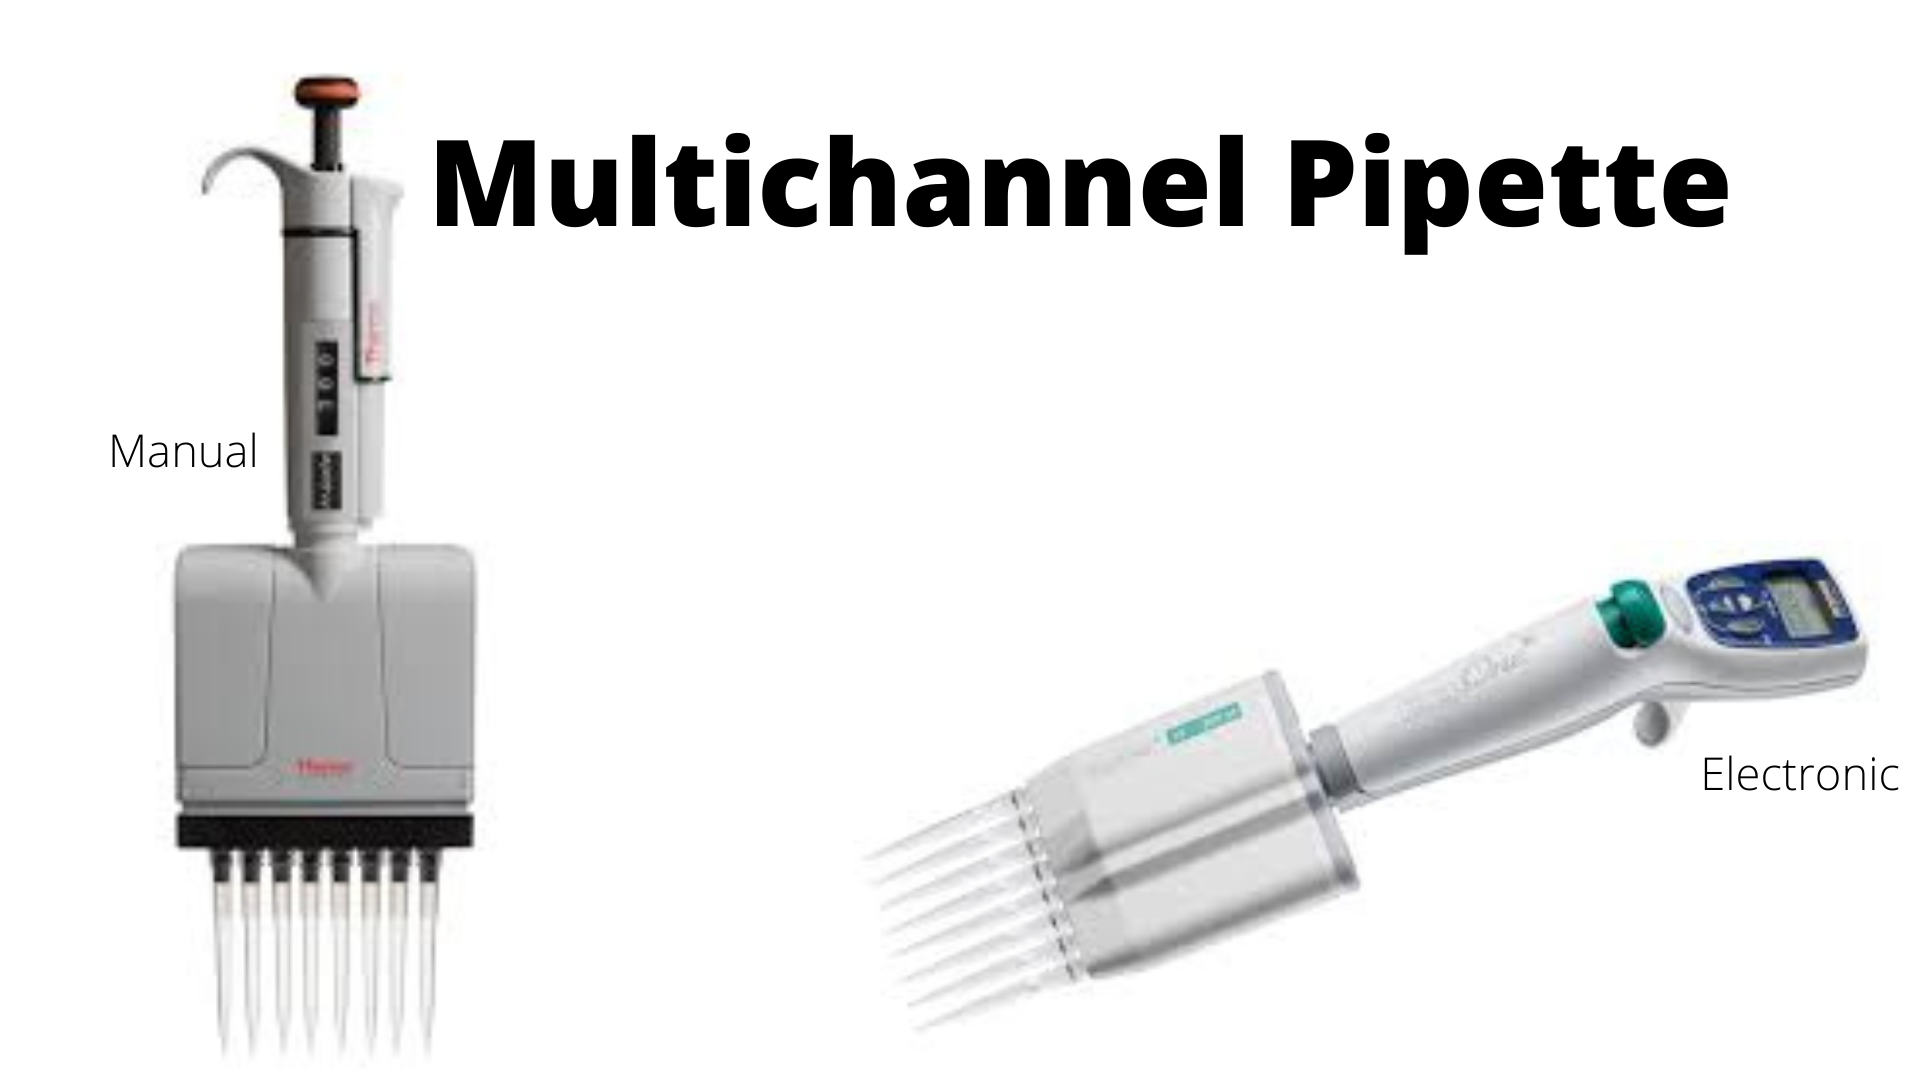 Figure: Electronic and Manual Multichannel pipette
Why Multichannel Pipettes Matter in Clinical Microbiology
The microtiter plate (a plastic tray with 96 or 384 individual wells) is the format for several of the most important tests in clinical microbiology:
ELISA (Enzyme-Linked Immunosorbent Assay): Detecting antibodies or antigens in patient samples across 96 wells simultaneously. Each well must receive an identical volume of sample and reagent for the optical density readings to be comparable across the plate.
Broth Microdilution MIC Testing: Determining the minimum inhibitory concentration (MIC) of an antimicrobial agent against a bacterial isolate. Serial dilutions of antibiotic are prepared across a row of wells; each well must contain an exactly defined concentration. A volume error in one well shifts the concentration and produces a false MIC result.
Serological Titrations: Quantitative antibody tests (anti-streptolysin O, anti-HBs titers) that use serial dilutions across a plate format.
In all of these, the 96-well plate demands that identical volumes reach identical wells simultaneously. The multichannel pipette is not just faster than single-channel pipetting for this work, it is more reproducible, because all channels fire from a single plunger depression under the same conditions.
Parts of Multichannel Pipette

The parts of the manual multichannel pipette are the same as a manual single-channel micropipette which are as follows:
- Plunger: It has two stops, first for aspirating liquid and second for dispensing the aspirated fluid.
- Tip ejector button: Pressing down this button helps in the ejection or removal of pipette tips.
- Volume adjustment knob: Like micropipettes, multichannel pipettes are also available with adjustment volume. So, a knob near the plunger helps set the desired volume.
- Digital volume display window: It displays the volume of the pipette.
- Plastic shaft: It is a tube-like structure used to displace air in an air displacement pipette and plays the collar role for ejecting tips.
- Tip cone: It holds the pipette tips. The only difference in this part between the multichannel and single-channel pipette is the number of cones. A single-channel pipette has one tip cone; a multichannel pipette has a row of them, most commonly 8 or 12, though configurations run from 8 up to 96 or 384 in specialized instruments.
- Pipette tip: These are disposable (or autoclavable) polypropylene attachments. The tip fits onto the tip cone and is the only part that comes into direct contact with the liquid being pipetted, which is what keeps the pipette body free of contamination.
The electronic multichannel pipette has almost the same parts as the manual. However, instead of the volume adjustment knob and plunger, the electronic multichannel pipette has buttons to change the volumes and start the pipetting procedure.
How Does a Multichannel Pipette Work?
A multichannel pipette works on the same air displacement principle as a single-channel micropipette: pressing the plunger expels a set volume of air, and releasing it draws an equal volume of liquid into each tip. The difference is that one plunger movement drives every channel at once, so all the tips aspirate and dispense together under identical conditions.
Before pipetting, run through a short check so every channel behaves the same way:
- Wear gloves for safety, and make sure the pipette is clean with no blockage around the tip cones.
- Set the required volume on a calibrated, well-maintained pipette.
- Load a fresh row of tips by pressing the cones straight down into the tips in the tip box, holding the pipette upright so every tip seats evenly.
- Check that all tips are firmly and equally attached before you aspirate. One loose tip means one channel delivers the wrong volume.
Methods for Dispensing Liquids
Two of the commonly used methods are forward and backward pipetting techniques.
Forward pipetting
It is best for liquids that do not foam easily or are in a limited amount. It is also known as exact pipetting.
- Depress the plunger to the first stop before dipping the tips into the liquid.
- While dipping the tips into the container, ensure it is as low as 1 cm, and all the tips are in equal depth.
- Release the plunger to fill the tips.
- Withdraw the tips from the container slowly from the edge to remove any extra liquid.
- Repeat the steps 1-2 times for prewetting or priming the tips for aspirating and dispensing equal volumes in all the channels.
- Check the tips for air bubbles, improper filling, or leakage before dispensing in the target container.
- If there are air bubbles or the tips are filled improperly, dispense the liquid and repeat aspiration and if there is leakage, discard the tips and reattach the new ones.
- For dispensing liquid in the target wells, place the tips as close to the bottom of the wells.
- Depress the plunger into the first stop, pause, and then depress to the last stop. This action dispenses the liquid. Remove the pipette slowly while the plunger is down by keeping the tips inside the well.
- Release the plunger and press the ejector button to discard the tips.
Backward Pipetting
It is also known as overfilling technique.
- The difference between this method and forward pipetting is depressing the plunger up to the second stop before dipping into the liquid, which overfills the liquid in the tips.
- Also, while dispensing the liquid, press the plunger to the first stop and discard the remaining liquid.
Calibration of Pipette (Multi and Single Channel)
Calibration is the process of assessing and refining any instrument’s precision and accuracy, especially measuring devices. Likewise, the pipette needs calibration from time to time.
You need to know the following for the correct way of calibrating a pipette manually:
Things to Consider for Calibration
- Temperature controlled environment
- Anti-vibration table
- Controlled pressure
- Know the proper pipetting techniques
- Clean environment
- The balance should be calibrated and stable.
Materials Required for Calibration
- Pipettes
- Semi-micro Balance
- Distilled Water
- Density chart for water at different temperatures
- Clean beakers
- Calculator or software for calculation
- Notebook for recording data
Procedure of Calibration
Gravimetric analysis, weighing the water a pipette delivers, is the reference method for calibration. The principle is simple: water has a known density at a given temperature, so if you weigh what the pipette dispenses, you can work out the volume it actually delivered and compare that with the volume it was set to.
Prepare the conditions first. Let the distilled water sit at room temperature for 15 to 30 minutes so its temperature is stable, and record that temperature (you will need it for the density factor). Work on a stable bench in a draft-free area, and make sure the analytical balance is level and calibrated. Check that the pipette is clean and unclogged.
Then weigh repeated deliveries, at three volumes. A pipette can pass at one volume and fail at another, so a proper calibration tests three: the nominal (maximum) volume, about 50 percent of nominal, and the lowest volume you actually use. At each volume:
- Place a clean beaker on the balance and tare it to zero.
- Aspirate the water, checking that no air bubble forms in the tip.
- Dispense into the beaker and record the weight of that single delivery. Re-tare (or record cumulatively) before the next delivery.
- Repeat until you have at least 10 weighings at that volume.
Then do the math and judge the result. Convert each weighing to a volume with V = w × Z, where w is the weight of that delivery and Z is the conversion factor for water at the measured temperature, read from a density table (Z corrects for water density and air buoyancy). Software usually does this, but the arithmetic is simple. From the set of volumes, take the average to judge accuracy (how close the average sits to the set volume) and the scatter to judge precision (how consistent the deliveries are). In calibration terms these are the systematic error and the random error.
Compare both against the limits. There is no single pass mark that fits every pipette, because the allowed error depends on the volume. Larger volumes must be more accurate in percentage terms than smaller ones: as a rough guide, a 1000 µL pipette is held to about ±0.8 percent, while a 10 µL pipette is allowed about ±1.2 percent. A pipette is fit for use when both its systematic and random error fall within the limits set by the manufacturer and the ISO 8655 standard. If it does not, it is adjusted, serviced, or taken out of use.
Calibrating a multichannel pipette
A multichannel pipette is calibrated on the same gravimetric principle, with one important difference: each channel is tested separately.
A single plunger drives all the channels, yet any one of them can drift out of tolerance on its own, so weighing only one channel would hide a fault in the others.
This is why multichannel calibration takes longer than single-channel, and why ISO 8655 allows a multichannel pipette twice the error limit of a single-channel pipette at the same volume: getting every channel to behave identically is genuinely harder.
In routine laboratories the full per-channel check is laborious enough that it is often sent to an accredited calibration service. The principle a student should carry is simple: every channel is its own measurement.
Difference Between Single and Multichannel Pipette
- A single channel pipette is not ideal for increasing efficiency in the laboratory that handles larger assays like 96 well ELISA. Pipetting from a single channel requires repeating the same task again and again.
- Single-channel pipettes cover a wide span, from about 0.1 µL to 10,000 µL (10 mL) across the full model range. Multichannel pipettes cover a narrower span, from about 0.5 µL to 1200 µL, because the largest and smallest volumes are less often needed across a whole row of channels at once.
- A few years back, a multichannel pipette had inaccuracy in aspirating liquid in different channels due to difficulty in use. However, the issue is handled well by the new generation pipette.
- Calibration of the multichannel pipette is more time-consuming and tedious than a single channel pipette.
- A multichannel pipette helps to achieve a significant decrease in human error due to less repetition of pipetting.
- Repairing some multichannel pipettes is impossible because if one channel of the pipette gets damaged, the entire system needs to be changed.
Common Errors with Multichannel Pipettes
| Error | Consequence | Prevention |
|---|---|---|
| Unequal tip immersion depth across channels | Channels aspirate different volumes; outer channels aspirate less than inner | Keep all tips at equal depth (≤1 cm); use a reservoir trough, not individual tubes |
| Not prewetting tips before critical aspiration | First aspiration delivers less than intended across all channels | Prewet 2–3 times by aspirating and discarding back into the source |
| Tilting the pipette during aspiration | Air enters shorter channels; inconsistent fill across channels | Hold multichannel pipette perfectly vertical during aspiration |
| Pipetting from individual tubes instead of a trough | Outer channels cannot reach liquid; only central channels aspirate | Always use a multichannel-compatible reagent reservoir (trough) for source liquid |
| Pressing tips onto cones unevenly | Some channels leak; others seal; inconsistent volume delivery | Press firmly along the entire tip row simultaneously using the tip rack; check all tips are seated |
| Skipping calibration for multichannel | Volume drift in one or more channels undetected; systematic error across all wells using that channel | Calibrate each channel individually; use gravimetric method; schedule per laboratory SOP |
| Using wrong tip type | Tips not designed for the pipette brand may not seal correctly on all cones | Use manufacturer-recommended tips or verified compatible tips only |
Where Students Get Confused
"All the channels share one plunger, so I only need to calibrate one channel." No. One plunger drives every channel, but the channels are separate air paths and any one of them can drift on its own.
A pipette can be perfect on channel 1 and out of tolerance on channel 5, and you would never know if you only checked one. Every channel is calibrated as its own measurement, which is exactly why multichannel calibration is slower than single-channel.
"I can draw reagent straight from a set of tubes." On a multichannel pipette the tips are spaced for a plate, so the outer tips will not sit in a row of separate tubes the way the inner ones do. Some channels reach liquid and some do not, and you get an uneven fill. Reagent for a multichannel pipette goes into a trough (a reservoir), where every tip dips into the same pool at the same depth.
"Forward and backward pipetting are just personal preference." They are matched to the liquid. Forward pipetting (aspirate to the first stop, dispense through both stops) is the default for ordinary aqueous samples.
Backward pipetting (aspirate past the second stop to overfill, dispense only to the first stop) is for liquids that foam or are viscous, such as serum or detergent, because the deliberate leftover in the tip keeps foam and short-delivery out of the well. The leftover is intentional, not waste.
"If the pipette looks like it filled, the volumes are equal." Look along the whole row before you dispense. Because all channels fill together, a single tilted pipette, a loose tip, or an air bubble in one channel produces one well that is short while the rest are correct. With a single-channel pipette you would notice; with a multichannel you have to scan every tip each time, because the error hides among the correct ones.
"Pre-wetting the tips is optional." A dry tip loses a little of its first draw to the plastic surface, so the first dispense across the row runs slightly short. Aspirating and expelling the sample two or three times before the real transfer coats every tip and makes the delivered volumes match. For plate work where every well is compared against the others, this is what keeps the readings comparable.
How to Remember
Multichannel = plate work; single-channel = tube work. The simplest selection rule: if your target container is a microtiter plate (96-well or 384-well), use a multichannel pipette. If it is a tube, an Eppendorf, or a single container, use a single-channel micropipette. The format of the target container tells you which pipette to reach for.
Forward pipetting = standard; backward pipetting = foamy or viscous. Forward pipetting (press to stop 1, aspirate, press to stop 1 to dispense, stop 2 to blow out) is the default. Switch to backward pipetting (press to stop 2, aspirate overfill, press to stop 1 only to dispense) when the liquid foams easily (serum, detergent solutions) or is viscous. Backward pipetting leaves excess in the tip — this is correct, not a mistake.
8 channels = column; 12 channels = row. A standard 96-well plate has 8 rows (A–H) and 12 columns (1–12). An 8-channel pipette fills one column at a time; a 12-channel fills one row at a time. Knowing this tells you immediately how many pipetting steps are needed to fill a full plate: 12 steps with an 8-channel pipette, 8 steps with a 12-channel pipette.
Calibration formula anchor: V = w x Z. Calculated volume equals the average weight of water dispensed, times Z, the conversion factor read from a density table at that water temperature. This is gravimetric calibration, the reference method for checking pipette accuracy, and for a multichannel pipette you do it one channel at a time.
Available Multichannel Pipette
Major multichannel pipette manufacturers include Eppendorf, Gilson (PIPETMAN series), Thermo Fisher Scientific (Finnpipette series), Sartorius (Picus series), Rainin (Mettler Toledo), and Integra Biosciences (Viaflo series). Channel configurations range from 4 to 384; volume ranges vary by model. For current specifications, refer to manufacturer websites or your laboratory supplier catalogue.
For a comparison of all pipette types used in the microbiology laboratory, see Types of Pipettes in the Microbiology Laboratory
Key exam facts
| Topic | Key fact |
|---|---|
| Definition | Pipette with 8–384 channels for simultaneous aspiration and dispensing into multiple wells |
| Primary clinical use | ELISA, broth microdilution MIC testing, serological titrations — all 96-well plate formats |
| Channels: 8 vs. 12 | 8-channel fills one column; 12-channel fills one row of a 96-well plate |
| Forward pipetting | Press stop 1 → aspirate → press stop 1 to dispense → press stop 2 to blow out; for standard aqueous liquids |
| Backward pipetting | Press stop 2 → aspirate (overfill) → press stop 1 only to dispense; for viscous or foamy liquids |
| Prewetting | Aspirate and discard 2–3 times before critical transfer; ensures equal fill across all channels |
| Source container | Must use a trough/reservoir — not individual tubes — to ensure equal immersion across all channels |
| Calibration method | Gravimetric: weigh at least 10 deliveries of water at each of 3 volumes; V = w x Z (weight x density factor); each channel tested separately |
| Multichannel error limit (ISO 8655) | Twice the single-channel limit at the same volume, because matching every channel is harder |
| Calibration frequency | Every 3–6 months; multichannel more time-consuming than single-channel |
| Accuracy target | No single pass mark; error must stay within ISO 8655 / manufacturer limits, which are volume-dependent (roughly plus or minus 0.8% at 1000 µL, plus or minus 1.2% at 10 µL) |
| Advantage over single-channel | Reproducibility, not just speed — identical conditions across all channels in one plunger depression |
| Electronic multichannel | Replaces manual plunger with programmable buttons; useful for repetitive serial dilutions across a plate |
References:
- International Organization for Standardization (2022). ISO 8655-1:2022. Piston-operated Volumetric Apparatus, Part 1: Terminology, General Requirements and User Recommendations. ISO.
- International Organization for Standardization (2022). ISO 8655-2:2022. Piston-operated Volumetric Apparatus, Part 2: Pipettes. ISO. (maximum permissible errors, multichannel error limits)
- International Organization for Standardization (2022). ISO 8655-6:2022. Piston-operated Volumetric Apparatus, Part 6: Gravimetric Reference Measurement Procedure for the Determination of Volume. ISO.
- Mahon CR, Lehman DC, Manuselis G (2018). Textbook of Diagnostic Microbiology. 6th edn. Elsevier.
- Cheesbrough M (2006). District Laboratory Practice in Tropical Countries, Part 2. 2nd edn. Cambridge University Press.
- Leber AL, editor (2016). Clinical Microbiology Procedures Handbook. 4th edn. ASM Press. doi:10.1128/9781683670438.CMPH

Comments
No comments yet. Be the first to share your thoughts.
Leave a comment
All comments are reviewed before they appear.