
Micropipette: Parts, Types, and Uses
Learn the parts, types, and uses of micropipettes — including air vs. positive displacement, pre-wetting technique, reverse pipetting for viscous samples, and common errors that affect diagnostic accuracy.
In a molecular diagnostics laboratory, a junior technician is preparing a PCR master mix. She needs to add 2 µL of DNA template to each reaction tube. She reaches for the P200 micropipette — the only one on the bench — sets it to 2 µL, and proceeds. The PCR runs overnight. The next morning, every reaction shows either no amplification or inconsistent bands. The problem: a P200 set to 2 µL operates at 1% of its working range. At that scale, a small variation in plunger pressure, tip seating, or angle produces a 50–100% error in actual volume delivered. Some tubes got 1 µL of template; others got 3 µL. The master mix was never at fault. The micropipette selection was.
The micropipette is the most precise liquid transfer instrument in the microbiology laboratory — but only when the right model is selected for the target volume, the technique is correct, and the instrument is calibrated. Understanding all three is what separates a reliable result from a failed run.
A pipette is an equipment ideal for pipetting or transferring liquid samples in the laboratory. Generally, glass or regular pipette can only transfer sample volume in a milliliter. For laboratories handling small volumes of samples (volumes in microliters), the ideal choice is a micropipette.
A micropipette is the laboratory equipment used for aspirating and dispensing small volumes (as small as 0.2 µl) of liquid. These are used in pharmaceutical, molecular, forensic, and diagnostic laboratories. It is of different types based on its principle (air and positive displacement), capacity (P20-P10,000), channels (single and multi), and working mechanics (manual and automatic).
microliter=µl
Why Micropipette Technique Matters in Clinical Microbiology
A microliter is one-thousandth of a milliliter — a volume invisible to the naked eye. At this scale, small errors in technique become large proportional errors in the final result.
Consider antibiotic susceptibility testing by broth microdilution. Each well in the microtiter plate receives a defined volume of antimicrobial at a specific concentration. A 10% volume error in one well shifts the antimicrobial concentration by 10% — enough to push a result from susceptible to resistant, or vice versa. A patient may receive the wrong antibiotic based on a pipetting error that took less than a second to make.
In PCR, the consequences are equally significant. Template DNA is added in volumes of 1–5 µL. An error of even 1 µL — invisible, undetectable at the time — changes the template concentration enough to cause non-specific amplification, failed amplification, or false-negative results in diagnostic assays.
This is why micropipette technique is not a minor procedural detail. It is a pre-analytical variable that directly affects diagnostic accuracy.
Parts of Micropipette
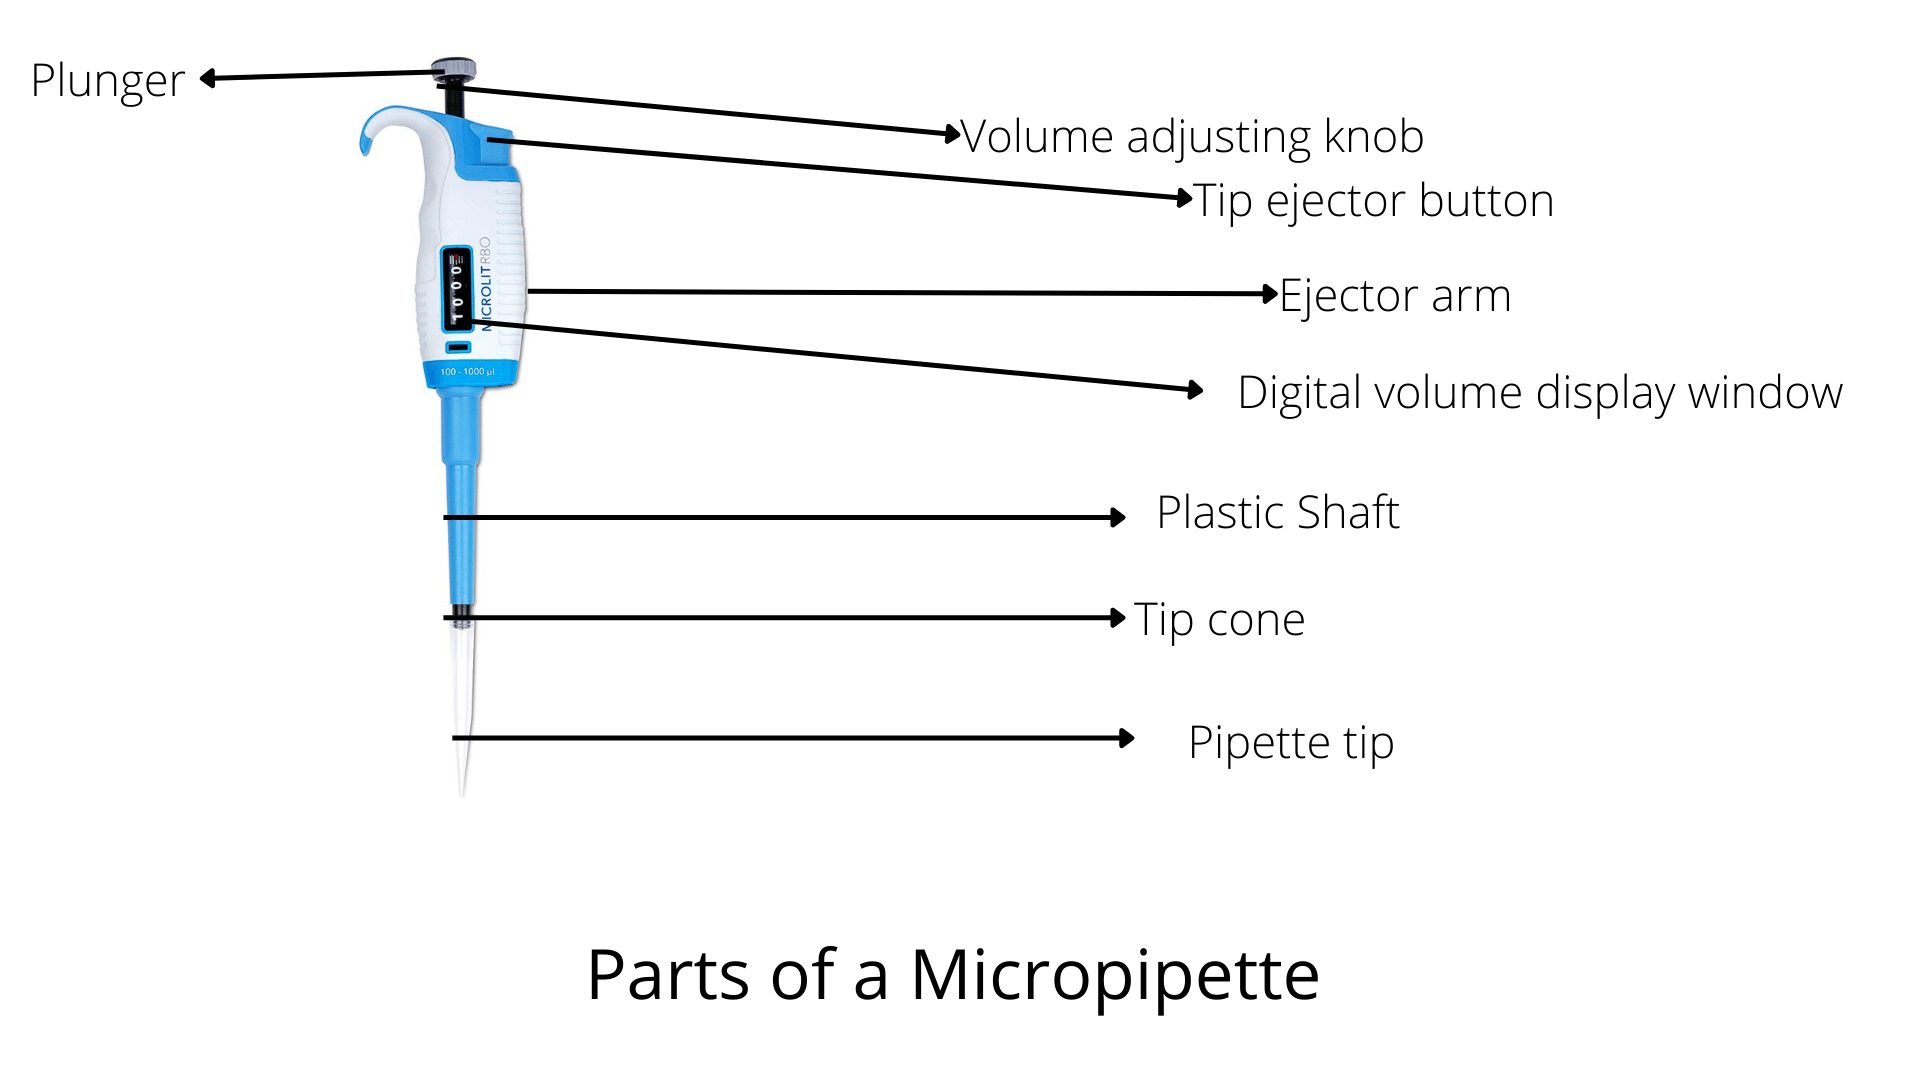 Figure: Parts of Micropipette
- Plunger: The plunger is the topmost part of the micropipette. Pushing down the plunger helps in the aspiration and dispensation of the desired amount of liquids. It consists of two stops, the first stop is for aspiration and the second stop is for dispensation.
- Tip ejector button: A button beside the plunger helps in the ejection/removal of pipette tips without using hands.
Read more: Pipette Tips: Types, Uses, and Criteria to Choose It - Volume adjustment knob: It is a knob attached to the plunger. Turning it helps in adjusting the desired volume in the adjustable volume micropipette. It cannot be turned/rotated in a fixed volume micropipette.
- Digital volume display window: It displays the volume that the micropipette can withdraw.
- Plastic shaft: A plastic shaft is a tube-like structure filled with air in an air displacement micropipette. Once you press the piston, some amount of air from the shaft releases, helping in the aspiration of liquid. In contrast, releasing the piston helps dispense liquid, and the air again fills up the shaft.
- Ejector arm: It is an extension of the tip ejector button. It puts pressure on the pipette cone once the ejector button is pressed.
- Tip cone: It is the place where the pipette tip is attached.
- Pipette tip: It is equipment made up of virgin polypropylene or molded plastics that come in direct contact with the liquid.
How to Use a Micropipette?
The correct way of using a micropipette affects its durability. The procedure for operating it is as follows:
- Select the right micropipette: Any micropipette has a fixed volume range. P1000 is an adjustable volume micropipette measuring liquid from 100 to 1000 µl. Likewise, P20 can aspirate fluid from 2 to 20 µl. So select the pipette based on the volume of liquid.
- Adjust pipette to the right volume: After choosing the correct pipette, adjust the micropipette to the desired volume with the help of a volume adjustment knob. Do not turn the knob above the range of the micropipette. It will damage the micropipette.
- Attach the pipette tip: Select the pipette tip based on micropipette use. Avoid touching the tip with your hands; instead, place the micropipette above the tip and press down to attach the tip to the tip cone. Make sure the tip is firmly attached to the micropipette.
- Aspiration of liquid: The plunger of the micropipette has two stops. For aspirating, press the plunger to the first stop and dip the end tip into the fluid to be aspirated. Release the plunger but make sure the tip is inside the liquid until the plunger regains its original position.
- Dispensation of liquid: Insert the tip into the container where you want to dispense the sample. Firstly, press the plunger to the first stop and pause. Then, press the plunger to the second stop to completely expel the liquid. Hold the plunger until you pull the tip entirely out of the tube to avoid re-aspiration.
- Removing tip: Firstly, place the micropipette above the disposing container. Then, press the tip ejector button to remove the tip. Avoid using your hands to remove the tip.
Pre-wetting the Tip (Critical for Accurate Volume Delivery)
The first aspiration with a new, dry tip consistently delivers less volume than intended. This happens because the dry polypropylene surface of the tip absorbs a small amount of liquid, reducing the actual volume dispensed.
When to pre-wet: Before any measurement where accuracy is critical — PCR setup, serial dilutions, ELISA, any assay where the first pipetting step matters.
How to pre-wet:
- Attach a new tip to the micropipette.
- Aspirate the target liquid to the first stop and dispense it back into the source container.
- Repeat 2–3 times.
- The tip surface is now conditioned — proceed with the actual transfer.
Pre-wetting takes 10 seconds and prevents a systematic low-volume error on every first aspiration.
Reverse Pipetting (For Viscous or Volatile Samples)
Standard (forward) pipetting — press to stop 1, aspirate, press to stop 1 again to dispense — works well for aqueous solutions. For viscous samples (glycerol, serum, concentrated protein solutions) or volatile liquids (ethanol, chloroform), it introduces errors because viscous liquids resist the air cushion, and volatile liquids evaporate into the air cushion and are under-delivered.
Reverse pipetting technique:
- Press the plunger all the way to the second stop before dipping into the liquid.
- Release the plunger slowly — this aspirates more than the set volume (overfill).
- Withdraw the tip from the liquid and touch it to the container wall to remove the hanging drop.
- Dispense by pressing only to the first stop — this delivers the exact set volume, leaving the excess in the tip.
- Discard the tip with the remaining liquid still inside.
The excess liquid in the tip acts as a buffer that compensates for the resistance of viscous flow. Never press to the second stop when dispensing in reverse pipetting — this expels the excess and over-delivers.
Common Micropipette Errors and How to Avoid Them
| Error | What goes wrong | Prevention |
|---|---|---|
| Using wrong pipette size | P1000 set to 2 µL = 1% of range; ±50% volume error is common | Always use the smallest pipette whose range covers your target volume |
| Not pre-wetting the tip | First aspiration delivers less than intended; systematic low-volume error | Pre-wet 2–3 times before critical transfers |
| Pipetting at wrong angle | Tilting >20° during aspiration creates hydrostatic pressure that over-aspirates | Hold micropipette vertically or at ≤20° tilt during aspiration |
| Immersing tip too deeply | Liquid wets the outer tip surface; excess carried into next container | Immerse only 2–3 mm below the liquid surface |
| Pressing to second stop during aspiration | Over-aspiration — more than the set volume enters the tip | Press only to first stop for aspiration in forward pipetting |
| Withdrawing tip before plunger fully releases | Air bubble aspirated with sample; volume short | Keep tip submerged until plunger has fully returned to rest position |
| Using standard tip for PCR | Aerosols enter the barrel; PCR product contaminates future reactions | Use filter tips for all PCR work and infectious specimens |
| Touching tip to container bottom during dispensing | Tip blocks, liquid backs up; volume not fully delivered | Touch the container wall at a 45° angle; do not press tip flat to bottom |
| Ignoring calibration schedule | Volume drift undetected — all results systematically off | Calibrate every 3–6 months per laboratory SOP; document each calibration |
Types of Micropipettes
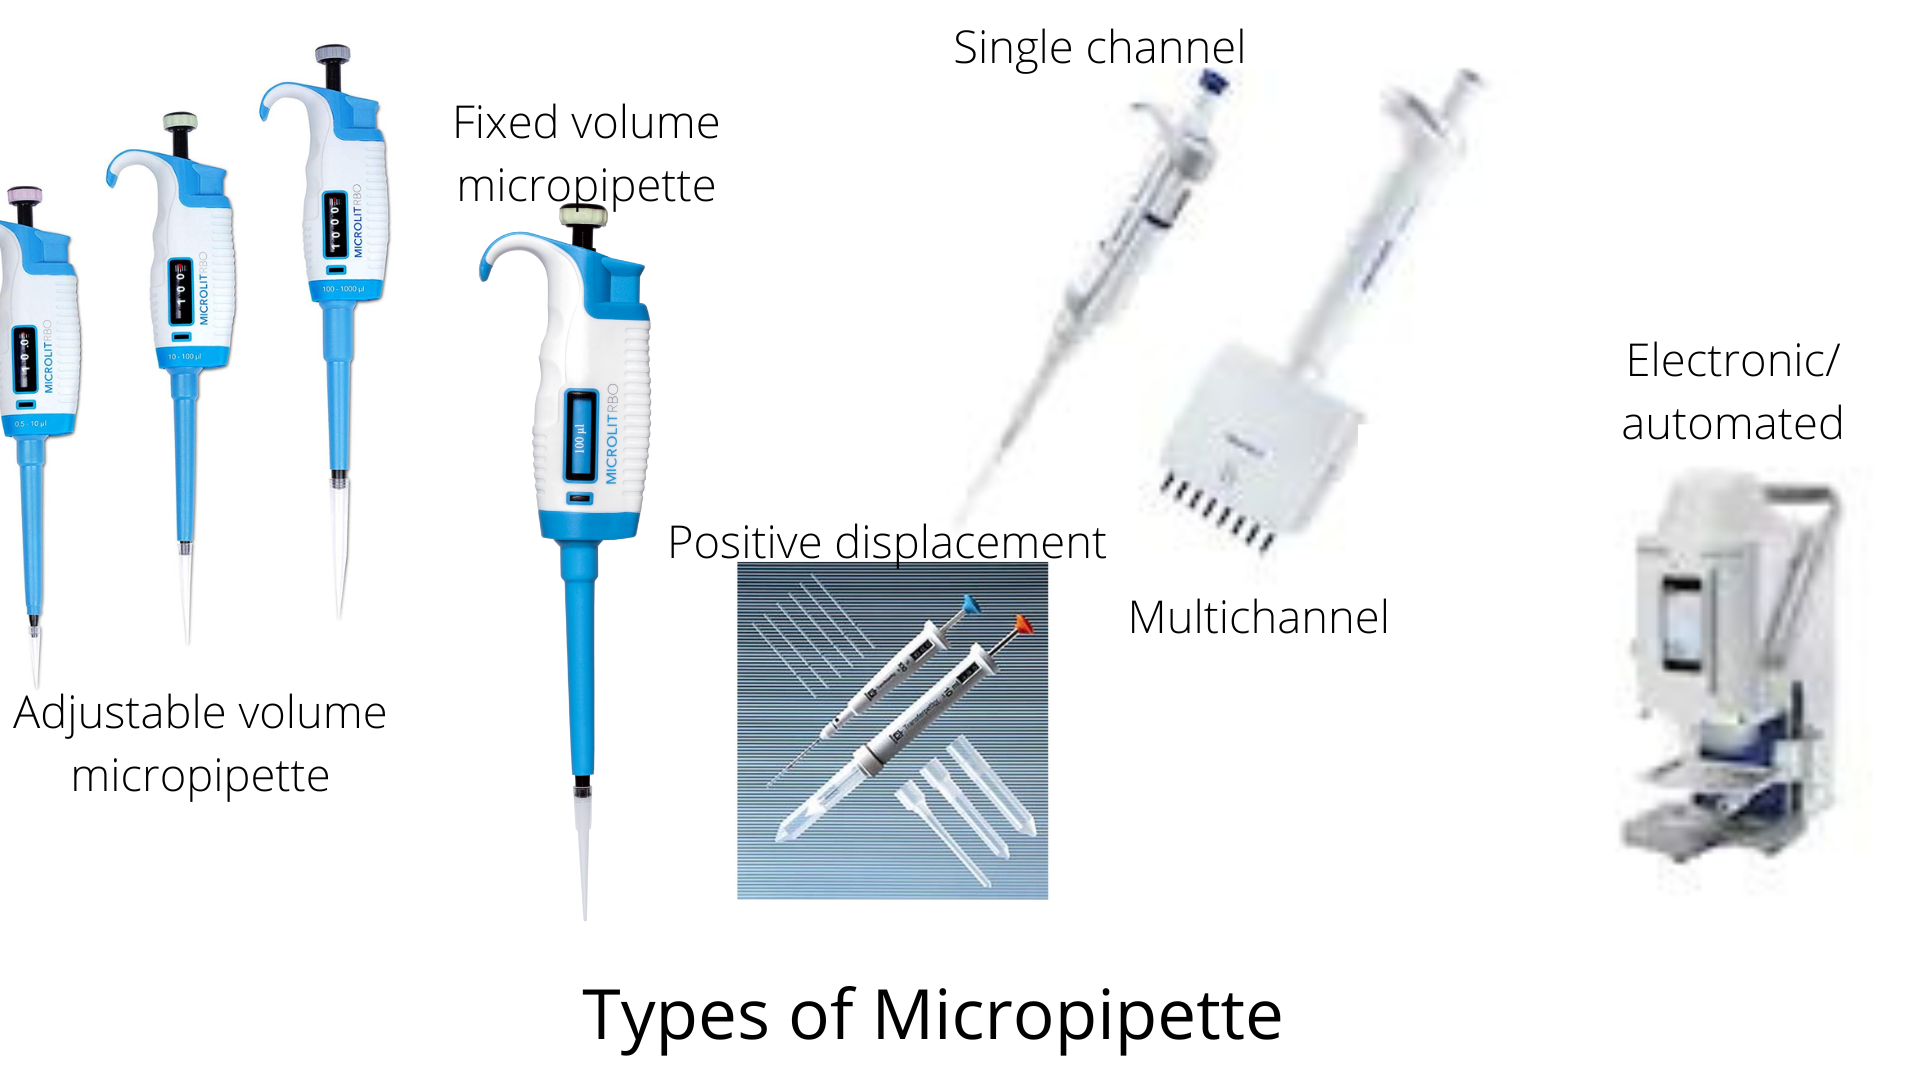 Figure: Types of micropipette
Micropipettes are classified on different basis. The basis for the classification of micropipettes are; the principle, the number of channels, pipetting mechanism, and volume.
Based on the Principle/Displacement Method
Air displacement micropipette
The piston is inside the pipette. There is an air cushion between liquid and piston. During aspirating liquid, the piston displaces an equal volume of air to the volume adjusted in the micropipette. The temperature and viscosity of the liquid greatly influence the precision of the air displacement micropipette. Likewise, calibration of the micropipette from time to time is also necessary.
Positive displacement micropipette
The piston is not inside the pipette shaft but inside the pipette tip. There is no air cushion between piston and liquid. The piston contacts the liquid directly, and no air is replaced during aspiration. No external factors like temperature and viscosity influence these kinds of pipettes due to the absence of the air cushion. It is also accurate for samples that are viscous and volatile sample.
Based on the Number of Channels
Single channel
Only a shaft is present in a single channel micropipette that can transfer one liquid at a time. They are available in various capacities and provide excellent accuracy. The capacity available ranges from 0.2 to 10,000 µl.
Multichannel
Multiple shafts are present in a multichannel micropipette that can transfer various liquids simultaneously. Common multichannel micropipette has 8-12 channels, but 4, 6, 16, and 18 channels are also available. It is best for tests involving multiple wells like ELISA, DNA amplification tests, etc. The capacity of multichannel micropipettes ranges from 0.2 to 1200 µl.
Based on the Pipetting Mechanism
Mechanical/Manual
In the mechanical/manual micropipette, personnel has to apply pressure to press the plunger for aspiration and dispensation. The piston has a spring.
Electronic
An electronic button replaces the mechanical plunger. It is also called an automated pipette and replaces manual labor. These have customizable programs to adjust to any requirement of the pipetting.
Based on the Volume
Fixed volume micropipette
These do not have an adjustment knob for chaining the volumes. These pipettes transfer an equal volume of samples every time. It is ideal for transferring viscous liquids in laboratories with a limited budget. It decreases the chance of error due to mistakenly changing the volume.
Adjustable volume micropipette
These have volume adjusting knobs for changing the volume. The volume of these pipettes comes in a range like P20 can transfer a volume of 0.2 to 20 µl. The available volume ranges are as follows:
| Volume range | Name/title |
|---|---|
| 0.2-2 µl | P2 |
| 0.5-10 µl | P10 |
| 2-20 µl | P20 |
| 5-50 µl | P50 |
| 10-100 µl | P100 |
| 20-200 µl | P200 |
| 100-1000 µl | P1000 |
| 500-5000 µl | P5000 |
| 1000-100000 µl | P10000 |
1000 µl= 1 ml10000 µl= 10 ml
How to Remember
The P-number rule: "P tells you the maximum, not the ideal." A P1000 can measure up to 1000 µL but is most accurate between 100–1000 µL. A P20 is most accurate between 2–20 µL. The P-number is the ceiling of the working range, not the sweet spot. Never use a micropipette at the very bottom of its range for a critical measurement.
Air displacement vs. positive displacement — the cushion analogy: Air displacement pipettes have an air cushion between the piston and the liquid — like a syringe with an air gap before the plunger reaches the fluid. This cushion means temperature and viscosity affect the volume. Positive displacement pipettes have no cushion — the piston directly contacts the liquid, like a syringe plunger touching the fluid directly. No air, no temperature effect, no viscosity problem. Positive displacement = direct contact = best for difficult samples.
Two stops, two actions: Stop 1 = aspirate (and first phase of dispense). Stop 2 = expel completely. In forward pipetting: aspirate at stop 1, dispense to stop 1, push to stop 2 only to blow out. In reverse pipetting: aspirate at stop 2, dispense only to stop 1. The second stop is always the "extra push" — use it intentionally, never accidentally.
The size selection rule — "Match the pipette to the volume, not the other way around." If the volume is 5 µL, use the P20 (range 2–20 µL), not the P200 or P1000. If two pipettes both cover your volume, choose the one whose range makes your target volume fall in the upper half of its scale.
Uses of Micropipette
Micropipettes are suitable in the laboratory that handles minute (0.1 to 1000 µl) volumes of samples. Some areas that use micropipettes are as follows:
- Clinical and microbiological laboratory: It is used for different tests used in diagnosing diseases. Serological tests (antibody/antigen detection using rapid test kits, ELISA tests, etc.), molecular tests (sequencing, PCR, blotting techniques, electrophoresis, etc.), and virus culture in cell lines use it for transferring reagents/samples.
- Chemical laboratory: These laboratories use micropipettes to handle viscous and volatile liquids for various experiments.
- Forensic laboratory: These laboratories use micropipettes to analyze blood, tissues, and fibers. Micropipettes are also helpful tests that determine the genetics of victims or analysis of DNA materials and fingerprints found at the crime scene.
- Pharmaceutical laboratory: These laboratories use micropipettes for medicine/drug production. These also use micropipettes for the produced drugs’ QC (quality control) testing.
- Food and beverage industry: Primarily, micropipettes function as liquid handling devices in these industries, and quality assurance tests are another area of micropipettes’ application.
For a comparison of all pipette types used in microbiology, see Types of Pipettes in the Microbiology Laboratory
Key exam facts in one table
| Topic | Key fact |
|---|---|
| Definition | Aspirates and dispenses volumes from 0.2 µL to 10,000 µL |
| Working principle | Air displacement — piston displaces air; liquid enters the tip only |
| Liquid contacts | Tip only — never the barrel/shaft |
| Two plunger stops | Stop 1 = aspiration and first-phase dispensing; Stop 2 = blow-out/complete expulsion |
| Air displacement limitation | Affected by temperature, viscosity, and altitude |
| Positive displacement advantage | Direct piston-liquid contact; unaffected by viscosity or volatility; used for special samples |
| P1000 working range | 100–1000 µL (not 0–1000 µL — avoid the lowest 10% of range) |
| P20 working range | 2–20 µL |
| Pre-wetting | Condition tip 2–3 times before critical first aspiration to prevent short-delivery |
| Reverse pipetting | Used for viscous/volatile samples; aspirate to stop 2, dispense to stop 1 only |
| Filter tips — when mandatory | PCR, RNA/DNA work, infectious specimens |
| Calibration frequency | Every 3–6 months; ISO 8655 standard governs piston-operated volumetric apparatus |
| Most common selection error | Using too large a pipette for the target volume (e.g., P1000 for 5 µL work) |
| Multichannel micropipette | 8–384 channels; simultaneous transfer into multiple wells; used for ELISA, MIC plates |
| Spanish terminology | Micropipeta; partes de la micropipeta — article receives significant traffic from Spanish-speaking students |
References
- Clinical and Laboratory Standards Institute (CLSI). (2016). Clinical Microbiology Procedures Handbook (4th ed.). American Society of Microbiology. https://doi.org/10.1128/9781555818814
- ISO 8655-1:2022. Piston-operated volumetric apparatus — Part 1: Terminology, general requirements and user recommendations. International Organization for Standardization.
- Eppendorf AG. (2019). The Lab Pipetting Guide. Eppendorf. https://www.eppendorf.com/pipetting-guide
- Sanders, E. R. (2012). Aseptic laboratory techniques: Plating methods. Journal of Visualized Experiments, (63), e3064. https://doi.org/10.3791/3064
- Mahon, C. R., Lehman, D. C., & Manuselis, G. (2018). Textbook of Diagnostic Microbiology (6th ed.). Elsevier.
Frequently Asked Questions
What is the difference between air displacement and positive displacement micropipettes?
How do I select the correct micropipette size for my volume?
What is pre-wetting a micropipette tip and why is it necessary?
When should reverse pipetting be used instead of forward pipetting?
What are the most common micropipette errors in the laboratory?
How often should micropipettes be calibrated?

Tankeshwar Acharya, MSc (Medical Microbiology)
Tankeshwar Acharya is an Assistant Professor in the Department of Microbiology at Patan Academy of Health Sciences (PAHS), Nepal, where he has been teaching and practicing clinical microbiology for over 14 years. He is the founder of Microbe Online, one of the leading free microbiology education resources on the web, covering bacteriology, mycology, parasitology, immunology, and clinical laboratory diagnostics written from direct experience in both the classroom and the diagnostic laboratory.