
Autoclave Sterilization: Cycles, Validation, Uses, and Failures

On this page
When autoclave sterilization fails in a clinical setting, the consequences are not abstract. In a busy district hospital, a technician loads surgical instruments into the autoclave and runs the cycle. The autoclave tape on the outside of the pack turns black (the expected color change) and the instruments are sent to theatre. What the tape did not show was that air was never fully purged from the chamber before the cycle started. The steam never penetrated the center of the pack. The instruments were hot, but not sterile. Three patients in the following week develop post-operative wound infections with Clostridium species; organisms whose heat-resistant endospores survived because they were never exposed to steam at the right temperature.
This is why understanding how an autoclave works (not just what settings to dial) matters. The tape changed color. The pressure gauge read 15 psi. The timer ran for 20 minutes. Everything looked right. But air displacement, the step most often skipped or assumed to be automatic in older gravity-displacement units, had silently failed.
The autoclave is a sealed device (similar to a pressure cooker) that kills microorganisms using saturated steam under pressure.
Principle
The use of moist heat facilitates the killing of all microorganisms, including heat-resistant endospores which is achieved by heating the materials inside the device at temperatures above the boiling point of water. According to the principle of gas laws, this can be achieved by raising the pressure inside the device.
The boiling point (vapor pressure equals that of the surrounding atmosphere) of water varies depending upon the surrounding environmental pressure. For example, water boils at 100 °C at sea level (higher pressure), but at 93.4 °C at 1,905 meters altitude (lower pressure). So, in an enclosed device, if we raise the pressure, the temperature at which water boils also increases.
The usual procedure is to heat at 1.1 kilograms/square centimeter (kg/cm2) [15 pounds/square inch (lb/in2)] steam pressure, which yields a temperature of 121°C. At 121°C, the time of autoclaving to achieve sterilization is generally considered to be 15-20 min, depending on the volume of the load. To make sure, sterilization is successful one should ensure:
- Air should be evacuated so that the chamber fills with steam.
- To ensure effective steam penetration, articles should be properly positioned inside the autoclave before sterilization.
Note that it is not the pressure of the autoclave that kills the microorganisms but the high temperature that can be achieved when steam is placed under pressure.
If bulky objects are being sterilized, heat transfer to the interior will be slow, and the heating time must be sufficiently long so that the object is at 121°C for 15 min. Extended times are also required when large volumes of liquids are being autoclaved because large volumes take longer to reach sterilization temperature.
Autoclaving is the final containment step in any microbiology lab. For the complete framework of waste decontamination and the foundational safety rules that govern it, see microbiology laboratory safety rules, which covers all decontamination and disposal procedures.
How does an autoclave work?
An autoclave works in four steps, and skipping any one of them leaves the load unsterile:
First, air is removed from the chamber, either by letting incoming steam push it out through a vent (gravity displacement) or by pumping it out first (pre-vacuum). This step matters most, because trapped air blocks steam from reaching the load.
Second, steam fills the chamber and contacts every surface. When steam touches a cooler item, it condenses, and this releases a large amount of heat directly onto the surface (the latent heat of vaporization). This is why moist heat transfers energy far faster than dry air at the same temperature.
Third, pressure raises the boiling point so the steam reaches 121°C rather than 100°C. The whole load is then held at that temperature for the required time, timed from when the load itself, not just the chamber, reaches temperature.
Fourth, the chamber exhausts and dries before the load is removed.
The killing itself is done by the high temperature, not the pressure. Pressure is only the means of getting steam hotter than boiling water.
Why 121°C and 15 minutes?
Moist heat kills by denaturing and coagulating proteins, the same irreversible change you see when an egg white turns solid. Once the active sites of a microbe's enzymes and its structural proteins unfold, they cannot refold, and the cell dies.
The problem is bacterial endospores. Their proteins are protected by a dehydrated, densely packed core, so boiling water at 100°C does not carry enough energy to denature them, which is why boiling disinfects but does not sterilize. Raising the temperature to 121°C under pressure supplies the extra energy needed to denature even these resistant proteins. The 15-minute hold is set from the killing rate of the most heat-resistant spore used for testing, with a safety margin built in (see biological indicators below).
Autoclave sterilization parameters
The standard autoclave cycle uses 121°C at 15 psi (103 kPa) for 15–20 minutes, but different time-temperature combinations are used depending on the load type, volume, and application:
| Temperature | Gauge pressure | Minimum holding time | Typical application |
|---|---|---|---|
| 115°C (239°F) | ~10 psi (~69 kPa) | 30 min | Heat-sensitive culture media (some sugar-containing media) |
| 121°C (250°F) | 15 psi (103 kPa) | 15–20 min | Standard cycle: culture media, glassware, liquids, wrapped instruments |
| 126–129°C | ~20 psi (~138 kPa) | 10 min | Faster cycle for heat-stable materials |
| 134°C (273°F) | ~30 psi (~207 kPa) | 3–5 min | Porous-load cycle: wrapped surgical packs, unwrapped instruments (flash) |
| 134°C (273°F) | ~30 psi (~207 kPa) | 18 min | Prion-contaminated materials (CJD/vCJD) |
These are gauge pressures (pressure above atmospheric) for saturated steam. The pressure and temperature are linked: a given gauge pressure produces steam at one specific temperature, which is why trapped air, which raises the gauge reading without adding steam, produces a false-high pressure and a cold, unsterile load.
Important: The minimum sterilization time must be measured from the moment when all materials in the load have reached the required temperature throughout not from when the chamber reaches the set temperature. Large volumes and dense packs take longer to equilibrate.
Components (Parts) of Autoclave
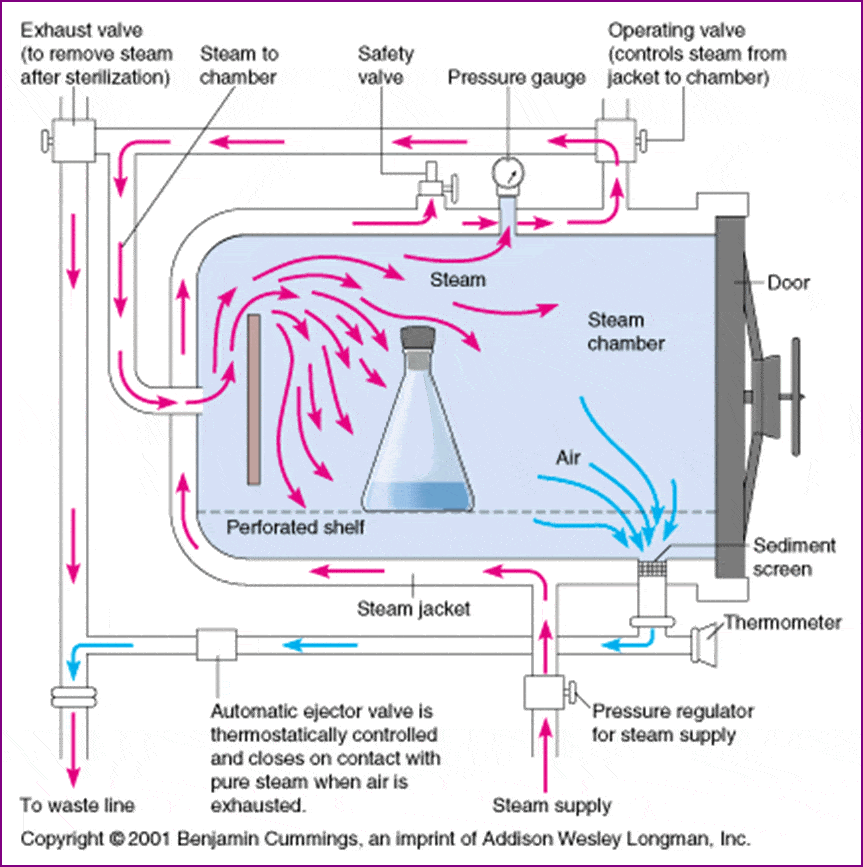 Figure: Gravity Displacement type Autoclave
- Lid/Door: It is at the top of the large-scale autoclave but in the case of a horizontal autoclave, it may be in the front part. The lid should be sealed tightly to prevent contamination and proper sterilization. The top is sealed tightly with the help of an airtight screw.
- Pressure Chamber: It is a vessel whose outer part is made of stainless steel, and the outer coat covers the inner part. The autoclavable materials are placed inside the inner part of the vessel, and the lid is closed tightly.
- Power Switch: It is present at the side of the autoclave and controls the electricity supplied to the autoclave.
- Control Panel: It controls the pressure and temperature inside the vessel and is present beside the main switch.
- Water Level Indicator: It helps indicate the water level of the autoclave. The correct level of water is essential.
- Pressure gauge: It indicates the pressure inside the chamber and is on top of the lid.
- Whistle: It is only present in some types of autoclave, like pressure cooker type, and is on the top of the lid. It helps release the pressure of the chamber before opening the lid after sterilizing the materials.
- Safety valve: This type of valve helps to avoid an accident when the pressure inside the vessel is exceptionally high. It is also present in the lid of the autoclave.
- Electrical heater: It is the heating element attached to the jacket; that heats the water to produce steam.
- Water releasing valve: It helps remove water for replacing and cleaning the water inside the autoclave chamber.
- Thermometer: It is at the top of the lid and displays the temperature inside the chamber.
- Stand: The part present helps the autoclave stand upright and forms the base of the autoclave.
Extra accessories
- Autoclave bag: It is a bag where waste materials are placed for sterilization inside the autoclave chamber.
- Autoclave baskets: Cans or baskets help to safely transfer sterilized material to and from the autoclave. It is available in various sizes; some can have lids or holes.
- Sterilization box: These are stainless steel boxes with lids and venting holes that can be used while sterilizing inside the autoclave.
Types of Autoclaves
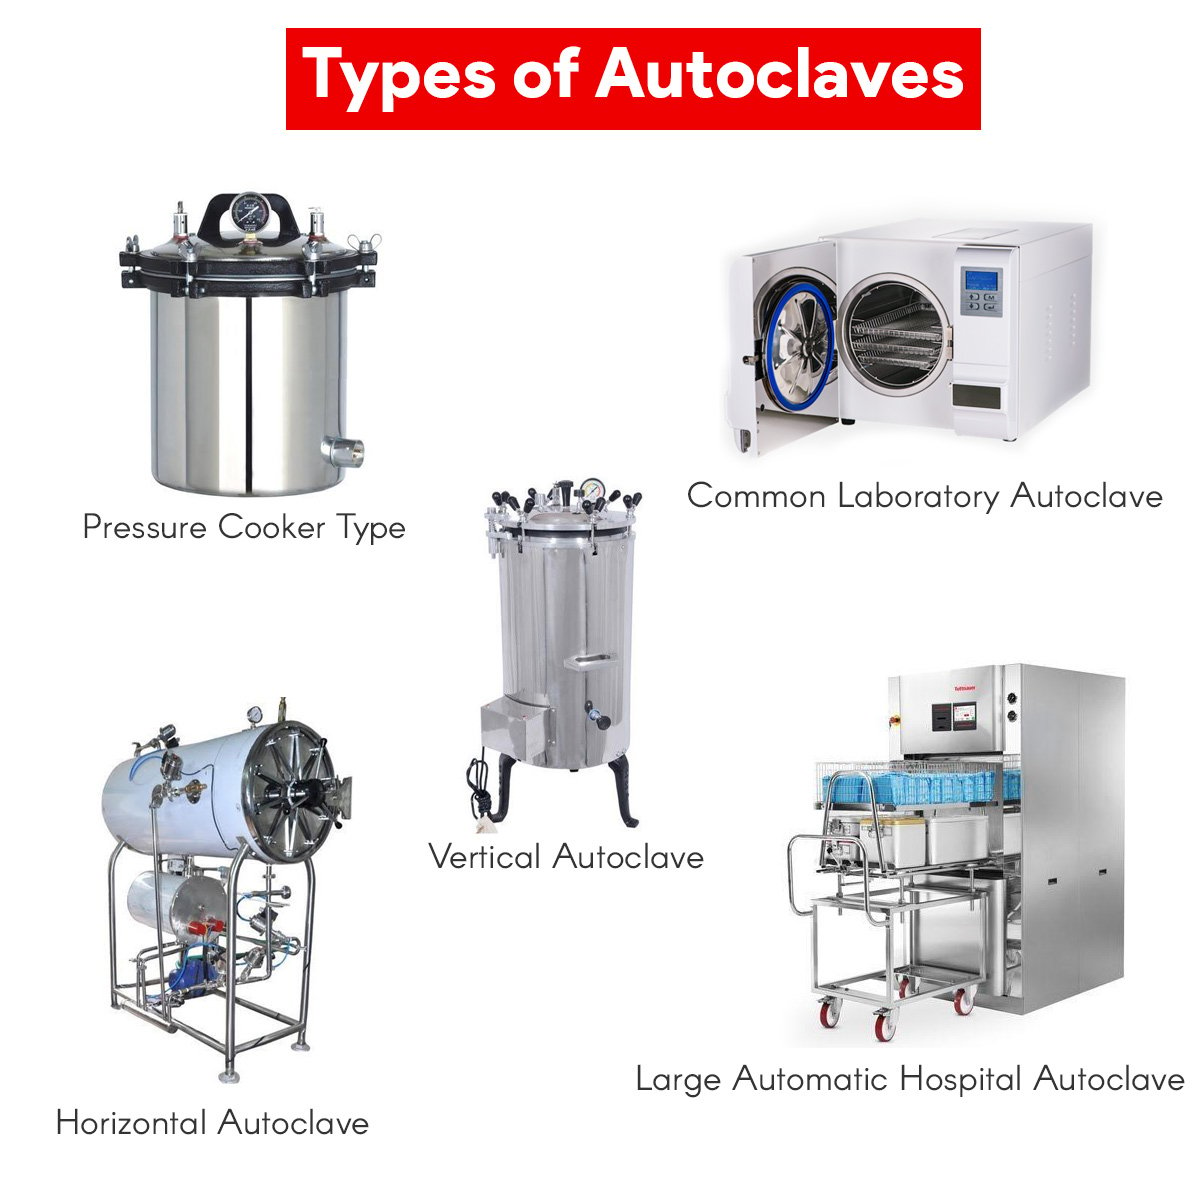 Figure: Various types of autoclave
Based on size
- Large-scale autoclave: It is more significant in size. Some may have double chambers and can have 500 liters to more than 1500 liters chamber. The capacity of the autoclave depends on the manufacturers. Companies like Systec provide large autoclaves ranging from 510 liters to 1580 liters. It is suitable for hospitals and clinical and research laboratories.
- Small-scale autoclave: It is smaller in size. It has chambers that can simultaneously fit 20-300 liters of autoclavable materials. But the size range varies based on the companies. It is suitable for university and college laboratories.
Based on Working Principle
Autoclaves are classified by how they remove air from the chamber, since air removal is what determines whether steam can reach the load.
Gravity displacement autoclave: Steam enters the chamber and pushes air out through a vent, relying on steam being lighter than air. Simple and reliable for open containers and liquids, but it leaves 5 to 10 percent residual air and creates air pockets in wrapped or porous loads, so it is unsuitable for autoclave bags and wrapped surgical packs. By orientation, gravity autoclaves are either horizontal (front-loading door opening outward, usually large units) or vertical (top-loading, usually small bench units).
By orientation, gravity displacement autoclaves come in two forms:Feature Vertical autoclave Horizontal autoclave Loading Top-loading Front-loading, door opens outward Typical size Small, bench-top Large, floor-standing Chamber capacity Lower Higher Typical setting University and college labs, small clinics Hospitals, CSSD, large research labs Cost and footprint Cheaper, compact Expensive, needs dedicated space Both use the same steam-under-pressure principle; the choice is about load volume and available space, not sterilization performance.
Positive pressure displacement autoclave: Steam is generated in a separate generator unit and then pulsed into the chamber. Faster than simple gravity units because steam is produced in seconds.
Negative pressure (pre-vacuum) autoclave: A vacuum pump actively removes air before steam is introduced, leaving less than 1 percent residual air. This ensures deep steam penetration into wrapped, hollow, and porous loads, and is required for wrapped surgical packs (see porous-load autoclave below).
Flash autoclave (rapid cycle autoclave): Used in operating theatres for the emergency sterilization of unwrapped surgical instruments. Operates at 132–134°C for 3 minutes for unwrapped items. Not recommended for implants or routine sterilization because items are not wrapped and must be used immediately after the cycle. Flash autoclaving was common in surgery but is being phased out in favor of proper pre-sterilized wrapped instrument sets due to infection control concerns.
Porous load autoclave: Specifically designed for wrapped surgical packs, gowns, drapes, and other porous materials. Uses a pre-vacuum cycle (air is actively removed before steam is introduced) ensuring deep steam penetration into porous materials and complex geometries. The standard cycle is 134°C for 3–5 minutes. Required for sterilizing wrapped items in hospital central sterile supply departments (CSSD).
Benchtop (tabletop) autoclave: The most common autoclave type in clinical and research laboratories. Compact, typically 16–40 liter chamber capacity. Suitable for culture media, glassware, small instrument sets, and biohazardous waste. Operates on same principle as larger units but with smaller load capacity and faster cycle times due to lower volume.
Continuous flow autoclave: Used in industrial and pharmaceutical manufacturing for sterilizing large volumes of liquid. The liquid passes through a heat exchanger that rapidly raises temperature to sterilization level, holds it for the required time, then rapidly cools it. Not used in clinical microbiology laboratories.
Is an autoclave the same as a sterilizer?
An autoclave is one kind of sterilizer, not a synonym for all of them. "Sterilizer" is the general term for any device that achieves sterility, which includes dry heat ovens, ethylene oxide gas chambers, and low-temperature plasma units. An autoclave is specifically a steam sterilizer: it achieves sterility using saturated steam under pressure. So every autoclave is a sterilizer, but not every sterilizer is an autoclave. In hospital central sterile supply departments the words are often used loosely, but when the method matters, "autoclave" always means steam.
Procedure
Using autoclave to sterilize materials
Place the material to be sterilized inside the pressure chamber and fill the cylinder with sufficient water
Close the lid and put on the electrical heater.
Adjust the safety valve to the required pressure.
After the water boils, allow the steam and air mixture to escape through the discharge tap till all the air has been displaced
This can be tested by passing the steam-air mixture liberated from the discharge tap into a pail of water through a connecting rubber tube. When the air bubbles stop coming in the pail, it indicates that all the air has been displaced by steam.
Close the discharge tap.
The steam pressure rises inside and when it reaches the desired set level (e.g. 15 pounds (lbs) per square inch in most cases), the safety valve opens and excess steam escapes out.
Count the holding period from this point of time, which is about 15 minutes in most cases.
After the holding period, stop the electrical heater and allow the autoclave to cool until the pressure gauge indicates that the pressure inside is equal to the atmospheric pressure.
Open the discharge tap slowly and allow the air to enter the autoclave.
Open the lid of the autoclave and remove the sterilized materials.
Sterilization control
Modern autoclaves have devices to maintain proper pressure and record internal temperature during operation. Regardless of the presence of such a device, autoclave pressure should be checked periodically and maintained.
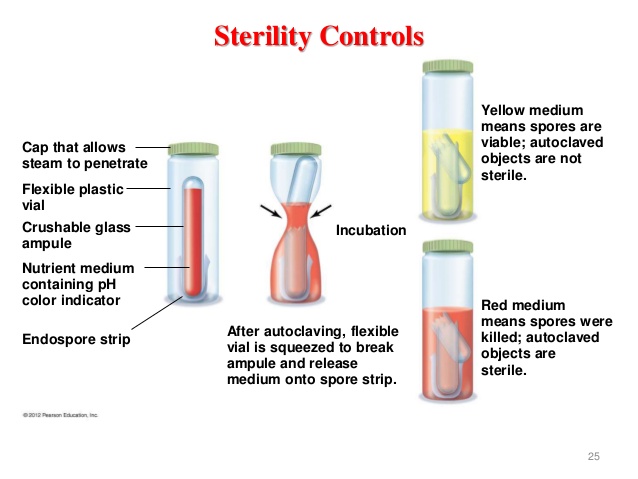 Several methods are available to ensure that autoclaving achieves sterility. The effectiveness of the sterilization done by autoclave can be monitored by:
Biological indicator
Spores of Geobacillus stearothermophilus (formerly called Bacillus stearothermophilus) are the best indicator because they are the most steam-resistant organism in routine use. Their D-value (the time to kill 90 percent, or one log, of the population) is about 1.5 to 2.5 minutes at 121°C, so complete kill of a standard spore load takes roughly 12 minutes. This margin below the standard 15-minute hold is what makes them a sensitive test of cycle adequacy.
The Centers for Disease Control (CDC) recommends weekly autoclaving of a culture containing heat-resistant endospores of Geobacillus stearothermophilus to check autoclave performance. The spore strip and an ampule of medium enclosed in a soft plastic vial are available commercially.
The vial is placed in the center of the material to be sterilized and is autoclaved. Then the inner ampule is broken, releasing the medium, and the whole container is incubated at 55 to 60°C (the growth optimum for this thermophile) for up to 48 hours, or 1 to 3 hours with a rapid-readout system. If no growth appears in the autoclaved culture, sterilization is deemed effective.
Autoclave tapes
Adhesive-backed paper tape with heat-sensitive chemical indicator marking that changes color or displays diagonal stripes, or the words “sterile” or “autoclaved” when exposed to effective sterilization temperature (121°C) are used to check the efficacy of autoclaves.
These tapes are placed inside and near the center of large packages because heat penetration in those areas ensures proper heat penetration (For example, when a large piece of meat is roasted, the surface can be well done while the center may still remain unheated, and if the center is sufficiently heated then it means the desired temperature is achieved). Autoclave tapes are not fully reliable because they do not indicate how long appropriate conditions were maintained.
Other useful indicators are thermocouple and Browne’s tube. Thermocouple is a temperature measuring device that records the temperature by a potentiometer.
Browne's tube
Browne's tube (invented by Albert Browne in 1930) is a small glass tube containing a heat-sensitive red dye that turns green after exposure to a set temperature for a set time. Because the color change depends on both temperature and how long that temperature is held, the tube reports time-temperature exposure rather than temperature alone, which is what makes it more informative than a simple heat-spot indicator.
Different tube types are made for different target processes (for example, a tube calibrated for 121°C steam versus one for hot-air oven temperatures), so the correct type must be matched to the method. A green result confirms the tube reached the right conditions; it does not, by itself, confirm that resistant spores were killed, which is why a biological indicator remains the reference standard.
Comparison of sterilization indicators
| Indicator type | What it detects | Reliability | Limitation |
|---|---|---|---|
| Biological indicator (G. stearothermophilus spores) | Actual killing of resistant spores | Highest, gold standard | Results take 24–48 hours (rapid read systems: 1–3 hours) |
| Chemical indicator ( Class 1-autoclave tape) | Exposure to heat only | Low, process indicator only | Does not confirm correct temperature or time was achieved |
| Chemical indicator (Class 4/5-integrating indicator) | Time + temperature combination | Moderate to high | More reliable than tape; must be placed inside packs |
| Browne's tube | Time + temperature | Moderate | Color change indicates exposure but not biological killing |
| Thermocouple | Actual temperature at specific load point | High for temperature only | Does not confirm sterility — must be combined with time record |
| Printout/chart recorder | Temperature, pressure, time throughout cycle | High for process verification | Mechanical failure can give false records |
Best practice: Use all three types simultaneously: mechanical (printout), chemical (integrating indicator inside each pack), and biological (weekly minimum, or with each load for implants).
How to Remember
The 15-15-121 rule The three core autoclave numbers are easy to confuse. Think of them as a countdown that ends in heat: 15 psi → 15 minutes → 121°C. The pressure and the time are the same number (15). The temperature (121) is what you're trying to reach. If you remember "15-15, then 121," you have the standard cycle locked.
Biological indicators: steam vs. dry heat Two organisms, two sterilization methods but students frequently swap them:
- Geobacillus stearothermophilus = steam (autoclave). Remember: "Geo likes it steamy."
- Bacillus atrophaeus (formerly B. subtilis var. niger) = dry heat / ethylene oxide. Remember: "Atrophaeus = arid (dry)."
Gravity displacement vs. pre-vacuum: the teabag analogy In a gravity displacement autoclave, steam slowly pushes air out (like dropping a teabag into a cup and waiting for water to seep in from the sides). It works for open containers but fails if the pack is tightly wrapped.
The pre-vacuum (porous load) autoclave actively sucks all the air out first (like squeezing the teabag before immersing it) so steam penetrates immediately and completely. That is why wrapped surgical packs require pre-vacuum autoclaves.
What cannot be autoclaved: the SOAP mnemonic Items that are destroyed or rendered useless by moist heat at 121°C:
- Sharp instruments with cemented optical lenses (heat dissolves the cement)
- Oils, powders, and waxes (steam cannot penetrate; use dry heat instead)
- Anhydrous (moisture-free) materials (steam penetration fails)
- Plastics not rated for autoclave temperatures (most common lab accident, check the manufacturer label)
Uses of Autoclave
Autoclave is particularly useful for media-containing water that cannot be sterilized by dry heat. It is the method of choice for sterilizing the following:
- Surgical instruments
- Culture media
- Autoclavable plastic containers
- Plastic tubes and pipette tips
- Solutions and water
- Biohazardous waste
- Glassware (autoclave-resistant)
Materials that cannot be autoclaved
Not all materials can be safely or effectively autoclaved. Using the autoclave on incompatible materials can destroy the material, damage the autoclave, or result in incomplete sterilization:
| Material | Why it cannot be autoclaved | Alternative sterilization method |
|---|---|---|
| Oils, greases, waxes, petroleum products | Steam cannot penetrate: surface contact only; interior remains unsterile | Dry heat sterilization (hot air oven at 160–170°C) |
| Powders (talc, sulfonamides) | Steam cannot penetrate dry powders, remains unsterile at the core | Dry heat sterilization |
| Sharp instruments (repeated cycles) | Repeated moist heat damages cutting edges and causes microsurgical instrument corrosion | Single-use instruments; cold sterilization (glutaraldehyde); gas sterilization (ethylene oxide) |
| Heat-sensitive plastics (polyethylene, polypropylene below autoclave rating) | Melt or deform at 121°C | Check manufacturer's autoclave-compatibility rating; use ETO gas or low-temperature plasma sterilization |
| Heat-sensitive biological materials (vaccines, sera, enzymes) | Denatured at 121°C | Filtration sterilization (0.22 μm membrane filter) |
| Flammable or volatile liquids | Risk of explosion under pressure and heat | Chemical sterilization or filtration |
| Sealed containers (any liquid) | Pressure equalization causes explosion when lid is closed | Always loosen caps or use vented containers |
| Household bleach and other chlorine solutions | Releases toxic chlorine gas at autoclave temperatures | Inactivate biohazard chemically first, then discard |
| Electronic equipment, optical instruments, batteries | Heat and moisture damage | ETO gas sterilization; gamma irradiation |
| Radioactive or chemotoxic materials | Risk of aerosol generation and contamination of autoclave | Dedicated specialist disposal protocols |
Precautions
Never autoclave any liquid in a sealed container.
The following precautions should be taken while using an autoclave.
- Autoclave should not be used for sterilizing waterproof materials, such as oil and grease, or dry materials, such as glove powder
- Materials are loaded in, such a way that it allows efficient steam penetration (do not overfill the chamber). It is more efficient and safer to run two separate, uncrowded loads than one crowded one.
- Wrapping objects in aluminum foil is not recommended because it may interfere with steam penetration. Articles should be wrapped in materials that allow steam penetration.
- Materials should not touch the sides or top of the chamber
- The clean items and the wastes should be autoclaved separately.
- Polyethylene trays should not be used as they may melt and cause damage to the autoclave.
Wet packs: a failed load that looks fine
A pack that comes out of the autoclave damp has failed, even if every indicator passed. Moisture provides a wicking path for bacteria from the unsterile outer surface into the sterile contents once the pack is handled or stored, so a wet pack is treated as contaminated and must be reprocessed.
Common causes are overloading, packs touching the chamber wall, removing the load before the drying phase completes, and superheated or wet steam from an overfilled reservoir.
The fix is loading discipline: leave space between packs, keep items off the chamber walls, and allow the full drying stage before unloading. This is why the loading rules above are a sterility requirement, not just a convenience.
Key differences between Autoclave vs dry heat sterilization
- Use autoclave (moist heat) when: the material is water-compatible, steam can penetrate it, and rapid sterilization is needed such as culture media, glassware, surgical dressings, biohazardous waste, aqueous solutions.
- Use dry heat (hot air oven) when: the material is damaged by moisture or steam cannot penetrate it, such as oils, powders, anhydrous materials, some sharp instruments.
Read more: Sterilization and Disinfection Methods
Key exam facts
| Topic | Key fact |
|---|---|
| Standard cycle | 121°C, 15 psi (103 kPa), 15–20 minutes |
| Kills | All microorganisms including heat-resistant endospores |
| Mechanism | Moist heat: protein denaturation and coagulation |
| It is NOT the pressure that kills | It is the high temperature achieved under pressure |
| Biological indicator organism | Geobacillus stearothermophilus (D-value 1.5–2.5 min at 121°C; complete kill ~12 min |
| Biological indicator for dry heat | Bacillus atrophaeus, do not confuse with autoclave |
| Timing starts when | All materials in the load (not just the chamber) reach 121°C |
| Prion decontamination cycle | 134°C for 18 minutes (CJD/vCJD-contaminated instruments) |
| Cannot be autoclaved | Oils, waxes, powders, anhydrous materials, heat-sensitive plastics, optical cement instruments |
| Autoclave tape limitation | Confirms heat exposure only, does NOT confirm correct time or full steam penetration |
| Gold standard indicator | Biological indicator (spore strip), results in 24–48 hours; rapid systems in 1–3 hours |
| Pre-vacuum vs. gravity displacement | Pre-vacuum required for wrapped porous loads; gravity suitable for open loads |
| Flash autoclave | 132–134°C for 3 min, unwrapped items only; being phased out in surgery |
References
- Tille, P. M. (2022). Bailey and Scott's Diagnostic Microbiology (15th ed.). St. Louis: Elsevier.
- CDC. (2019). Guideline for Disinfection and Sterilization in Healthcare Facilities. Centers for Disease Control and Prevention. https://www.cdc.gov/hicpac/Disinfection_Sterilization/
- WHO. (2016). Decontamination and Reprocessing of Medical Devices for Health-care Facilities. World Health Organization.
- Rutala, W. A., & Weber, D. J. (2019). Disinfection, sterilization, and control of hospital waste. In Mandell, Douglas, and Bennett's Principles and Practice of Infectious Diseases (9th ed.). Elsevier.
- Block, S. S. (Ed.). (2001). Disinfection, Sterilization, and Preservation (5th ed.). Lippincott Williams & Wilkins.
Frequently Asked Questions
What is the standard autoclave temperature, pressure, and time?
121°C at 15 psi for 15-20 minutes minimum. Holding time measured from when all materials in the load reach 121°C, not just the chamber gauge.
Why is it temperature not pressure that sterilizes?
Why must all air be removed?
Air pockets prevent steam contact. Air-steam mixtures at 15 psi reach only ~112°C, too low. Complete air removal ensures 121°C throughout the entire load.
What biological indicator tests autoclave effectiveness?
Geobacillus stearothermophilus spores: D-value 1.5-2.5 min at 121°C. CDC recommends weekly testing. For dry heat (hot air oven): Bacillus atrophaeus spores.
Can you autoclave liquids in sealed containers?
Never. Pressure differential when cycle ends can cause explosive rupture. Always loosen caps before autoclaving.
Why are oils and powders not sterilized by autoclave?
Oils repel steam; powders trap air and both prevent steam penetration. Use dry heat sterilization (160-170°C) where conduction-based heat penetration is independent of steam.
What is the difference between gravity displacement and pre-vacuum autoclave?
Gravity: steam slowly pushes air out, may leave air pockets. Pre-vacuum: pump actively removes air first ensuring complete steam penetration. Required for wrapped surgical packs.
What cycle is recommended for prion-contaminated materials?

Tankeshwar Acharya, MSc (Medical Microbiology)
Tankeshwar Acharya is an Assistant Professor in the Department of Microbiology at Patan Academy of Health Sciences (PAHS), Nepal, where he has been teaching and practicing clinical microbiology for over 14 years. He is the founder of Microbe Online, one of the leading free microbiology education resources on the web, covering bacteriology, mycology, parasitology, immunology, and clinical laboratory diagnostics written from direct experience in both the classroom and the diagnostic laboratory.
Comments
No comments yet. Be the first to share your thoughts.
Leave a comment
All comments are reviewed before they appear.